
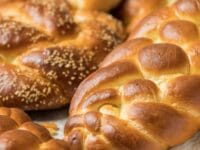
Is there any food that reflects the beauty of Judaism more than a freshly baked challah? Jews and non-Jews alike love the flavor and shape of this delicious eggy bread. But challah is so much more than just bread. The tradition of challah is a very spiritual one; for observant Jews, it is a way to directly connect with the spiritual energy of God. In fact, baking challah is considered an important blessing in the Jewish home.
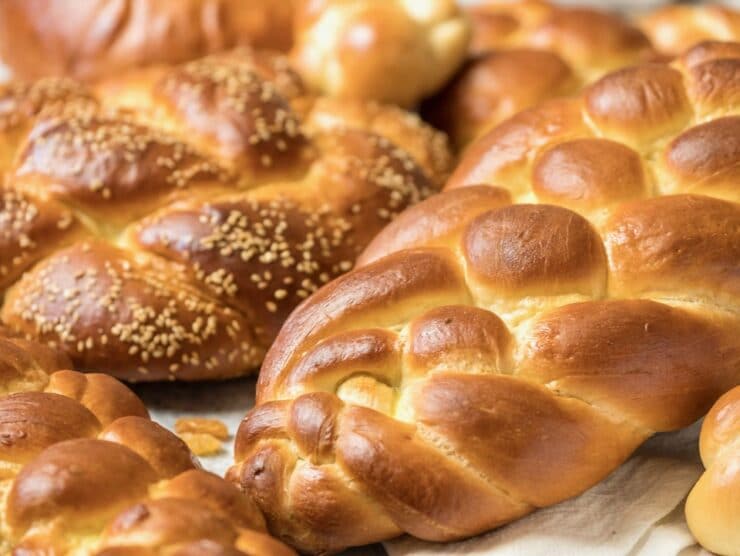
Today, the word challah is used to describe the beautiful loaf of braided bread that appears on Shabbat tables all over the world. In ancient times, challah referred to a small bit of dough that was set aside for the Temple priests as an offering to God:
Of the first of your dough you shall present a loaf as a contribution; like a contribution from the threshing floor, so shall you present it.
Numbers 15:20
Burning a small portion of dough as an offering is part of the challah blessing.
Traditionally, challah is served on Shabbat and holidays. I like to think of challah as a “special occasion” bread because of the time and effort that goes into making it. You can certainly make challah any day of the year, but in my home the process is reserved for Shabbat and the major Jewish holidays (except for Passover, of course, when leavened bread is not allowed). The smell of freshly baked challah ushers in our weekly Shabbat celebration and puts everybody in a mood of gratitude. As blog reader Rabbi Gershon Steinberg-Caudill put it—“I love it when I finish making my Shabbat Challah. It smells like Shabbat!”
The ritual associated with separating and blessing the challah is a somewhat complex process, dependent on the size of challah you are baking and your level of observance. Customs vary according to Halachic opinion; Ashkenazi and Sephardic traditions approach the blessing differently. If you are interested in learning more about the process of separating challah, there are many guides available online… or ask a trusted rabbi!

For me, baking challah is like a meditation. Kneading and rising, kneading again, shaping, braiding and baking— it all takes a lot more time than baking brownies from an instant mix. Smelling the bread baking, then seeing your gloriously braided challah on the dinner table, really makes it all worthwhile. I hope this blog inspires you to try it yourself!
The following recipe is my favorite way to make challah, developed after many attempts to create a “foolproof” challah recipe. It’s a rich, moist, eggy challah sweetened with honey. The multiple risings create a beautiful texture, and the egg wash results in a gorgeous golden crust. Feel free to sprinkle your challah with any of the toppings suggested in the recipe. You also can add raisins or chocolate chips to the dough (adding real chocolate will make it a dairy recipe). No matter which way you choose to make it, challah is a delicious way to celebrate Shabbat, or any other holiday.
If you’ve never made challah before, remember to be patient. Baking challah is a simple process, but it does take time and effort. You may need to try it a few times to get a “feel” for the dough. If you follow my instructions exactly, you should be fine— I’ve tried to describe each step very carefully and specifically. Comment me if you have any questions.
For instructions on how to braid your challah, click the following link:
Challah Part 2: How to Braid Challah.
Good luck! 🙂
Recommended Products:
We are a participant in the Amazon Services LLC Associates Program, an affiliate advertising program designed to provide a means for us to earn fees by linking to Amazon.com and affiliated sites. As an Amazon Associate I earn from qualifying purchases.
Challah
Ingredients
Dough Ingredients
- 1 1/2 cups lukewarm water, divided
- 1 packet active dry yeast (1 packet is equivalent to 2 1/4 tsp or .25 ounce active dry yeast) - you may substitute 1 3/4 teaspoons of instant yeast or .6 ounce compressed fresh yeast (1 small cake)
- 1 teaspoon sugar
- 1 large egg
- 3 large egg yolks
- 1/3 cup honey
- 2 tbsp avocado oil (I prefer avocado oil for flavor and health reasons - you may substitute sunflower oil or canola oil)
- 2 teaspoons salt
- 4 1/2-6 cups all purpose flour - PLEASE NOTE - if you are using the metric conversion tool on this recipe, the flour is not updating correctly. The correct metric measurements for flour are 562.5 to 750 grams (do not change the recipe serving sizes or it will not work)
Egg Wash Ingredients
- 1 large egg
- 1 tablespoon cold water
- 1/2 teaspoon salt
Optional Ingredients
- Raisins, chocolate chips (1 ½ cups of either)
Optional Toppings
- Sesame seeds, poppy seeds, kosher salt
NOTES
Instructions
- Pour ¼ cup of the lukewarm water (about 110 degrees) into a large mixing bowl. Add 1 packet of active dry yeast and 1 tsp of sugar to the bowl, stir to dissolve. Wait 10 minutes. The yeast should have activated, meaning it will look expanded and foamy. If it doesn’t, your yeast may have expired, which means your bread won’t rise—go buy some fresh yeast! This step Is called "proofing" the yeast - if you're using instant yeast you can skip this step and simply add the yeast to your dry ingredients. If you're using fresh yeast (or compressed or cake yeast), simply stir it into the lukewarm water to dissolve, then add the remaining wet ingredients - no need to wait for proofing.

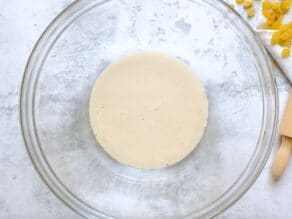
- Once your yeast has activated, add remaining 1 ¼ cup lukewarm water to the bowl along with the egg, egg yolks, honey, oil, and salt. Use a whisk to thoroughly blend the ingredients together.
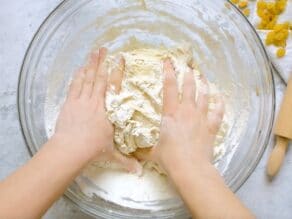
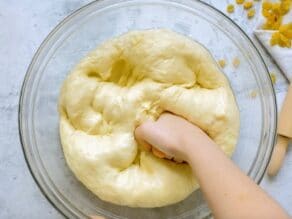
- Begin adding the flour to the bowl by half-cupfuls, stirring with a large spoon each time flour is added. When mixture becomes too thick to stir, use your hands to knead.Continue to add flour and knead the dough until it’s smooth, elastic, and not sticky. The amount of flour you will need to achieve this texture varies—only add flour until the dough feels pliable and “right.” If you plan to add raisins or chocolate chips to the challah, incorporate into the dough as you knead.
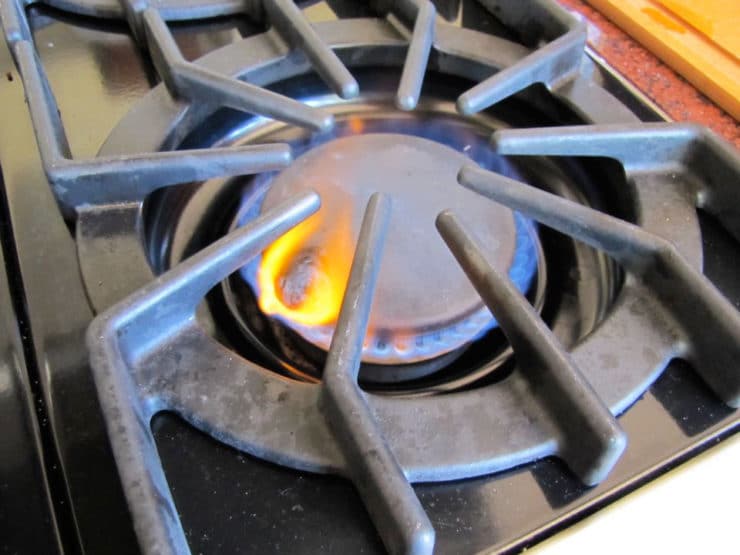
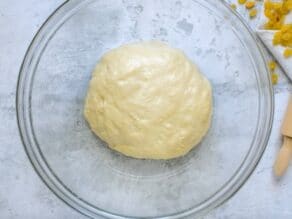
- Place a saucepan full of water on the stove to boil.Meanwhile, remove the dough from your mixing bowl and wash out the bowl. Grease the bowl with oil. Push the dough back into the bottom of the bowl, then flip it over so that both sides are slightly moistened by the oil.
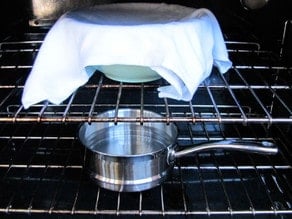
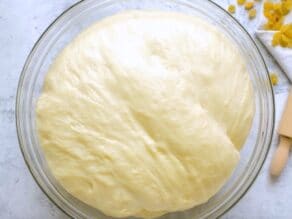
- Cover the bowl with a clean, damp kitchen towel. Place the bowl of dough on the middle rack of your oven. Take the saucepan full of boiling water and place it below the rack where your dough sits. Close the oven, but do not turn it on. The pan of hot water will create a warm, moist environment for your dough to rise. Let the dough rise for 1 hour, or until the dough doubles in size. This may take longer depending on a number of things, including weather conditions... be patient! It's important to let the dough rise for best results.
- Take the dough bowl out and punch it down several times to remove air pockets.
- Place it back inside the oven and let it rise for 1 hour longer, or until the dough doubles in size.
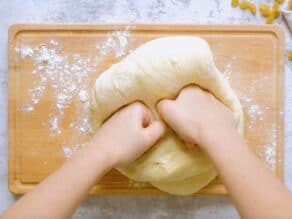
- Take the dough out of the oven. Flour a smooth surface like a cutting board. Punch the dough down into the bowl a few times, then turn the dough out onto the floured surface. Knead for a few minutes, adding flour as needed to keep the dough from feeling sticky.
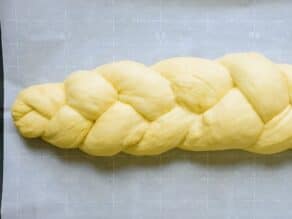
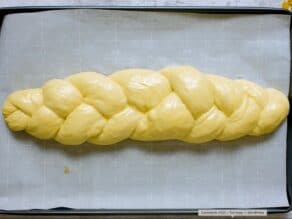
- Now your dough is ready to braid. If you plan to separate and bless the challah, do it prior to braiding. Click here to learn how to braid challah.After you’ve braided your challah, place it on a cookie sheet lined with parchment paper (this will catch any spills from your egg wash and keep your challah from sticking to the cookie sheet).Note: I usually only put a single challah braid on a cookie sheet, since they tend to expand a lot when baking.
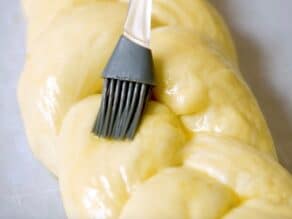
- Prepare your egg wash by beating the egg, salt and water till smooth. Use a pastry brush to brush a thin layer of the mixture onto the visible surface of your challah. If you're adding sesame seeds or some other topping, sprinkle it on the damp dough now - the egg wash helps it stick. Reserve the leftover egg wash.
- Let the braid rise 30 to 45 minutes longer. You’ll know the dough is ready to bake when you press your finger into the dough and the indentation stays, rather than bouncing back.Heat oven to 350 degrees F. The challah needs to bake for about 40 minutes total, but to get the best result the baking should be done in stages. First, set your timer to 20 minutes and put your challah in the oven.
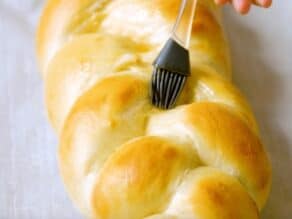
- After 20 minutes, take the challah out of the oven and coat the center of the braid with another thin layer of egg wash. This area tends to expand during baking, exposing areas that will turn white unless they are coated with egg wash.Turn the tray around, so the opposite side is facing front, and put the tray back into the oven. Turning the tray helps your challah brown evenly—the back of the oven is usually hotter than the front.
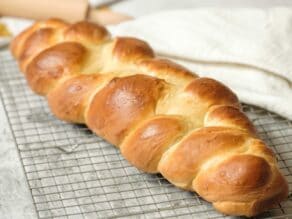
- The challah will need to bake for about 20 minutes longer. For this last part of the baking process, keep an eye on your challah—it may be browning faster than it’s baking. Once the challah is browned to your liking, take the tray out and tent it with foil, then place it back in the oven. Remove the foil for the last 2 minutes of baking time.Take the challah out of the oven. At this point your house should smell delicious. You can test the bread for doneness by turning it over and tapping on the bottom of the loaf—if it makes a hollow sound, it’s done. Let challah cool on the baking sheet or a wire cooling rack before serving.

Nutrition


I have been making your recipe for months and love it!! Do you ever make the dough the night before and put it in the refrigerator. Tell me what you recommend for the dough to rise in the morning Thanks
Is there a way to make 4 mini challah loaves from this recipie ?
I love making your challah …. my family just eats it too fast ….. thinking about making 4 mini and can you freeze them ?
Sure! Just divide the dough into four portions and braid each portion separately. They will likely bake faster with the smaller size, I don’t have an exact timing for you.
Have you tried making this recipe gluten free and if so what type of flour did you use? I used to love your recipes and miss them a bunch 🙁
I have never found a great GF recipe for challah – but I promise if I find one, I will post it!
I have an old old recipe from my mother’s when I had my bakery. It’s all spotted up and unfortunately oil or something has erased some of the ingredients and measurements. I was happy to find yours! It looks very easy we’ll try it next time. Thank you
Love love the recipe. Just wondering if there is a time you can refrigerate the dough before baking. Thank want to prepare the dough early in the day , but don’t want to bake it until just before serving time. So it’s still warm. At what point can you put it in fridge or freeze dough? What do you do to prepare for baking. Thank you. I look forward to baking. Love your recipes.
I adore this recipe! I make sure my hands are covered in oil when I knead the dough and it comes out so delicious and moist. I added an additional layer of egg wash with my last loaf and will continue to do so in future, it comes out so gorgeous and golden. My Jewish partner says it is the best challah he has ever tasted so I will continue to make it weekly. Thanks Tori!
Hi and thanks for the step by step. Can you offer me a suggestion? My loaves are often splitting/tearing in the crevices between the braids. Any idea what I can do differently? Thanks 🙂
Let the braid rise a little longer before you bake it.
Great recipe!
Honey instead of sugar made this Challah delicious! Not dry at all!
I used olive oil instead of canola.
Easy directions too!
Thanks,
Joy
What do you think of all purposes flour vs bread flour for challah? Thanks
They will both work for this recipe.
Hi Tori-
Thank you for all of the details in your instructions. Very helpful for the novice baker!
One question (I was not able to find the answer in previous comments). I am planning to make the rolls tomorrow. How long do they need to cook?
Thank you!
I just finished baking challah it usually takes about 20 minutes for rolls to bake. They should be a nice golden color
I tried this recipe twice and it turned out perfectly both times. I 1.5x the recipe the first time and made 1 medium sized 4 strand loaf (it’s pretty big!) and 2 smaller loaves to give away – I prefer to keep the smaller loaves as 3 stands otherwise it turns out too skinny for my preference. My 5 yr old helps me make the strands which she will cherish as a memory. I was worried the honey might come through the taste because I didn’t want it to be sweet but it did not and enhanced the flavour beautifully. This is a keepsake recipe I will make again and again for sure.
Does this bread freeze well if you make buns
I had the same question. I found this on another website:
While many people wrap their challah in multiple layers of aluminum foil, I prefer plastic freezer bags. Foil is both bulky and expensive. … When well wrapped in airtight freezer bags and placed in a good freezer, challahs can last for two months or more, if necessary.
How do you bake the dough from frozen? do you leave to defrost or put right into the oven? what temperature for baking and how long?
I never made challah as a kid, but my bubie did (she also worked at a bakery) and good challah is worth the effort. This recipe is a lot of work and takes time, but it is definitely worth it. My 9 year old and I have made it 2 years in a row and it turned out even better this year. She is better at braiding than I am. This year we made the second half into a bunch of buns of assorted size and they are delicious to snack on. Thanks for the great recipe!
This recipe for challah is excellent exactly as written. There’s nothing like the smell of freshly baked challah! Thanks for this.
Simple easy and best of all… Your description of how the dough should be was exact on point.
Hi tori! I just love this recipe and have been making it every Friday for months now. Perhaps you can help me problem solve. When I braid the challah it looks beautiful, however when it bakes the strands pull apart in the oven resulting in a not so beautiful finished product (however still tastes amazing). I’ve tried everything. Different oven temperatures, different rise times, nothing seems to have mattered, the strands still pull apart. Any insight would be greatly appreciated!
Hi Marla! They pull apart a little for me too, that’s why I do a second egg wash halfway through baking to make those white parts more golden. I don’t know of a way to avoid it completely. Does your result look very different from the pictures in this post? If it seems like they are pulling apart a lot more than the pictures in this post, you might try letting it rise a bit longer before baking.
Hi Tori! Your recipes are gold to me. I married into a Jewish family, then we moved away 8 years ago and suddenly the holiday cooking was up to me. Now my husband says I am a better cook than his own mother… thanks to you. However, this weekend was my first time attempting Challah. I think I followed your recipe to a T, and the loaves were gorgeous and rose like you said they would in all the right time frames. When I sliced into them about 5 hours after baking, the texture is drier and more flaky than I was expecting. What did I do wrong? While they were still delicious, I would like to try again and get it right. One thing to mention is we live around 4,800 elevation. Would that change anything? I don’t bake much but sometimes when things don’t turn out the same as I remember I wonder if it is the elevation.
Hi Heather, so glad you’re enjoying the recipes. I am almost sure it’s the elevation that is causing you trouble here. I don’t know much about converting recipes for high elevations, but there are a lot of guides available online with recommendations. Good luck!
I am so new at 79 baking bread from scratch. Ive done lots in a bread oven but this was really new to me. First my yeast didn’t work so I used the instant. Then when it got hard to mix I used my hands which became coated with dough. I had a hard time getting all the flour incorporated so I don’t know what this is going to look like. I accidentally turned the oven on and had to turn it off and hope the oven wasmt too hot when I put the water and dough in. Still waiting for the first rise right now. Then when I picked up the years package I notice a lot of yeast coating the inside and so I don’t even know if the bread will rise. So how do you deal with yeast that’s static clinging to the package? And I think the dough was still a little sticky in parts but I just couldn’t get any more incorporated. I think I made a mess of my first try. Maybe next try will be a single loaf and a lot of looking for how to incorporate the flour properly.
Hi Carol! Tori’s assistant Ashley here. It’s never too late to get into baking! I’m glad you’re giving it a go. 🙂
I consider myself to be a pretty experienced baker and even I have difficulties, so please don’t feel discouraged. The best tip I can give for bakers of all levels is to read through the recipe a few times before getting started. It’s easy to miss a small, but important detail. I also highly encourage testing yeast beforehand to make sure it’s fresh. Then you won’t have any worries about your dough not rising. If you’re concerned about yeast clinging to the inside of those small packets, most stores also carry it in small glass jars. Baking takes patience to get right! If you try it again, please let us know how it goes and I hope you have better luck! 🙂
very delicious recipe!!! a while ago, i forgot to put he eggs in at the right time so i only but them in after i kneaded dough. i ended up only using full eggs and my recipe turned out just fine!
Thank you Tori! I had never made challah from scratch before and I’m so glad I chose your recipe (my mom used it too.) It came out perfectly each time and I did not have high hopes. (Oh, except the time I preheated the oven to make my kids’ lunch while the dough was rising in there. That one had to be a re-do.) I love that this challah isn’t too sweet, which is how we like it in our family. I also loved your ‘loops’ instructions for holiday challah.