Hummus was one of the very first recipes I ever blogged about, and it continues to be a favorite recipe on my site. Making your own hummus is easy and affordable, and the resulting flavor is far superior to those tubs of store-bought dip. When you peel the chickpeas before blending, a light, silky texture emerges that is simply irresistible.
Hummus is an absolute staple in our home cuisine. Rarely a family gathering goes by without a dish of hummus at the table. This simple food is tasty, filling, heart-healthy, vegetarian, dairy free and gluten free. What could be better?
Since first posting this recipe, I have refined my hummus-making technique quite a bit. Peeling the chickpeas is a must, but I always found it to be a very tedious process. The owner of a local falafel joint shared his secret for peeling lots of garbanzo beans at once, and I’ve been using it ever since.
This simple trick using baking soda works like a charm! I decided to update my recipe with this new technique, and I even added a video to help walk you through the steps- check it out down below the ingredient list.
Hummus has been a mainstay of the Middle Eastern diet for centuries. It is eaten as both an appetizer and a main course, usually served with hot baked pita bread and a bowl of olives. Hummus is often paired with fresh fried falafel and sometimes shared alongisde ful mudammas in a dish known as hummus ful.
In Western countries, it tends to be served as an appetizer or snack dip alongside vegetable crudités, pita bread or chips. A decade ago hummus was relegated to the health food stores, an oft-overlooked dip with a niche audience.
The dip has gained massive popularity in the past few years, and now can be found at most major grocery stores in varying flavors. From roasted pepper to spicy jalapeño to white bean basil, you can find a variety of hummus choices on market shelves. Venture into making it yourself, and you’ll discover even more possibilities– like creamy avocado cilantro or exotic peanut hummus. Once you master the technique, you can come up with your own delicious ideas!
Hummus is very nutritious… and if you make it yourself, it’s affordable too. You can make about three times the amount of hummus for the price of one store-bought tub, and it tastes so much better made fresh. As long as you have a food processor, nothing could be easier. Of course, you could mash it the old fashioned way with a mortar and pestle, but it will take some serious elbow grease. I highly recommend the processor if you have access to one.
I sometimes add roasted garlic to my hummus instead of plain garlic. The roasting adds depth to the garlic’s flavor, and just a hint of sweet smokiness that I find delicious. It’s also easier on the digestive system than raw garlic. I have provided instructions for roasting garlic in a previous blog. Use raw garlic if you prefer a stronger, sharper garlic flavor.
Keep in mind that all ingredients are “to taste.” The key to great hummus is tasting often and adjusting the flavors as desired.
Hummus tastes best when made with cooked chickpeas instead of canned. To learn how to prepare the chickpeas, check out this post: How to Soak and Cook Chickpeas.
Recommended Products:
We are a participant in the Amazon Services LLC Associates Program, an affiliate advertising program designed to provide a means for us to earn fees by linking to Amazon.com and affiliated sites. As an Amazon Associate I earn from qualifying purchases.

Video by Entice Films
Classic Hummus
Ingredients
- 3 1/2 cups canned OR soaked and cooked chickpeas/garbanzo beans
- 1 tablespoon baking soda (optional - to help skin the chickpeas, then rinsed away - see instructions below)
- 1/3 cup tahini paste
- 8 roasted garlic cloves , or more to taste (you may substitute 1-3 fresh garlic cloves if you prefer a stronger sharper flavor)
- 1/4 cup fresh lemon juice , or more to taste
- 1 tablespoon extra virgin olive oil , plus more for garnish
- 3/4 teaspoon cumin
- 1/2 teaspoon salt , or more to taste
- Pinch cayenne pepper
- Paprika and fresh minced parsley for garnish optional
Instructions
- If using canned chickpeas, drain and rinse them first. If cooking the beans, follow my soaking and cooking instructions here. Drain the beans after cooking and let them return to room temperature.To make this hummus ultra creamy, you should peel the cooked chickpeas. While this step is optional, I do recommend it for creamy results. To peel and remove the chickpea skins easily, place them in a skillet with 1 tbsp baking soda and stir, coating all the beans thoroughly with baking soda. Heat up the skillet over medium, stirring the beans constantly, for 2-3 minutes until the beans are completely heated throughout and the skins begin to separate from the beans.

- Pour the hot beans into a large mixing bowl, then immerse them in 3-4 changes of cold water, agitating the beans with your hands to release the skins. Loose skins should float to the surface where they can easily be discarded with each batch of cold water. When most of the skins are gone, proceed with the recipe.

- Another way of skinning the chickpeas (which takes a lot longer) is to take each chickpea and gently squeeze to remove the skin, then discard the skins before processing. While this step is not completely necessary, it will ensure that your hummus turns out very smooth and creamy.

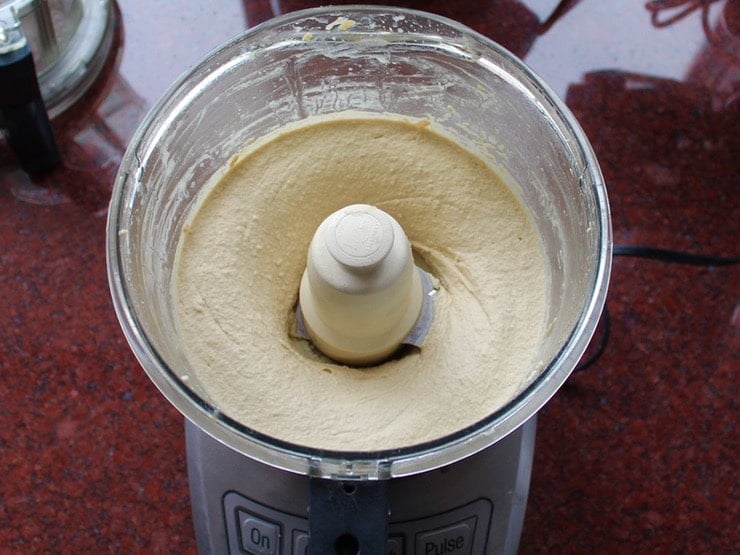
- Reserve about 15-20 whole chickpeas for garnish. Outfit your food processor with a blade attachment. Place chickpeas, tahini paste, roasted garlic, lemon juice, 1 tbsp olive oil, salt, cumin, and cayenne pepper into the processor. Process the mixture until it becomes a smooth, creamy hummus.
- Taste the mixture and add more salt, lemon juice, or garlic to taste. Process again to blend any additional ingredients. If the texture seems too thick, add lukewarm water and continue to process until desired consistency is reached.
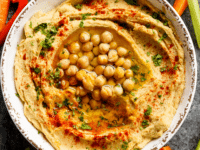
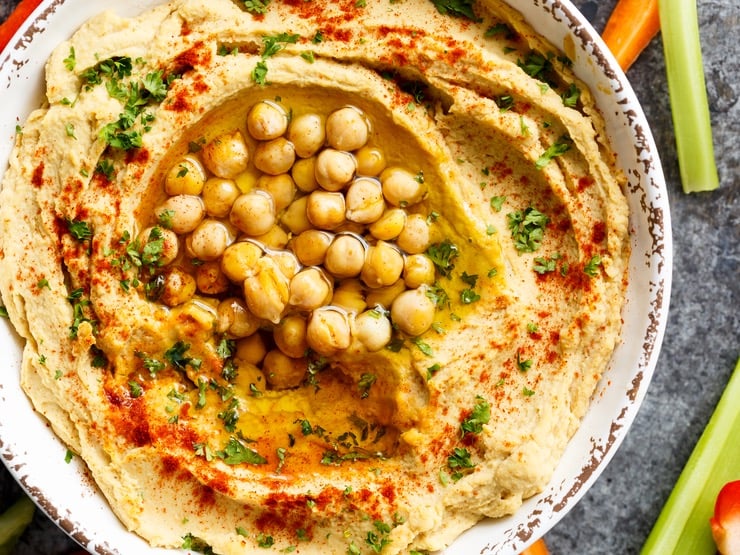
- Transfer hummus to a shallow bowl and create a well in the center with a spoon. Garnish with reserved chickpeas, a drizzle of olive oil, and a sprinkle of paprika and minced fresh parsley. Serve with pita, crackers, or fresh vegetables for dipping.


NOTES
Nutrition


Hi Tori,
Before I try this, I just wanted to make sure I understand correctly your instructions. When you say” tahini paste” are you referring to just basic tahini like you’ve given the recipe for “Tahini Sauce” or are you referring to just tahini sesame seed paste?
Thank you!
Natalie
sorry if this is a repeat question (I did go through them quickly) is it freezable?
Hi Stephanie, I do not recommend freezing hummus.
Just stumbled on this. I have been making homemade chummous for years using almost the same recipe. I always make a large amount at a time and freeze what I’m not going to be using in the upcoming week. I’ve never had a problem. For my palette, it tastes just as good. Maybe try freezing a small amount and see if it works for you or not.
The only difference between this recipe and mine, aside from slight variations in amount of spices, is that I put in a tsp of s’chug, a hot Yemeni sauce. Like the cayenne, it adds some bite, but with a more distinctive taste.
Oops, forgot to mention. If you do decide to try freezing it, leave some space at the top of your container for expansion. When you thaw it, you may notice some of the natural oils of the tahini have separated out or that the mixture feels a bit clumpy or grainy; if so, you just have to mix the chummous well and everything will be restored to normal consistency. B’tayavon !
Great recipe for Hummus. Loved the roasted garlic. My batch needed lots more of everything! Double the lemon juice, more liquid and more liquid and more salt to taste. Initially, very bland but I’m glad you mentioned tasting it. That was key for me! Gratefully,
Mark
Very happy you enjoyed it Mark! Yes, tasting is key, as I’ve found some like a more creamy hummus with less punch, while others prefer more tartness from the lemon juice, while some like it very garlicky. Best to try it until it’s just right for you!
Just returned from Israel and first meal I made was your fallafal and hummos. Fortunately, I brought back plenty of tahini. Your recipes are very good and as tasty as what I ate in Israel. So Tori….todaraba!!!
You’re welcome Lisa! 🙂
Finally! I’ve lived in Israel in 94/95, and since then missed the humus. Tried a few recipes but it never worked, it was always too different from the real thing. Until now, this is so yummy! Thanks from the south of Chile !
I lived in Israel for 3yrs and my favorite part was the food. Falefa was my absolute favorite. I could eat it for breakfast, lunch & dinner. I still miss it now that am back,home.there was,this shawama place in takana( hope I spelt it write) .it was to die for. Omg. I loooooove Israeli food.
Made this and it came out awesome 😉 Thanks a lot …!with loads of love from The Netherlands !
That makes me so happy, knowing that my hummus made it all the way to the Netherlands! 🙂
What is the shelf life of this recipe?
Hi Anna, it will keep from 4-6 days in the fridge.
I had hummus AND falafal a long time ago and always thought I hated chick peas because of the taste. Then I had a dish called Jasmine’s Rice which was jasmine rice with cooked carrots, chick peas, onions, celery and topped with roast lamb. Now I know from a meal I made the other night that I’m not that into Tahini. So I found a recipe to make hummus with peanut butter instead of tahini (and another that talked about making hummus without tahini because kids don’t like the taste of tahini. Guess I’m a kid) and I used this recipe. So when I processed it I had to do more after the first 1/4 cup of water, so I added the next one with lemon juice. Fantastic!!! Give it a try using organic natural peanut butter (found some without even salt — only ingredient was peanuts) and it is fantastic with all the subtle flavors coming through.
That’s great Michael! Glad you found a variation that worked for you. I’m a kid at heart, but I do love my tahini. 🙂
Hi. Just discovered your site today….will be reading often! Two notes on hummus. I live in the southwest and like spice and have been adding Chipotle to my hummus (powder not the chipotle Chile in adobo) with some toasted red Chile flakes. I roast peeled garlic cloves in a saucepan with olive oil – enough to cover, and then use the oil to sauté or add to my hummus if I want a more delicate garlic flavor. This might help someone who wants the flavor but has problems with raw garlic. I found your site today looking for a recipe for challah bread. I made it for a friend who had asked me to bake 2 loaves for him and some friends tonight. I didn’t get to taste it but he told me it was a great success.
Glad the challah turned out well Jeane!
Thank you for your wonderful recipes. I also am going to try making the tahini sauce as well as the Falafel as per your directions. Seems mouthwatering. But can I cut out the onion and garlic?
Hi Vidya– you’re welcome! You can cut the onion and garlic, but they might be kind of bland without. If you have trouble digesting garlic, try roasting it first. It really makes a big difference.
Excellent recipe. I’ve made hummus this way for some time, but this inspired me to start from scratch by cooking the garbanzo beans, and it really is superior! The cooking water can be added to the mixture if you need a little liquid in order to get a nice puree. I will also try roasting the garlic, as I prefer a more mild garlic flavor, and raw can be too sharp.
There is also a wonderful spice, smoked sumac, that can be sprinkled on top instead of paprika. I’m not sure if it’s used in Israel, but it is used on hummus in other Middle Eastern cuisines, and it adds a wonderful, smoky depth of flavor. It’s not always easy to find, but well worth the effort.
Great tip Ryan!
I tweak this with lemon AND lime. I used the fresh and the roasted. I am not going to use the fresh again after the roasted was tasted! Delicious with the cumin as well. I have never seen that one in any recipe and I have been making my own for a long time. YUM!
Sounds really good. Love all the different ideas from the comments. Thank you all!
Love your site – such lovely pics with your recipes!
I have a Vitamix blender that I use for (well, everything) making hummus. A bonus of the high-speed blender is that I don’t need to use tahini… I can use sesame seeds instead. The blender blitzes everything to creamy oblivion (skins on the chickpeas too) so I don’t have to whinge over a jar of tahini languishing in my fridge.
Although I doubt it would languish long these days anyway, since my 3yo son refuses to eat meat – but he loves hummus. I add nonfat Greek yogurt to it to make the hummus a more filling and nutritious meal for him.
Oh, and an emergency substitution of lime juice has turned into our favorite recipe tweak of all time! Try it some time instead of lemon! Thanks again for creating such a wonderful site! I can’t wait to try more recipes!
Hi Tori, greetings from Denmark, thank you for all the great receipes in here, we also enjoy a good hummus here, I always use tahine, but I always have too much of it left over, since they only sell it in large bowls where I live. Do you know for how long an opened bowl of tahine can be kept in the fridge?
Hi Amalie, in my experience tahini in a closed sealed jar will last quite a long time– a few weeks, at least– if it is kept refrigerated. It’s similar to peanut butter in that way.
I am a very strict vegan , I am following Dr. Esselstynes diet , almost to the letter.I am trying to reverse my heart disease. I cannot use oil of any kind, not even the sesame oil which is in tahini. I love hummus and I want to make my own. I love it on whole wheat bread that I make using no oil. Do you have a recipe that I use? Thank you in advance for your time. Jim
Hi Jim, I don’t have a recipe for tahini-free hummus. You can try making the recipe as written, but omit the oil and tahini. Add warm water to the blender till the mixture is smooth. It may taken you several times scraping the sides of the processor and reblending till it gets smooth; the water will help. Let me know how it turns out if you try it.
Try using really good canned garbanzos and the Aquafaba from the can (liquid the beans are canned in). Even a few pieces of avocado will add the smoothness without using oil but still give you flavor. Toasted sesame seeds that have been finely processed in a spice or coffee grinder are a good flavor boost without the oil, too. I see this is an old post…wonder if this oil free diet really worked to reduce your heart disease?
i just made this oh my gosh it’s soo nice, that roasted garlic is really something (so full…. *^^*)
hi i want to make hummus but i don’t want to use 8 roasted garlic cloves so how many fresh cloves should i use because as u know if i put eight fresh ones it would be really strong so how many?
Start with 1 medium clove and process. Taste. If you want it more garlicky, add another clove. Continue adding till it tastes the way you want it to. If I’m using raw I usually only add one clove, but I don’t like my hummus super garlicky.
I have begun to pop the chickpeas out of their skins before using. Makes the hummus smooth, smooth, smooth! It takes a bit of time. I sit at kitchen table and listen to itunes, can do a can in about 12 minutes, or dried beans/boiled in about the same amount of time. They also taste a lot better to me without skins (creamier).
Try it, I think you’ll notice a significant difference!
Hi Gena, yes– if you look at the instructions above, I have added this tip, which I was recently reminded of by Deb Perelman on Smitten Kitchen. It definitely does make a difference if you have the time to do it!