
Having trouble making hamantaschen for Purim? Are your hamantaschen spreading or opening when they bake? Are they losing their shape? Maybe the filling is leaking. Perhaps you’re having trouble folding your cookies into neat triangles. Or maybe you’re just looking for an easy hamantaschen recipe that will get you perfect results, every time. Whatever your question, I’m here to help!
I have compiled this list of tips to help people who are new to baking hamantaschen (sometimes spelled hamentashen). It took me several years to master the proper technique and develop some terrific dough recipes. I now have a firm understanding of what it takes to make pretty and delicious hamantaschen. I want to share that knowledge with you, so you can avoid some of the pitfalls I’ve encountered over the years. Hopefully my tips will help obtain a tasty and beautiful result from the very first try! But first, a little history.
What is the meaning of Hamantaschen?
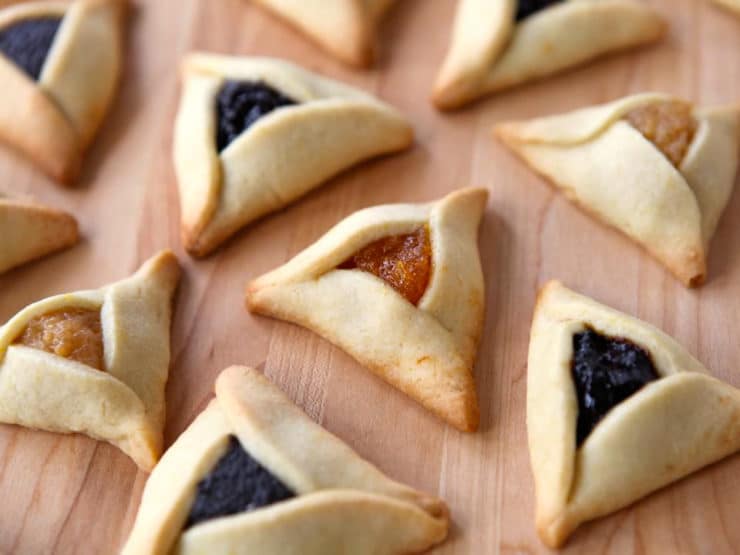
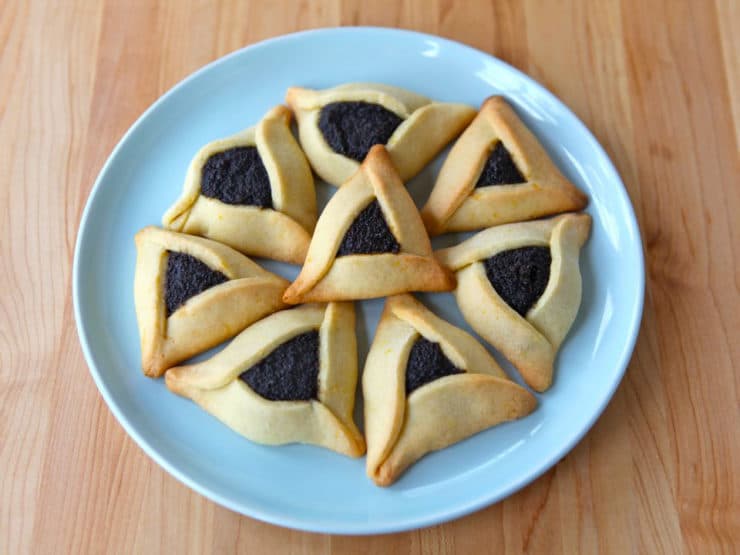
Purim is the Jewish holiday in which we commemorate being saved from persecution in the ancient Persian Empire. A symbolic food eaten during the holiday of Purim is hamentaschen (“ears of Haman”). Haman is the villain of the Purim story (more on that below). This triangular-shaped cookie is supposed to represent either Haman’s ears or his three cornered hat. The center of each “hat” is filled with jam or sweet filling.
According to the Book of Esther in the Bible, the Jews of the city of Shushan were threatened by Haman, a prime minister who convinces the King Ahasuerus to kill all the Jews (because the Jewish Mordecai refused to bow down to Haman). Haman casts lots (the word Purim means “lots”) to determine the date he would carry out his plan: the 13th of Adar. In the end, the Jews are saved by the heroic Queen Esther, Mordecai’s niece (and adopted daughter), who married Ahasuerus (after he banished his first, rebellious wife Vashti). When Ahasuerus discovers that his wife Esther is Jewish, he decides to reverse Haman’s decree, and instead of the Jews being killed, Haman, his sons, and other enemies are killed instead.
Tips for Creating Perfect Hamantaschen (Hamentashen)
1) Find a great dough recipe. Here are two foolproof, tasty dough recipes that I highly recommend. They are easy to handle and shape, and they provide great results when baked. You won’t need a food processor or stand mixer or any fancy kitchen gadgets (the buttery one calls for an electric mixer – the dairy free one, a wooden spoon). One thing you’ll notice – my buttery dough recipe does not contain leavening like yeast or baking powder. I found it stayed close better without the addition of leavening, and the texture was not affected. The cookies are easy to shape, and can be made quickly without needing to wait for a rise.
Dairy Free Hamantaschen Recipe
2) Roll your dough out to 1/8 inch thick (or less) on a floured surface. You want your rolled dough to be as thin as possible, while still being thick enough to maintain the cookie’s structure. 1/8 inch seems to be the magic number; sometimes I roll mine out even thinner than that. For a more doughy texture you can roll it thicker, but remember– the thicker the dough is, the harder it will be to handle and shape. Thick dough is also more prone to opening/spreading in the oven.
3) Use a thick filling that won’t run/weep from the cookies while baking. Knowing the proper consistency of a hamantaschen filling takes experience, because each type of filling is slightly different. Poppy seed filling has a very different texture than fruit filling, for example. A good filling should be somewhat thick so that it doesn’t run. However, you don’t want it too thick, or it will bake up dry or tough. It’s best to follow a tested and proven recipe. Try one of these fillings, which have all been thoroughly tested:
Rabbi Olitzky’s Chocolate Chip Cream Cheese Filling
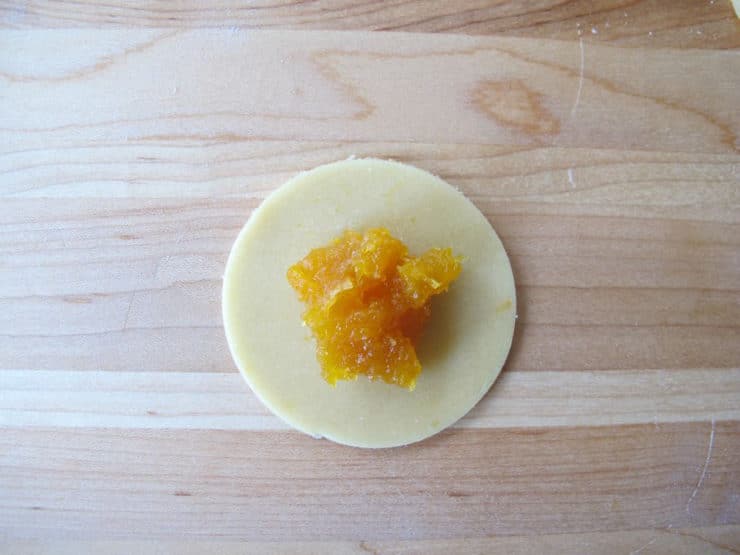
4) Cut your hamantaschen dough in 3-inch circles (or larger) before filling and folding into triangles. Anything smaller than 3 inches will be difficult to fold around your chosen filling.
5) Most fillings can be chilled before using to fill hamantaschen. I’ve found that fruit filling, poppy seed filling, and cream cheese-based fillings tend to be easier to work with when they’re chilled in the refrigerator. The chilling process thickens the fillings and makes them less sticky, which makes them easier to handle with when you’re assembling your hamantaschen. However, some fillings are better at room temperature — particularly chocolate-based fillings like Nutella, which will harden with prolonged refrigeration. Check your filling recipe to see if refrigeration is recommended.
6) Do not overfill your hamantaschen. Use roughly 1 teaspoon of filling per hamantaschen cookie – not more. However tempting it might be to put lots of delicious filling in the middle of your cookie, using more than 1 teaspoon can cause your hamantaschen to spread open and leak in the oven. 1 teaspoon is plenty, especially when you cut your dough circles to 3 inches… it’s the perfect amount of filling.
7) Fold your triangles the right way! Using the proper folding method will help your hamantschen hold together and create a beautiful shape. I’ve provided detailed, illustrated, step-by-step folding instructions below.
8) Remember, the filling will be very hot! Once you remove the baking sheets from the oven, move them to a rack to cool completely before serving.
Follow these tips, and you’ll be creating beautiful batches of homemade hamantaschen in no time! What are your favorite hamantaschen fillings?

How to Fold Hamantaschen
Ingredients
- Hamantaschen dough , recipe options linked in blog post above
- Filling of your choice , filling recipes linked in blog post above
Instructions
- Roll dough between 1/8 - 1/4 inch thick and cut into circles with a cookie cutter or glass rim that is at least 3 inches wide. Place a teaspoon of filling (whichever filling you choose) into the center of each circle. Do not use more than a teaspoon of filling, or you run the risk of your hamantaschen opening and filling spilling out during baking. Cover unused circles with a lightly damp towel to prevent them from drying out while you are filling.

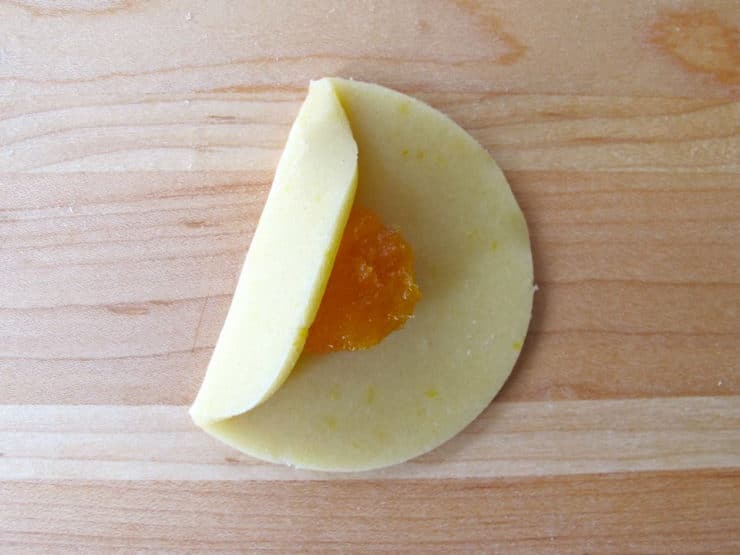
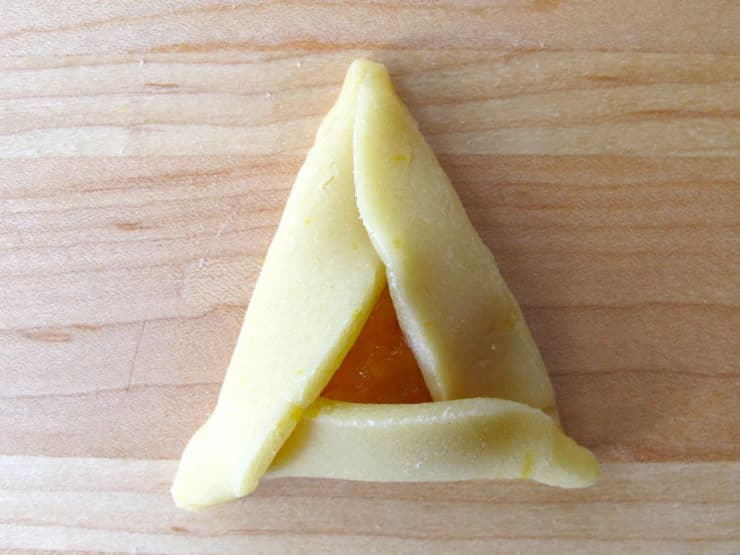
- Assemble the hamantaschen in three steps. First, grasp the left side of the circle and fold it towards the center to make a flap that covers the left third of the circle.
- Grasp the right side of the circle and fold it towards the center, overlapping the upper part of the left side flap to create a triangular tip at the top of the circle. A small triangle of filling should still be visible in the center.
- Grasp the bottom part of the circle and fold it upward to create a third flap and complete the triangle. When you fold this flap up, be sure to tuck the left side of this new flap underneath the left side of the triangle, while letting the right side of this new flap overlap the right side of the triangle. This way, each side of your triangle has a corner that folds over and a corner that folds under-- it creates a "pinwheel" effect. This method if folding is not only pretty-- it will help to keep the cookies from opening while they bake.
- Pinch each corner of the triangle gently but firmly to secure the shape.
- Repeat this process for the remaining dough circles. Bake according to recipe instructions.


NOTES
Nutrition

tried this recipe?
Let us know in the comments!
See recipe links above for nutritional information related to specific recipes.


I made your dairy free recipe last year (including your apricot filling) and they were the BEST hamantaschen I’ve ever made! The dough was AMAZING to work with, tasted delicious and the folding technique was perfect! I even use the dough for sugar cookies when I want to make them without dairy (or just to save time because it doesn’t need to be refrigerated prior to rolling and baking).
These are a hit at our house
Seriously the best dough recipe! And the folding technique really works! Makes the most perfect hamentashen 🙂
I had fun with these last year…will try again this year..
Made them yesterday for the first time. Not one of opened! Thank you so much! I love your recipes
Just finished making 9 batches of your dairy free dough to make Sunday for our Temples Purim Party. If you’re ever in Savannah, check us out. Congregation Mickve Israel.
That’s a lot of hamantaschen! 😀
We made 600 last year.
Hamentashen are from heaven.
Thanks for these recipes. My Mom passed away recently shortly after her 100th birthday and I haven’t found her hamentaschen recipe yet. I’m sure it’s there but there’s a lot to go thru! She always made me chocolate chip hamentaschen when I was little and there are lots of fond memories associated with them. You non dairy dough sounds a lot like hers.
I may be one of the few people on the planet that doesn’t like Nutella but I’ve recently found Peanut Butter & Co.’s Dark Chocolate Dreams and am going to try that instead.
Thanks again for all of your wonderful blogs and recipes.
Tori, Thank you for the lekvar and apricot filling recipes–will try them the next time I make Hungarian kifli cookies. A great alternative to the canned fillings. I find it very interesting that you do call it lekvar. Is this traditional in Jewish baking? I have always known it as a Hungarian word (and my family is Catholic), although have seen it with other Eastern European cultures, too. Thanks!
I will be making Hammantaschen with the children from the Hebrew School as I do every year, however I will use your recipe
Greased sheet or ungreased sheet? Parchment or no parchment? How many degrees Fahrenheit? How long?
All of this information is included in the recipe. Follow the steps exactly as written.
I made the buttery dough and it was so easy to make and very easy to handle. I made the prune and poppy seed filling which were also so so easy. There is a quite a bit of left over filling, especially the poppy seed. I think it makes enough for almost a triple recipe. The pastry is more crisp than the Hamantaschen that I remember growing up. I remember them being a bit more ‘crumbly’. But these were too easy to not do again! The pastries look beautiful. They taste divine. Everyone is loving them! Thank you for great directions.
Tori!
Thank you!! This recipe was delicious and your tips were so helpful. I made this and my family requested it over and over again, scarfing them up within hours!!!
This dough is so delicious, I think I’m going use it in place of other cookie recipes and see what happens!!
Great Katherine! Thank you for writing.
Thank you for the great apricot filling recipe! I’m using the leftover for pb&j sandwiches.
Yum!
Thanks for a great recipe. I made them with mohn and I was very pleased with the result.
Thanks Tori for the super-quick reply! It is the butter dough I’m using. Also I think my oven is a bit hotter than most as they get to about the same doneness as in your photos in only about 18 mins. I will try chilling first. Thanks again!
This is a fantastic recipe – best result I’ve ever had! One question – mine seems to flatten and spread out a bit more than yours. Is there some trick to helping them keep a more perky shape? 🙂
thanks!
Felicity, which dough are you using? I’m not sure why they’re spreading more for you, but usually this is a temperature issue, especially with butter doughs. Try putting the assembled cookies into the refrigerator for 15 minutes before baking to firm up the fat a bit, it should help. Also you might try using parchment paper or a silpat to line the cookie sheet instead of greasing it, sometimes using too much grease can cause the spreading issue. Good luck!
I used my own dough recipe but used your technique and it was amazing how wonderful they came out! Thank you so much for this easy yet effective way to fold hamentachen. I’ve never had an ENTIRE batch turn out perfect!!!
Congrats Rebecca! Love it 🙂
First batch out of the oven…..ABSOLUTELY SCRUMPTOUS! Need to work on the fold overs on the corners though…oh well….will just have to make some more. Thank you for a great post and recipe.
You’re welcome Lori 🙂
Hi –
Your tutorial is great. I tried the non dairy dough recipe. Using the 2 and 1/4 cups of flour seemed not enough and it was extremely sticky. I added at least other half cup of flour to make it workable. Reading all the comments about how dry I was confused because I had sticky dough not dry. No water needed. Once I added the flour they came out great.
Jessica, so glad you had a good experience. This type of dough is quite variable, which is why I say add liquid or add flour depending on your needs. It really is about texture and working with the dough till it “feels right.”