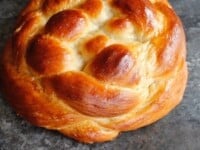
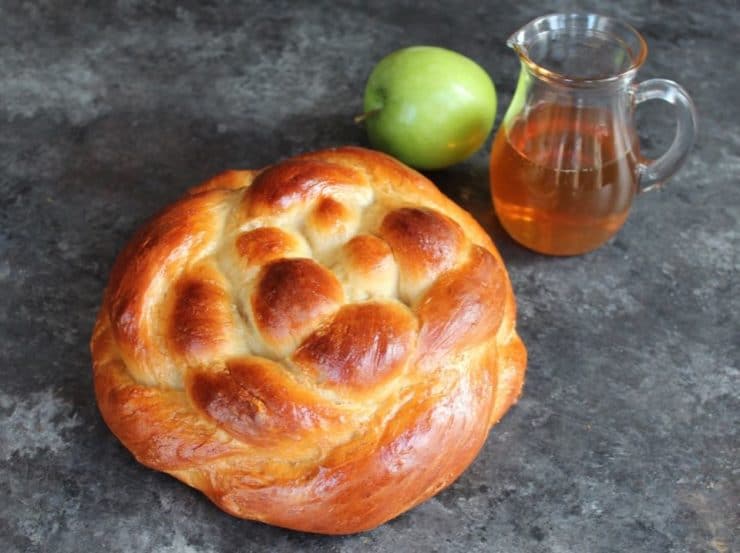
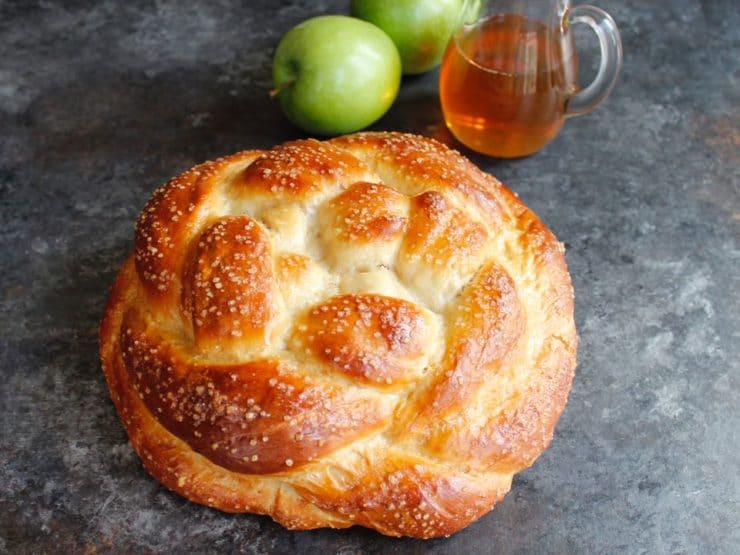
Apple Honey Challah is one of my most popular Rosh Hashanah recipes. This beautiful braided challah is sweetened with honey and stuffed with tender apple pieces. I have included easy braiding instructions for a perfect round challah every time.

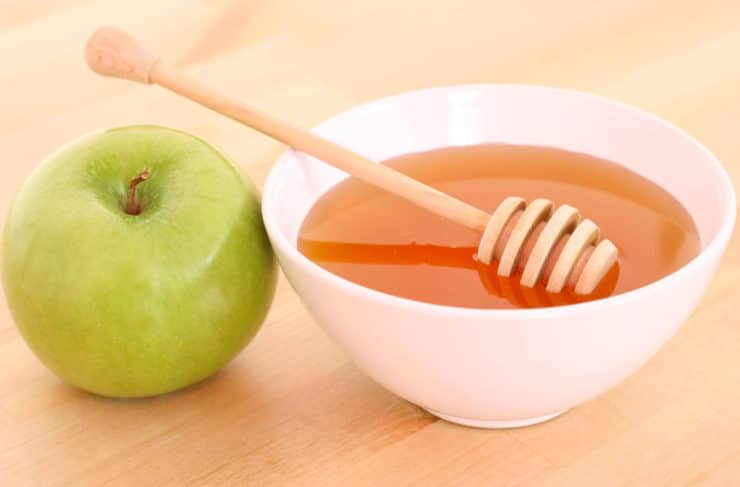
Rosh Hashanah is fast approaching. What better way to celebrate than with a freshly baked Apple Honey Challah? On Rosh Hashanah we dip apples in honey to symbolize our hope for a sweet new year.
In this recipe, the apple and honey tradition is incorporated into my Shabbat challah recipe. It has become a holiday tradition for many readers and their families.
The Rosh Hashanah tradition is to braid challah in a round shape for the holiday. Some believe the round shape represents a crown for God. Our family tradition says that the circular shape represents the cyclical nature of the year– as one year draws to a close, another year begins, and so the circle continues.
There are many ways to make a round challah. In this post, I’ll be sharing a braiding technique that was first introduced to me by my blogging friend Andrea at Capitol to Capital. It creates a lovely challah with a very pretty design on the top.
I’ve broken it down in step-by-step instructions for you; it seems complicated at first, but once you get the hang of it you’ll realize it’s actually pretty easy.
I wanted this challah to be sweet, but not dessert-sweet. I gave it a sweetness level similar to Hawaiian bread, so it could be served and enjoyed with dinner. You can sweeten it further by topping it with honey… and with butter, if you’re so inclined.
The recipe is dairy free so it can be served with a meat meal, but I’ve gotta say it’s awesome topped with salted butter and honey. Holy moly. Good stuff!
The apples were a challenge at first. I used Granny Smith, which are naturally tart but best for baking. In the beginning, the apples weren’t baking up sweet enough for my taste.
I solved this by tossing them in sugar before integrating them into the challah. You can add a little cinnamon to the apples, too, if you’d like an apple-cinnamon flavor. With the sugar, they ended up adding a soft, moist bit of sweetness to the dough– just right!
If you’ve never made challah before, I don’t recommend starting with this one. Working with challah dough is something that becomes considerably easier with time and experience.
Rather than working the apples into the dough during kneading, I’ve found that concealing the apples in the strand creates a more even, smooth shape to the braid.
Making these stuffed strands is not a complicated process, but it might be frustrating to somebody who has never worked with challah dough before. If you’re new to challah, I recommend simply making this into a Honey Challah by omitting the apples. You can then make regular strands instead of stuffed ones, and you can choose any braiding technique you like.
There are several easy braiding methods, including a simple 3-strand or 4-strand braid, or a Linked Loops braid for a round Rosh Hashanah challah. For an introduction to the basic braiding techniques, click here.
For those who don’t want to bother with braiding and aren’t worried about making a round shaped challah, you can try a Royal Challah pan, which will create a beautifully shaped challah without the need to braid.
If you’re comfortable with challah and you’re up for the challenge, read on! It’s really not that difficult, especially since I’ve broken each step down with photos to illustrate.
Here is a printable diagram that you can bring into the kitchen to keep you on track as you braid. Once you do it a couple of times, you’ll realize it’s a very simple braid to master:
How to Braid a Four Strand Round Challah
This challah smells AMAZING while it’s baking. It has the aroma and flavor of the holiday. Topping it with turbinado sugar gives an extra bit of crunchy sweetness to the crust. Shana Tova!
Recommended Products:
We are a participant in the Amazon Services LLC Associates Program, an affiliate advertising program designed to provide a means for us to earn fees by linking to Amazon.com and affiliated sites. As an Amazon Associate I earn from qualifying purchases.
Apple Honey Challah
Ingredients
Dough Ingredients
- 1 1/2 cups lukewarm water, divided
- 1/4 ounces active dry yeast
- 1 teaspoon sugar
- 1 large egg
- 3 large egg yolks
- 3/4 cup honey
- 2 tablespoons avocado oil (or canola - avocado oil is healthier)
- 2 teaspoons vanilla
- 2 teaspoons salt
- 5-7 cups flour
- 3 medium granny smith apples
- 1/4 cup sugar
- 2 tablespoons turbinado sugar (optional)
Egg Wash Ingredients
- 1 large egg
- 1 tablespoon cold water
- 1/2 teaspoon salt
Instructions
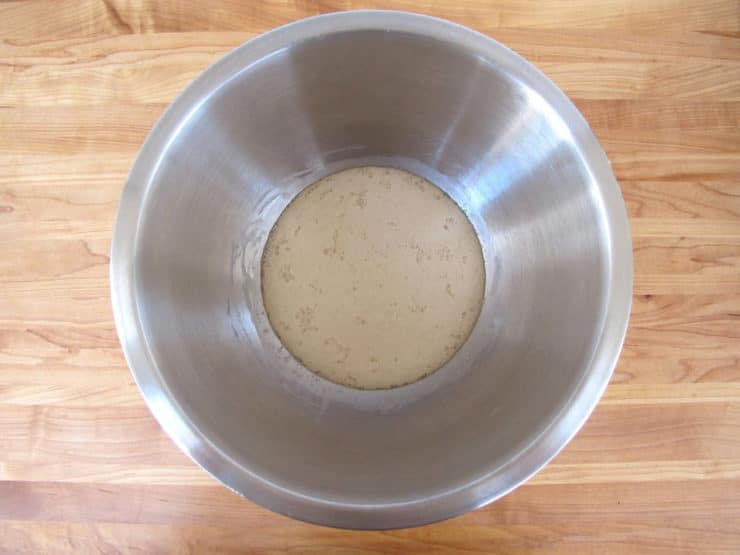
- Pour ¼ cup of the lukewarm water (about 110 degrees) into a large mixing bowl. Add 1 packet of Active Dry Yeast and 1 tsp of sugar to the bowl, whisk to dissolve. Wait 10 minutes. The yeast should have activated, meaning it will look expanded and foamy. If it doesn’t, your yeast may have expired, which means your bread won’t rise—go buy some fresh yeast!

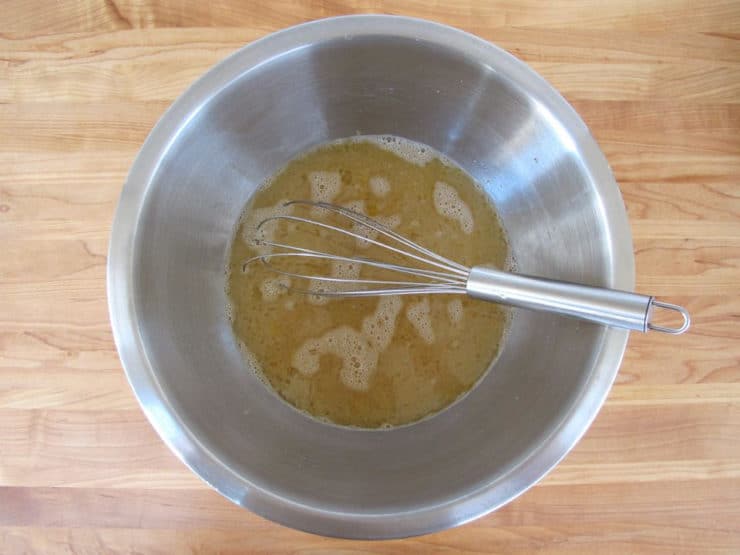
- Once your yeast has activated, add remaining 1 ¼ cup lukewarm water to the bowl along with the egg, egg yolks, honey, canola oil, vanilla and salt. Use a whisk to thoroughly blend the ingredients together.
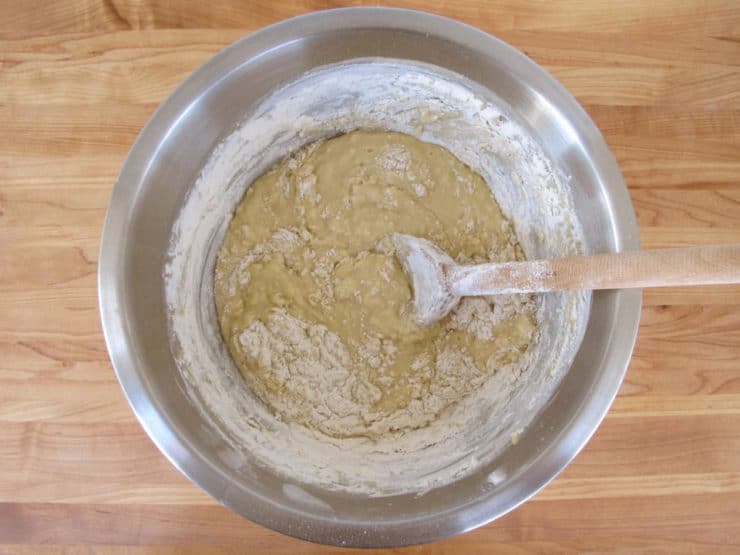
- Begin adding the flour to the bowl by half-cupfuls, stirring with a large spoon each time flour is added. When mixture becomes too thick to stir, use your hands to knead.
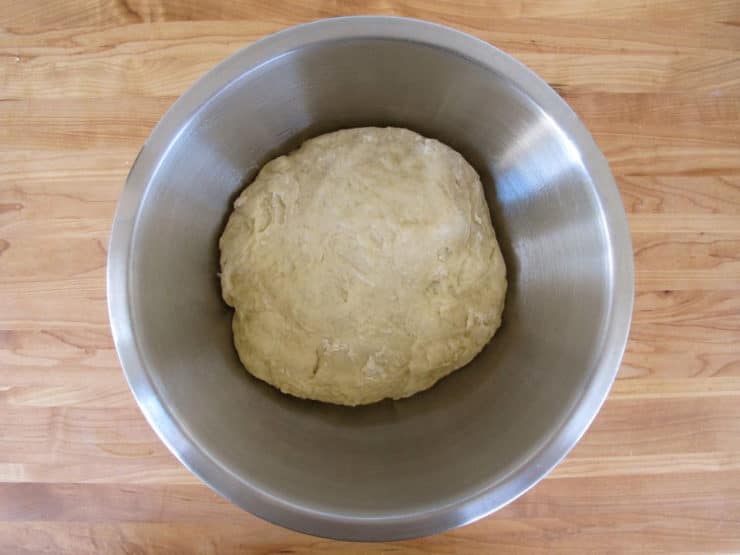
- Continue to add flour and knead the dough until it’s smooth, elastic, and not sticky. The amount of flour you will need to achieve this texture varies—only add flour until the dough feels pliable and “right.” Turn the dough out onto a smooth surface and knead a few more times.
- Place a saucepan full of water on the stove to boil.
- Wash out the mixing bowl that you used to mix the challah dough. Grease the bowl with canola oil. Push the dough back into the bottom of the bowl, then flip it over so that both sides are slightly moistened by the oil.
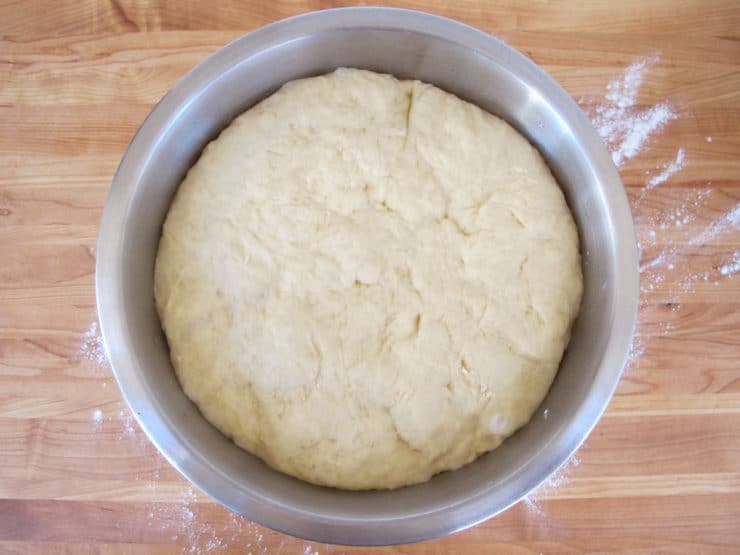
- Cover the bowl with a clean, damp kitchen towel. Place the bowl of dough on the middle rack of your oven. Take the saucepan full of boiling water and place it below the rack where your dough sits. Close the oven, but do not turn it on. The pan of hot water will create a warm, moist environment for your dough to rise. Let the dough rise for 1 hour.
- Take the dough bowl out and punch it down several times to remove air pockets. Place it back inside the oven and let it rise for 1 hour longer.During this final rise, fill a mixing bowl with cold water and dissolve ½ tsp of salt in it. Peel the apples and dice them into very small pieces, about ¼ inch large. Place the diced apples into the bowl of lightly salted water. Reserve. When you are ready to begin braiding the dough, drain the apple pieces and pat them dry with paper towels. Toss the apple pieces with 1/4 cup of sugar. If you’d like, you can add ½ tsp of cinnamon to the sugar to give the apples an apple-cinnamon flavor.

- Take the dough out of the oven; it should have doubled in size during this final rise. If it has not fully risen, return it to the oven till it's had a chance to properly rise. When the dough is ready, flour a smooth surface like a cutting board. Punch the dough down into the bowl a few times, then turn the dough out onto the floured surface. Knead the dough a bit, adding flour as needed to keep it from feeling sticky. You will have enough dough for two medium-sized challot (challahs).
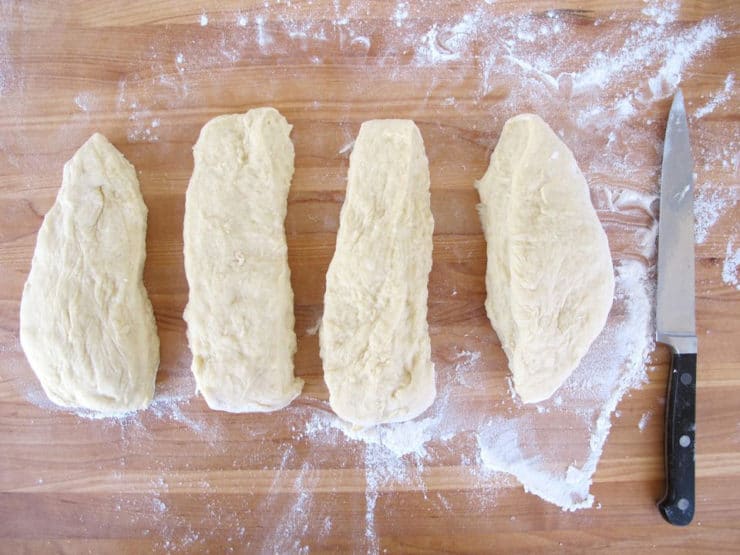
- Divide the dough into two equal halves. Put one half of the dough on a smooth, lightly floured surface. Leave the other half of the dough in the bowl covered by a moist towel. Cut the dough on the floured surface into four equal portions.
- Take one of the four portions and stretch it with your fingers into a rough rectangle, about 1 foot long and 3-4 inches wide. Use a rolling pin to smooth the dough, if it helps. The rectangle doesn’t need to look perfect, and it shouldn't be too thin-- the dough needs to be thick enough to handle an apple filling.
- Sprinkle some of the sugared apple pieces across the center of the rectangle. You should use about 1/8 of the apple pieces in each rectangle. Liquid will collect in the apple bowl as you progress—do not transfer the liquid to the dough, or it will weaken and become mushy. Do your best to shake off excess liquid before placing the apples on the dough. Leave at least 1/2 inch border along the outer edge of the dough clean, with no apples.
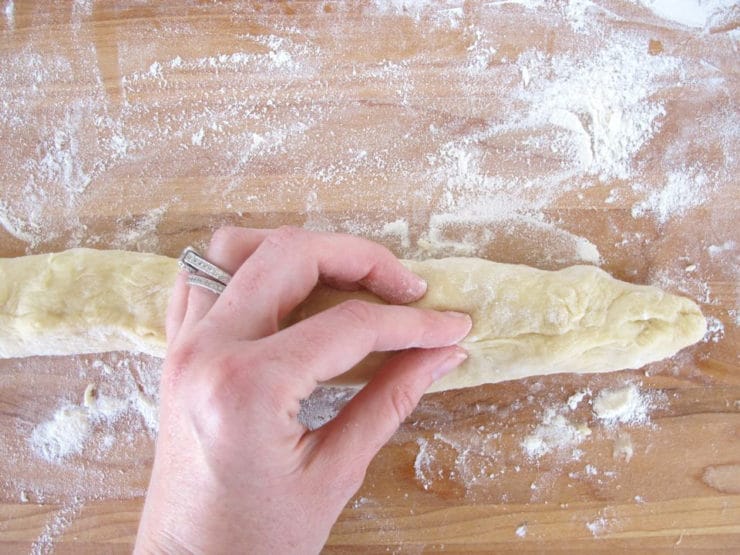
- Gently roll the upper edge of the rectangle down to the lower edge and pinch to seal, creating a snake-like roll of dough stuffed with apples. This is the beginning of your strand.
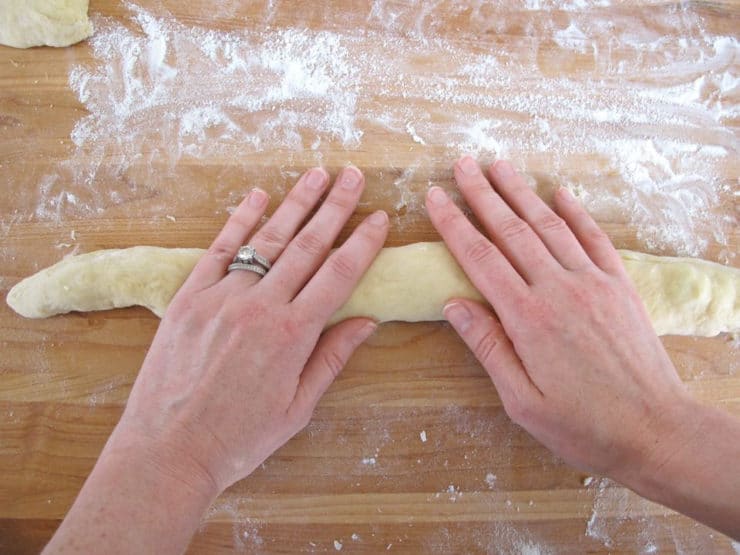
- Gently and carefully roll the stuffed strand till it becomes smooth, using gentle pressure with your hands on the center of the strand, pulling outward as you roll. If any apples begin to poke through the dough, repair the hole with your fingers before you continue. Re-flour the surface as needed to keep your dough from sticking.
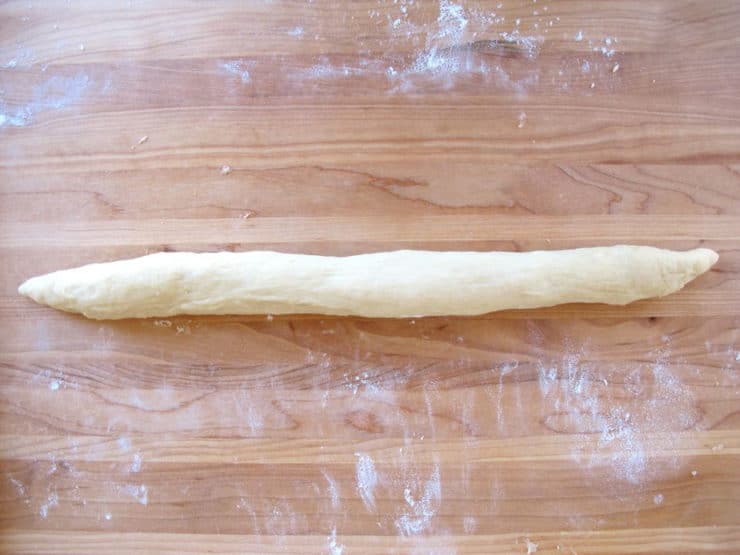
- Taper the ends of the strand by clasping between both palms and rolling. At the end of the rolling process, your strand should be about 16 to 18 inches long with tapered ends.Once your apple strand has been rolled, repeat the process with the remaining 3 pieces of dough, making sure that they are even in length with the first strand. In the end, you’ll have 4 apple-stuffed strands.
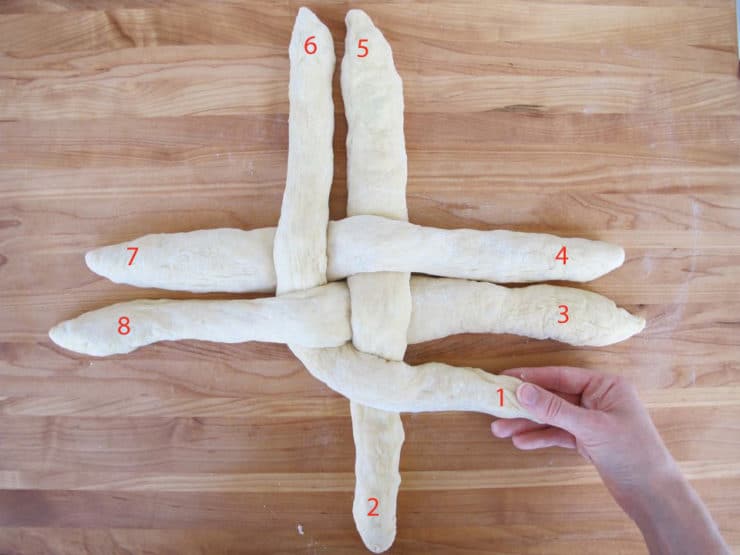
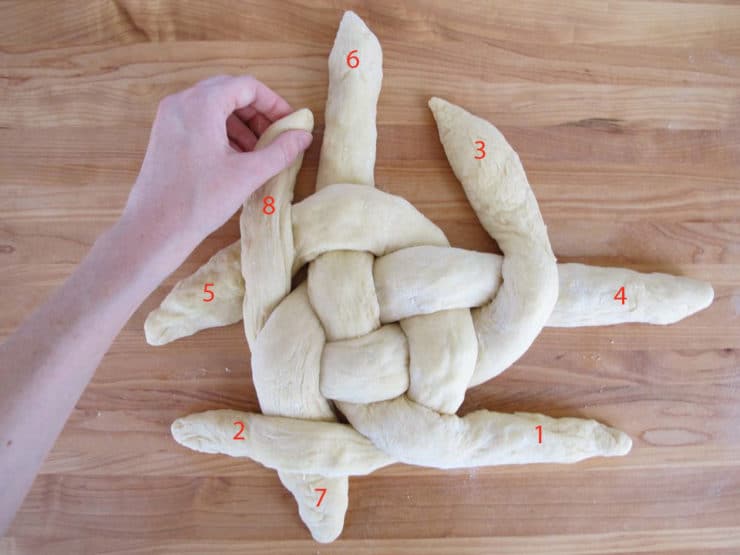
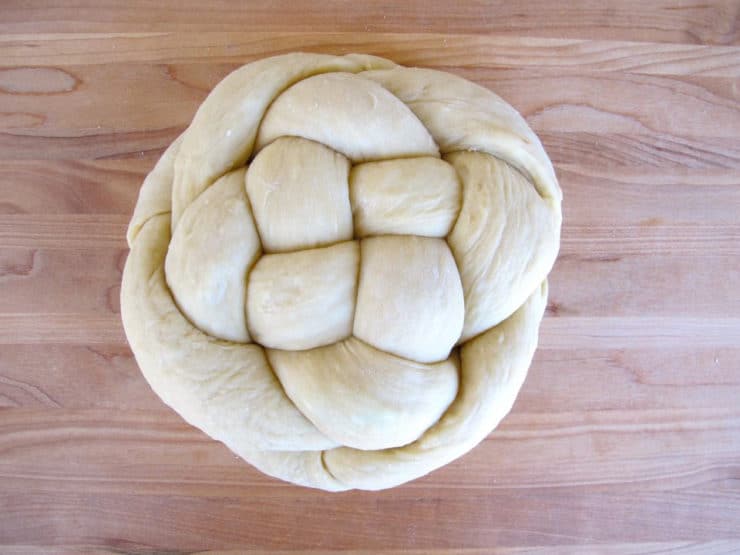
- Now your stuffed strands are ready to braid. There are a few different ways to braid 4 strands into a challah. This recipe will guide you through one method for braiding a round four strand challah. For other braiding methods, click here.Place two strands in the center of a smooth surface, running parallel top to bottom. Place the third strand across the two strands, going under the left strand and over the right. Place the fourth strand directly below the third strand, going over the left strand and under the right. You will have something similar to a tic-tac-toe board pattern, with the center of the board being a very small square and 8 “legs” sticking out from that center. Keep the center as tight as possible… you’ll be braiding from the center. I have numbered the strand ends in the following diagram to make the braiding process easier.
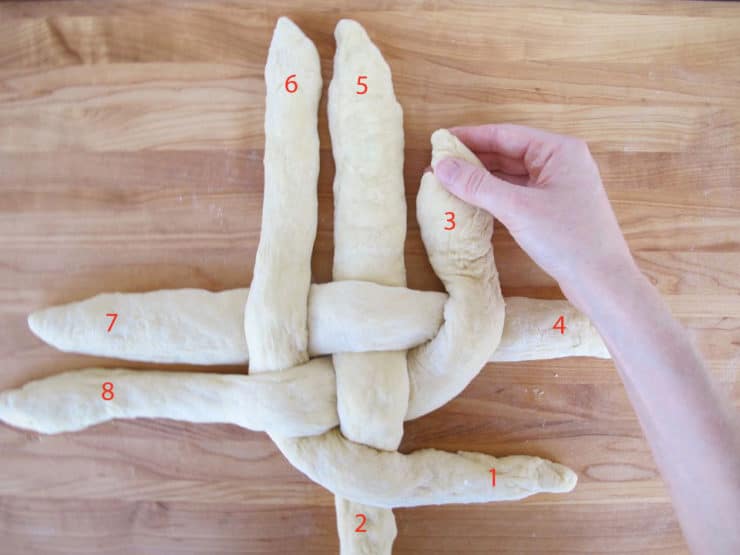
- Take strand 1 and cross it over strand 2.
- Take strand 3 and cross it over strand 4.
- Take strand 5 and cross it over strand 6.
- Take strand 7 and cross it over strand 8.
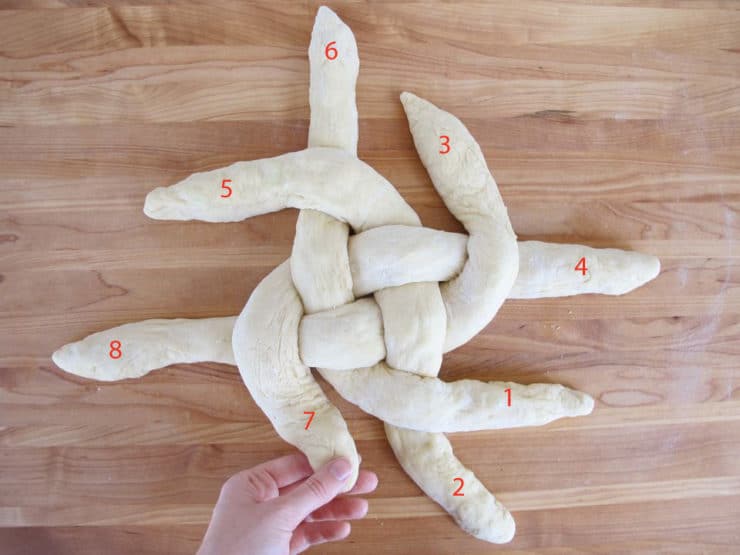
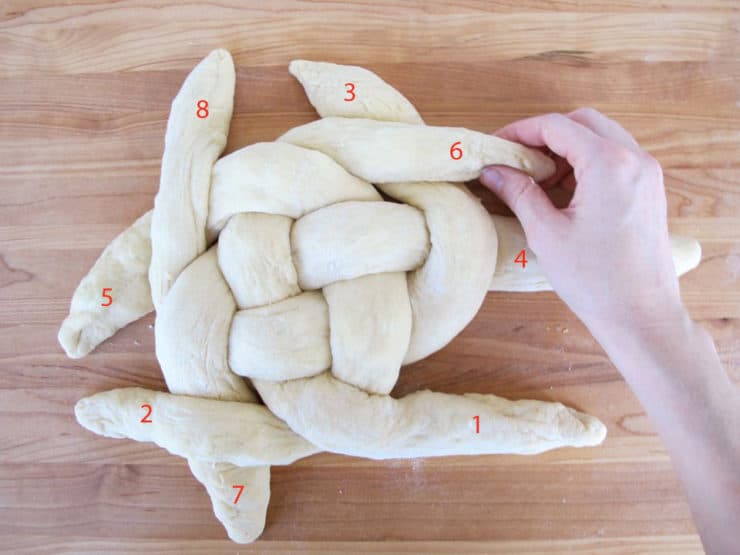
- Take strand 2 and cross it back the opposite way, over strand 7.
- Take strand 8 and cross it over strand 5.
- Take strand 6 and cross it over strand 3.
- Take strand 4 and cross it over strand 1.
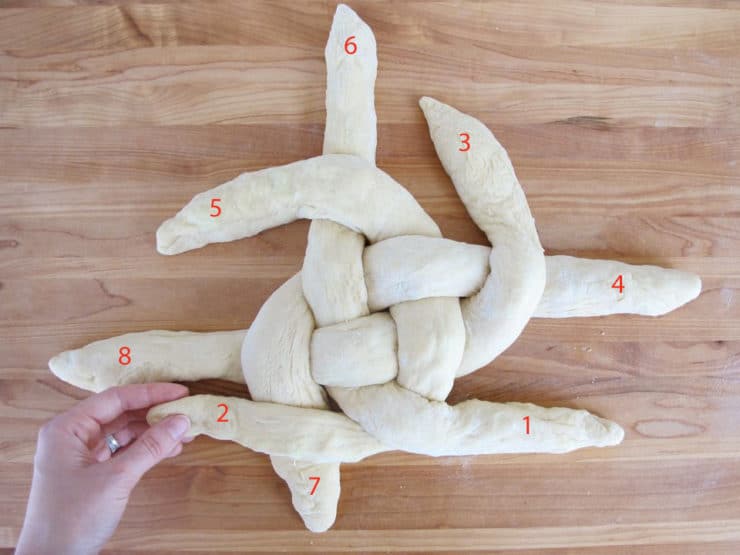
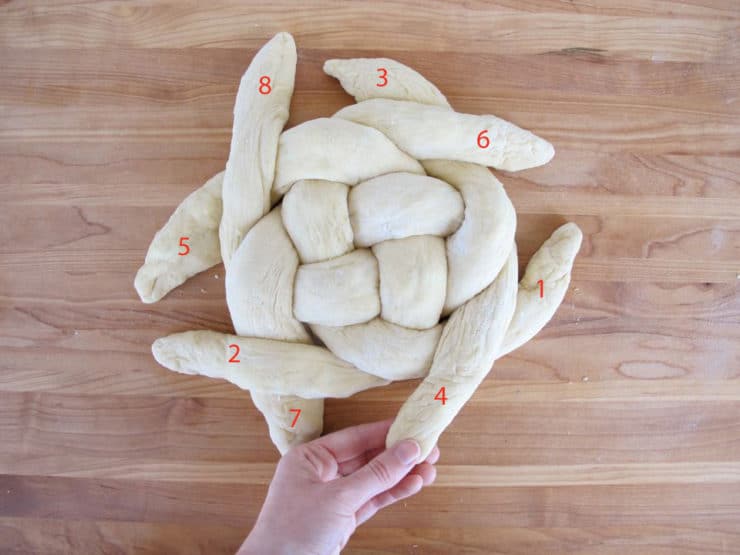
- Take strand 7 and twist it with strand 4.
- Tuck the twisted ends under the challah.
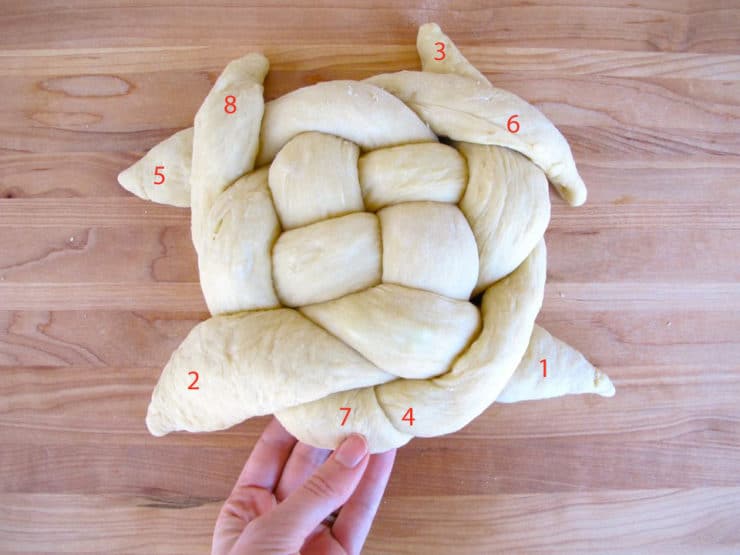
- Repeat this process with the remaining loose ends—twist and tuck 1 with 6, then 3 and 8, then 5 and 2.
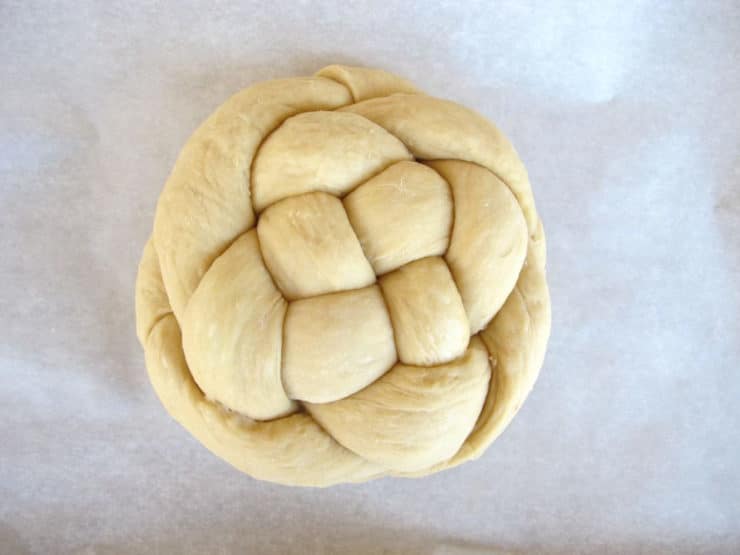
- When all of the loose ends are twisted under, gently plump the challah into a nice, even round shape.
- After the round has been braided, place it on a baking sheet lined with parchment paper. Preheat the oven to 350 degrees F. Let the braid rise 30 to 45 minutes longer. You’ll know the dough is ready to bake when you press your finger into the dough and the indentation stays, rather than bouncing back. While this challah rises, you can braid the other half of the dough in the same way, or you might choose a different braid for your second challah. No matter which way you braid, you can conceal the apple pieces inside the strands using the same method described above. Your second challah will rise as the first one bakes.
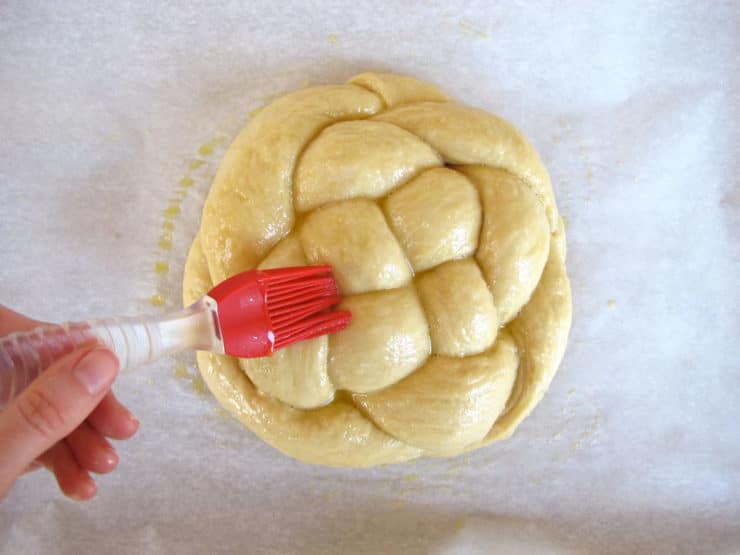
- Prepare your egg wash by beating the egg, salt and water till smooth. Use a pastry brush to brush a thin layer of the mixture onto the visible surface of your challah. Reserve the leftover egg wash. Sprinkle the top of the challah with 1 tbsp turbinado sugar, if you wish.Each challah needs to bake for about 45 minutes total, but to get the best result the baking should be done in stages. First, set your timer to 20 minutes and put your challah in the oven.After 20 minutes, take the challah out of the oven and coat the grooves of the braid with another thin layer of egg wash. These areas tend to expand during baking, exposing dough that will turn white unless they are coated with egg wash. Turn the challah around, so the opposite side faces front, and put it back into the oven. Turning it will help your challah brown evenly—the back of the oven is usually hotter than the front.The challah will need to bake for about 20 minutes longer. For this last part of the baking process, keep an eye on your challah—it may be browning faster than it's baking. Once the challah is browned to your liking, take it out and tent it with foil, then place it back in the oven. Remove the foil for the last 2 minutes of baking time.Take the challah out of the oven. At this point your house should smell delicious. Test the bread for doneness by turning it over and tapping on the bottom of the loaf—if it makes a hollow sound, and it's golden brown all the way across, it’s done. Because of the apples in this challah, it may take a bit longer to bake than your regular challah recipe. Err on the side of letting it cook longer to make sure it's baked all the way through. You can also stick an instant read thermometer in the thickest part of the challah-- when it reads 190, it is baked all the way through. Let challah cool completely on a wire cooling rack before serving. Bake the second challah in the same way.


NOTES
Nutrition


Turned out awesome. Thank you for the recipe. Braiding takes a lot of time but I suck at braiding. Gave it out to 10 people all gave A+ review.
Oh my gosh, this was so amazingly good. My daughter declared it the best baked thing she’s ever had and my husband declared it bakery-level good. Just delicious, even if mine didn’t turn out quite as pretty.
The best Challah I’ve made!
I’ve always struggled with making challah that is as light and fluffy as one found in a bakery but this recipe resulted in one that could challenge the best of bakers. It was slight, fluffy, and scrumptious. I did not proof the dough in the oven but instead did 2 rounds of 1 hour proofs, each time covering the bowl with a damp towel. I made this entire recipe into a 6 strand round challah and put 1/4 cup of finely diced apples into each strand. After braiding the challah I let it sit for 30-40 minutes before putting in the oven and continuing with the directions as written. The dough did split but I thought it looked light golden treasure peaking out of the bread and didn’t mind a bit.
This recipe is going into my book and I will be using it for years to come.
So happy you enjoyed it!
Made this for the chag .Doubled the recipe and made 4 challahs with. I used high gluten flour which made it sticky to handle ,It was still very delicious and a big hit . I will make again and use all purpose this time . Thanks for the instruction on how to make it so pretty .
Mine didn’t turn out quite as pretty as yours (the tail ends kept sticking out as it was rising and then pulled out again as it was baking and the seams split showing a bit of the apples) but it was DELICIOUS!! As my father used to say about my earlier cooking days (in his Brooklyn accent), “Don’t tell em your mistakes. they’ll nevah know!” Everyone LOVED it! It ws first time making challah and I’m sure the ‘art’ of making it will get better as I go. Thank you for an EXCELLENT recipe!
It definitely is an art form and takes practice to master. So happy you had great results!
this challah was amazing! What an enjoyable holiday activity to bake with my daughter. Makes amazing challah french toast afterwards.
As a one cook by it you our instructions & video made it really easy. Tasted wonderful! Made a gluten free, lactose free version too! Thanks.
Glad to hear it! Please share your gluten free version here if you don’t mind, I’m sure it would be useful to other readers.
Made it today. Wonderful instructions and photos. Turned out perfect! Will definitely be checking out other recipes.
This was fabulous!
A huge hit and I put a crumb topping on it!
I was going to try that – Now that I know someone else did, will definitely do it this year – thanks for the suggestion
Hello shana tova!
I was wondering how do you store this type of challah especially since it’s got apples ?
Thank you for the recipe i made it it’s delicious! Happy New Year!
I would recommend refrigeration for longest shelf life. Glad you enjoyed it!
I made this yesterday – first time I’ve made a challah. OMG. It was so good, and although it took a lot of time, was well worth it. Thanks for a great recipe. Happy New Year!
My father’s mother was a Mennonite from southern Russia. She was the best cook I’ve ever known. She would have loved loved loved the attention to detail In your recipe and the love of cooking that shines through it. You’ve brought back wonderful memories and made me smile – ear to ear.
Thank you Paula! That’s nice to hear. I really do love sharing these techniques, and I do it from the heart.
I use this recipe every year! I love it. I use bread flour (makes fluffier bread) and you don’t have to use apples. For my son’s kindergarten class last year, I made the apples and honey challah for the teachers. For the kids, I stuffed the challah with chocolate chips. The cinnamon and sugar went great with both versions. I even tried stuffing with rainbow chips. Don’t do that! The rainbow chips melt and leak purple. Chocolate chips were a great variation. They reminded me of French chocolate croissants.
Wonderful recipe and great instructions! I make this every year – I have some rising right now. Shanah tovah!
Amazing, a show stopper! Your instructions are great and it’s delicious.
Yay! Shana tova!
after braiding – do you raise it in the oven while it’s preheating??
or just leave it out on the counter uncovered?
No! Raise on the countertop for the final raise. Definitely not in the preheating oven.
Thank you for the easy-to-follow directions!! I have a challah recipe from my step daughter but I didn’t know how to make round shape. Your site helps me a lot!!
You’re welcome!
Can I make with instant yeast?
Yes. 1 package active dry yeast (1/4 ounce or 2 1/4 teaspoons) = 1 2/3 teaspoons instant yeast
The apple honey recipe looks great. I’m looking forward to making it.
could the challah be made without apples? Or with raisins added? Thank you!
Yes, and yes.
Hi Tori – do you recommend bread flour or regular all-purpose flour for this recipe?
All purpose. Unless explicitly stated, all of my baked recipes call for all purpose.