
A few months ago I wrote up a short post on a new food “trend” with ancient roots – fermentation. Many of you expressed interest in learning more about the process. I’ve never done any fermenting at home before, but your interest inspired me.
For my first fermentation adventure, I decided to take a crack at homemade sauerkraut. Together with my kitchen assistant Gary, who happens to be a farm trained, do-it-yourself culinary school grad with lots of fermenting experience, we fermented a crock of cabbage to make homemade sauerkraut.

iStock.com/vertmedia
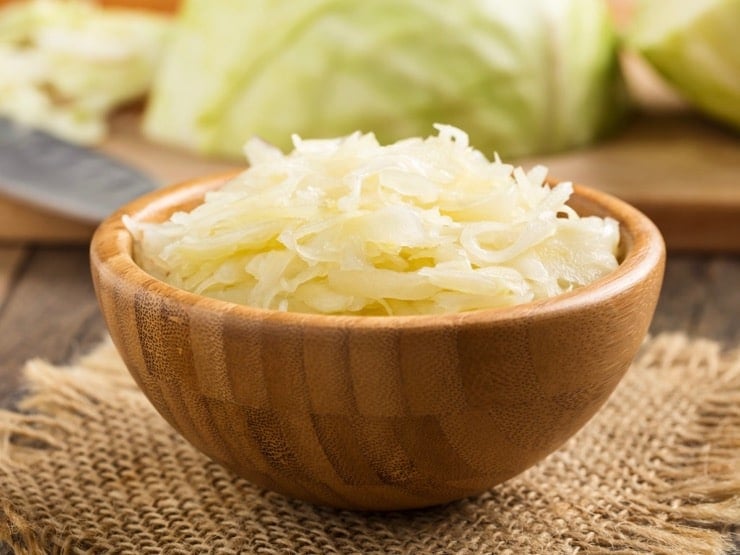
Sauerkraut, a combination of the southern German and Austrian words “kraut,” meaning cabbage, and “sauer” meaning sour, literally translates to sour cabbage. It is created by fermenting cabbage over a long period of time.
There are several health advantages to homemade sauerkraut. It’s high in enzymes and vitamin C, both of which are lost during the heating and pasteurization of store-bought sauerkraut. It’s also low calorie and easy to digest.
As I was learning about the fermentation process, I became curious about the difference between fermenting and pickling. The most obvious difference is that fermentation creates acid, while pickling requires an added acid, for example vinegar. Both serve as a preservation technique, the science is just a bit different.
Sauerkraut takes about 4-6 weeks to make. Since it’s a “hurry up and wait” kind of thing, I am documenting the adventure here on my blog. I will walk you through what we did, step-by-step, so you can try it at home.
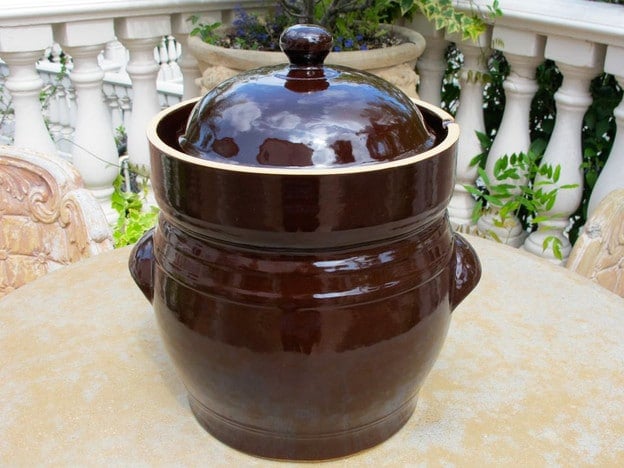
First thing’s first– I bought a crock. A big, honking fermentation crock. It really looked so much smaller online. At first, I was dismayed.
After the initial shock wore off, I decided the size was a plus… it means you can make a large batch of fermented veggies at the same time. With the amount of time it takes to ferment, why not make a big batch that will last you several months? And I do mean a big batch. We sliced up enough cabbage to create a decade’s supply of sauerkraut. Seriously.
If you too would like to be the proud owner of a ginormous fermenting crock, here is the one I’m using. Keep in mind that it’s pretty heavy/substantial and kind of awkward to handle. It also comes in a smaller size, which is likely a lot more manageable. There’s an even larger size, but that would require some serious fermentation love.
You will also need a set of weights to help weigh down whatever you are putting in the crock. We used 10-15 liter stone weights; for a smaller crock, use 5 liter weights.
Crocks can be a bit pricey, so if you’d rather not invest in one, there are some less expensive options. You can use just about any sterilized container, taller than it is wide, made from enamel, ceramic or food grade plastic.
Once you have chosen your vessel, find a plate that will cover the majority of the cabbage. To make sure that the cabbage stays submerged in the brine, a key component of fermentation, you will need to make a weight to place on top of the plate.
The simplest option is to place plastic storage bags filled with salt water on top. You can then cover your container with plastic wrap or a lid.
Once we cleaned out the crock, we got to work. With Gary and Ashley’s help and experience, I felt more confident in outlining the process for you here. I’ll check back with you in a few weeks and let you know how our sauerkraut turned out.
Meanwhile, here are a few books that helped us learn the basic fermentation process:
Preserving Food Without Freezing or Canning
Since I’m fairly new to fermentation, I decided to start with a basic sauerkraut, which only requires salt, cabbage, and water. Spices can be added to make a flavored sauerkraut or kimchi. If you feel like experimenting, the same method can be used for other vegetables, including cucumbers, onions, beets, carrots, kohlrabi, red cabbage, and rutabaga. You can even combine a variety of vegetables in a kraut medley if you’re really feeling adventurous.
We are a participant in the Amazon Services LLC Associates Program, an affiliate advertising program designed to provide a means for us to earn fees by linking to Amazon.com and affiliated sites. As an Amazon Associate I earn from qualifying purchases.

How to Ferment Cabbage and Make Sauerkraut

Ingredients
- Fermentation crock
- Cabbage - amount varies based on your needs we used 3 large heads
- Large mixing bowl
- Kosher salt
- Kitchen scale
- 2 fermentation weights
- Medium saucepan
Notes
Instructions
- Start by boiling 6 cups of water with 1 tbsp of kosher salt till salt is dissolved. Allow to cool.
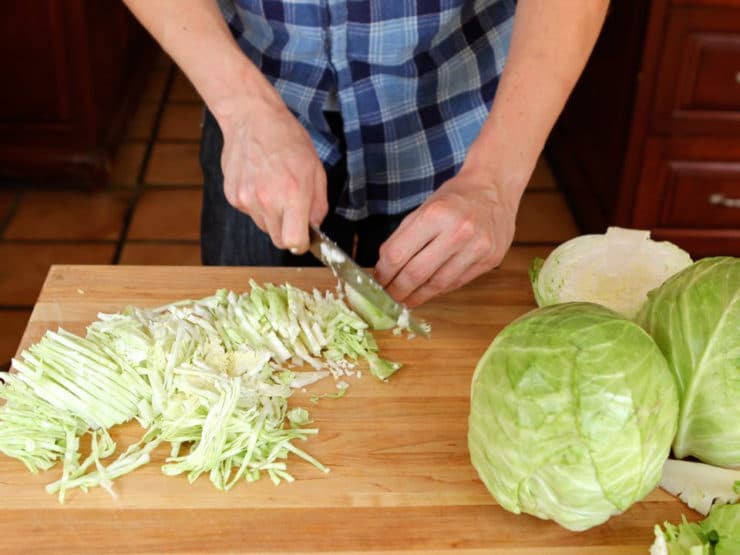
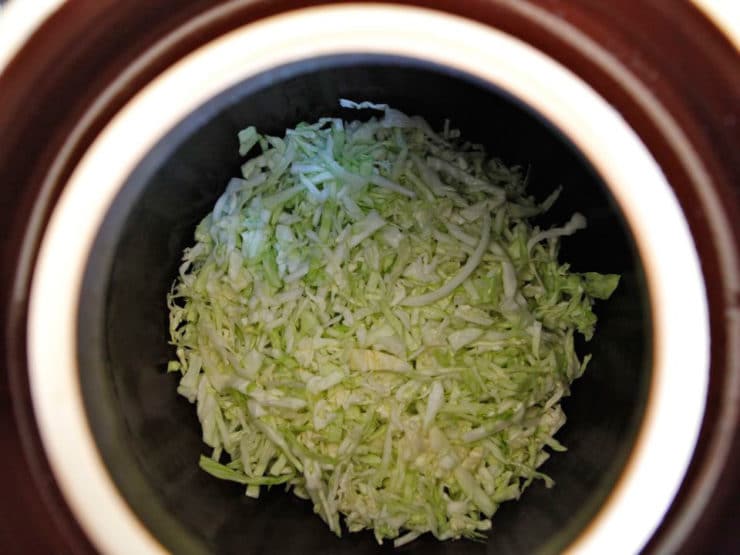
- Meanwhile, clean your cabbage and pull off 5-6 of the external whole leaves, set aside. Shred the remaining cabbage - for instructions on shredding cabbage, click here.

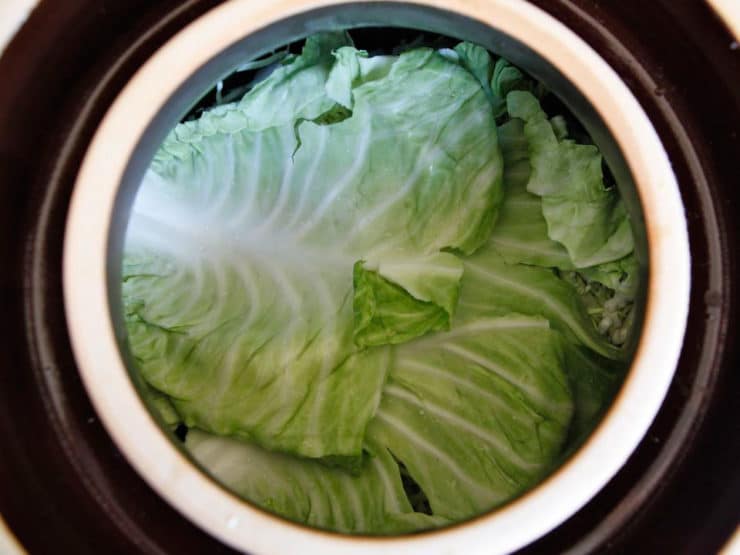
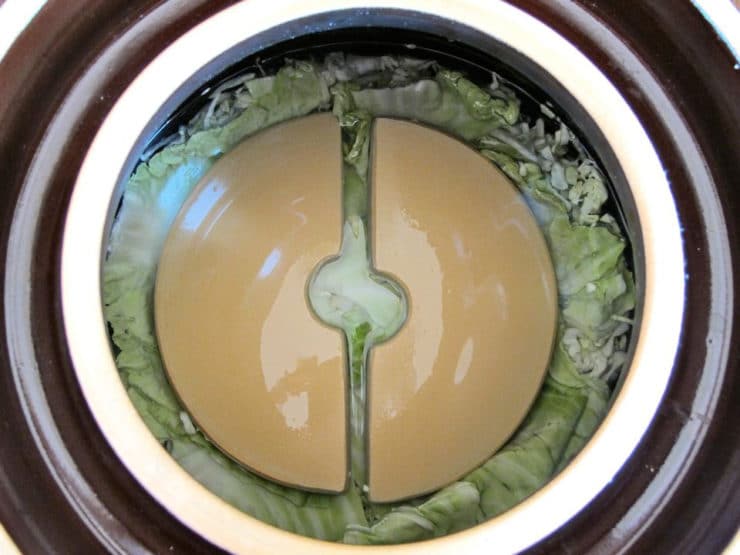
- Cover the bottom of your fermenting pot with 3-4 whole cabbage leaves. You will only need two layers of whole leaves in the crock, one on the bottom and one on the top.
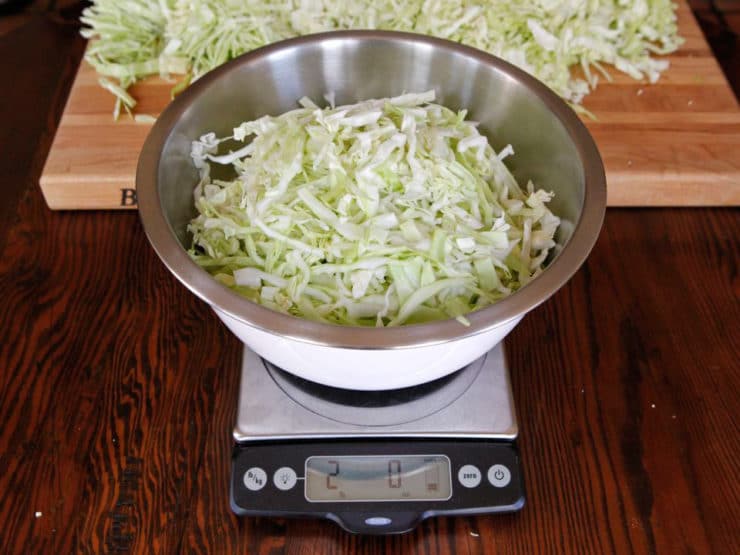
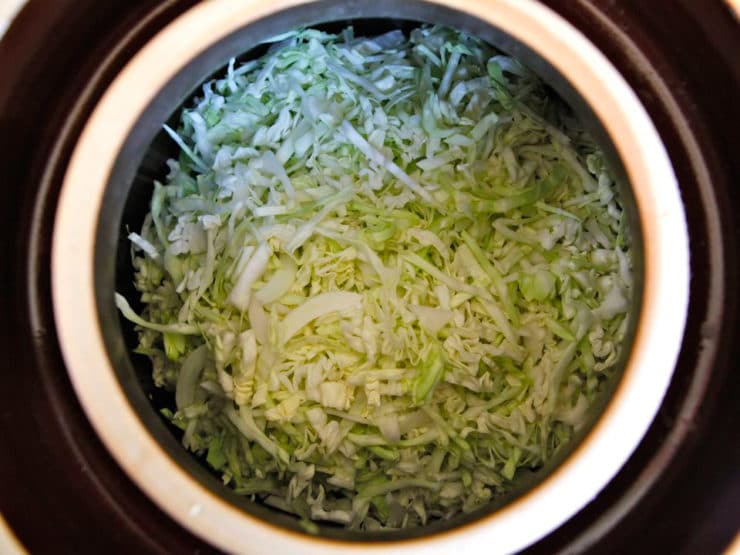
- You will need to salt the shredded cabbage before adding it to the fermentation pot. We found this is easiest to do in smaller batches, to keep the salting amount consistent and mixed throughout the fermentation crock. Measure out 2 pounds of shredded cabbage into a bowl (we zeroed our scale with the bowl on, then measured a 2 pound batch).
- Use clean hands to toss the shredded cabbage in the bowl with 1 tsp kosher salt.
- Place the salted, shredded cabbage into the fermentation pot on top of the whole leaves.
- Measure out another 2 pounds of the shredded cabbage and mix with 1 tsp of salt, then add to the fermenting pot. Repeat this process in batches until all of your shredded cabbage has been salted and added to the pot. Pack down the cabbage tightly, but do not crush the cabbage strips.
- Cover the top of your shredded cabbage with remaining whole cabbage leaves. These leaves will help to collect the yeast that may accumulate at the top of the crock, and can easily be removed and discarded after the fermentation process is complete.
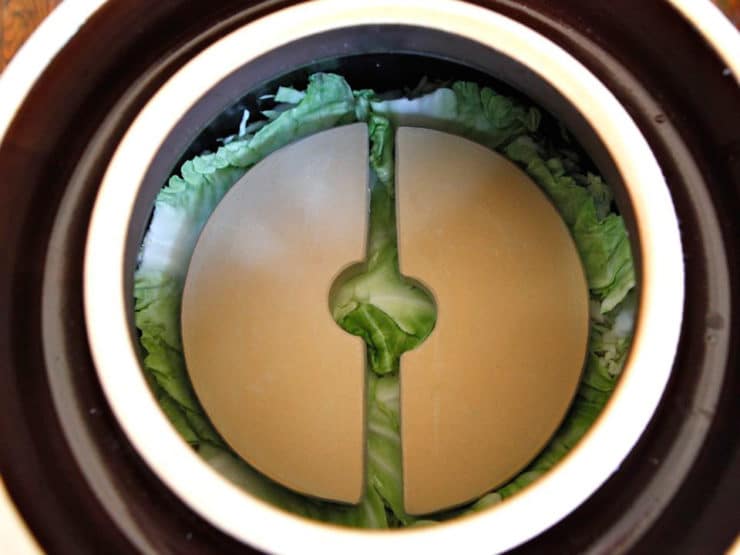
- Place stone fermentation weights on top of the whole cabbage leaves and press down, but not too hard. You don’t want to damage the cabbage.
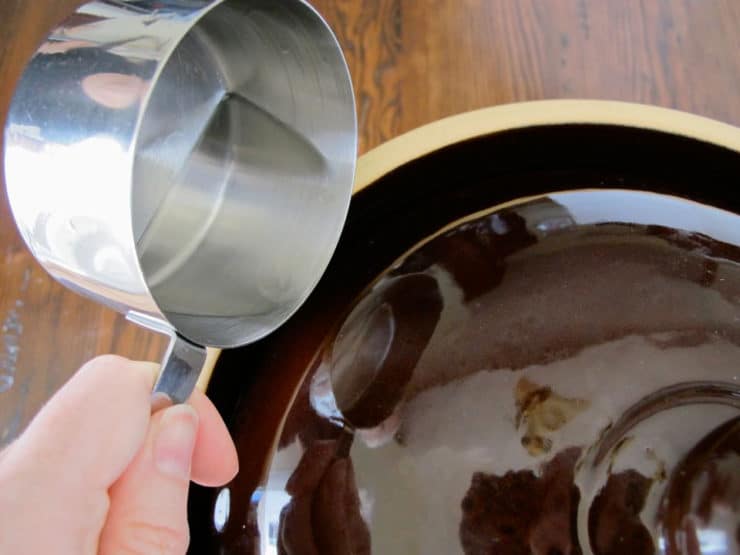
- Cover the fermentation crock with a lid. The salt will naturally draw some water out of the cabbage. After a few hours, check to see how much liquid has accumulated inside of the pot. It should be about 1-3 inches above the cabbage. If this hasn’t happened, add cooled, boiled salt water to the pot. We ended up needing about 3-4 cups of salt water. Pour it over the cabbage till it is submerged (you may not need to do this if your cabbage has created enough natural liquid). Reserve the remaining salt water.
- Once the water level is where it should be, cover the pot and fill the channel around the lid with cooled salt water to create an airtight seal. This will keep oxygen out of the pot. Once this has been done, do not open the fermentation pot for at least 2 weeks. No peeking! Reserve the remaining salt water brine in a sealed container in the refrigerator; you will need it over the course of the next several weeks.
- For the first few days, store the pot in a warm place, between 68 and 72 degrees. After a few days have passed, listen for a fizzy, bubbling sound coming from the pot. This is good and means that fermentation has begun. If you don't hear anything, don't worry, it may just mean that the walls of your crock are too thick for sound to travel through. After fermentation has started, move the pot to a cool place, between 59 and 64 degrees, for the remaining fermentation time. If you don't hear anything after 1 week, go ahead and move the crock to a cooler location without waiting for it to sound bubbly.
- Check your water channel regularly to make sure that it's filled with salt water. At times, the pressure which builds up inside the crock can cause suction, which pulls the channel water into the crock (it happened to us a few days in). If this happens, pour more of the salt water into the channel to keep it full.
- After the first 2 weeks, check your sauerkraut’s brine level and skim off any yeast or bubbles that have gathered near the top. Be sure that your cabbage is always submerged in the brine. Fermentation breeds strange sounds and smells, so try not to worry about those. Close the fermentation crock again and refill the channel with salt water.
- Your sauerkraut should be ready in about 4-6 weeks. You will know for sure once bubbles no longer appear in the liquid. The longer you allow the cabbage to ferment, the tangier the flavor will be.


UPDATE: Our kraut turned out great! It took about 5 weeks to achieve the flavor and texture I was going for. This sauerkraut was so much better than the store-bought kind… it was salty, pungent and the lactic acid made it tingle on my tongue. It’s delicious and way cheaper than store-bought probiotics. Good for your gut, good for your tastebuds… can’t beat that!
Have you tried fermentation before? Did it turn out the way you hoped it would? What is your favorite fermented f


I’m trying to make sauerkraut for the first time. I have a 3 gallon crock shredded 9 heads of cabbage layered it in the crock with salt, placed a plastic lid with rocks on top, I left it for about 2 weeks checked it and it looks to have black spongy mold on top, it’s this normal? Thanks for your time Sharin
Hi Sharon, yeast growth (white) can be normal. Darker mold on top of sauerkraut usually appears due to oxygen exposure, or the cabbage being improperly submerged. The prevailing advice now seems to be that for food safety, it’s probably best to toss the whole batch if there is any sign of visible mold. To avoid surface mold growth in future, keep the cabbage submerged at all times with weights, making sure the liquid is always above the cabbage — and make sure you’re fermenting it in a cool corner of the home.
A fascinating site. I look forward to spending more time on it. Thank you.
Louise
I live in a little house, but do have a basement / cellar. Do I have to leave my crock of completed kraut in the crock it was made in, or can I move it into jars and store in my dark, cool cellar? I remember my great-grandma having a big wooden barrel full of sauerkraut in her cellar, and I think she just dipped out of it when she wanted sauerkraut for kapusta! That method wouldn’t be as efficient for me… Thanks in advance for your answer!
Well explained method. However, unfortunately, after 4 weeks in a warm area, I still don’t have fermentation happening. My cabbage is a fresh as when I put it in. Weird. Any ideas why this would be?
Great advice for making kraut in a crock. I’ve been using a crock for about 4 years now and I’ve tried different approaches to make delicious sauerkraut. One thing that can be done instead of using water is to let your cabbage and salt make its own brine before putting in the crock. I cut my cabbage into thin slices, put into a large bowl, add about a 1/4 cup salt and use a hand held chopper to chop the cabbage. The more the cabbage releases the stored water the more brine and easier to chop it becomes. I use about 6 large cabbage heads, close to 3/4 cups of salt (I taste the cabbage as I go to check the salt taste to make sure it’s not too salty), and about 3/4 cups of vinegar. Once my cabbage has made its own brine with all my ingredients I place it in the crock. I use a sauerkraut pounder to pack in the crock because you don’t want too much open space to allow bacteria to grow before adding the weights on top. Make sure brine is above the weights, close the crock, add water/salt mixture to the seal and wait 4-6 weeks before opening, opening allows bacteria to enter. After I open my crock, I add the kraut/brine mixture to clean jars leaving 1/2-1 inch head space, use the pounder again to pack jars, and put quart jars in a water bath for 20 minutes. Make sure jars seal when cool, I put my jars in a cool dark place for storage. Kraut should last over a year on shelf as long as seal remains in tack.
No water needed, just salt the veg, squeeze/massage hard it a couple of time over 3 hours, pack into jars and weigh down, so that only cabbage juice forms the liquid, there will be enough to submerge the veg. Then ferment at room temp for a few days, then store cool and enjoy. Adding lots of water just dilutes the flavour (flavor in some languages ).
Pretty good advice.i have been making krout 4 about 50 years & your process is just about right on. I ferment mine in an 8 gallon plastic food grade bucket. Works very well & is lite. Make 2 of these buckets every year. A great item is sauerkraut cole slaw like pepper slaw,no mayo delicious as side. Godspeed
Hi,
The recipe calls for 1 tsp. of salt for every two pounds of cabbage. Most other recipes that I looked at require two tablespoons of salt for every two pounds of cabbage. I would prefer the sauerkraut less salty, but there is a substantial difference between recipes. I would appreciate your comments.
Thanks.
Hi Peter, Tori’s assistant Ashley here. I cannot attest to the other recipes, but this one has always worked well for us and lots of other readers have had great results.
Sounds great! Thanks for sharing. I have started making sauerkraut but made a silly mistake of opening it a few times in the first few days of fermentation. It’s bubbling now (4th day) and I won’t open it again. Do you think it will be fine with the short glimpses of oxygen coming in?
Add water? The reason you have to add water is because you haven’t bruised, massaged or crunched the cabbage which initiates the release of brine. If you were to do this, there would be enough brine to cover the cabbage and you wouldn’t have to water down your kraut.
I’ve used this process twice now, and getting ready to do it for the 3rd time. I leave it in the low traffic area in my house. I don’t have the ability to switch it to different temperatures, but in about 4wks (give or take) it’s good to go for me. Afterwards I can it to keep and to give out. People I give jars to rave about it. It is not like store bought. Much more tangy and firm. It has become my favorite.
What’s the difference between eating old shredded cabbage from the refrigerator, and brine cabbage?
I’m serious because it looks and smells the same . There is no yeast or mold involved.Except its crunchy.
I have been fermenting cabbage and many other things my entire life. I won’t eat the store bought stuff. It is terrible and has no health benefits at all. Just a suggestion for people wanting to try a different flavor of sauerkraut. I shred fresh horseradish root and chop habanero peppers. I mix about 5% of the total weight in to the cabbage and ferment that. It is amazing. People are always begging for handouts.
Great article! Just curious, since you’re not boiling this to can and store it, how do you keep it for eating the next few months?
You store the excess in the refrigerator, unless you have a colder cellar or basement. The cooler temperatures minimize/cease further fermentation. If you kept it at room temperature, it would continue to ferment and make it more sour. At some point, it would be too sour to eat for most folks. I bought a 5L and a 2L. My first couple batches are with the 2L just to understand things better and then I’ll switch over to the 5L and use my 2L as a pilot crock for “new recipes”.
Hi! My daughter is experimenting with fermenting (she regularly makes kombucha and kefir) and started a crock of cabbage about 3 weeks ago before leaving for college. This morning I cleaned off the top layer because it was growing either mold or yeast, and had an unpleasant odor.
It’s only been fermenting 3 weeks. Would it be recommended for me to add brine and allow it to continue to ferment? The flavor at this point is not good. Or should we toss this batch and start again?
It may be fine, fermentation can be stinky especially in the beginning of the batch. Some batches tend to be more smelly than others. If the smell is similar to the smell of human sweat, dirty socks, sulfurous, or “goaty,” then it’s likely a normal smell that will dissipate with time as the ferment progresses. However, if it smells unmistakably like rotten or putrid food, you should toss it. As far as flavor goes, by “not good” I’m not sure what you mean. Does it taste rotten? Or just not tangy enough? If it’s an issue of tang, you can let it ferment a few days longer, then sample again. If you don’t notice any increase in tang, that means the fermentation sugars have been used up and this batch won’t get any more sour. For your next batch, you can add a bit of sugar to the batch – about 1/2 teaspoon for every quart – which will result in higher levels of lactic acid in the fermentation. If it tastes and smells rotten, trust your senses and scrap this batch. A batch will occasionally go bad, but it’s rare.
My wife and I decided to make kraut we cut the Cab mixed salt in each batch and put it in the crock. When the crock was full we put a plate and wieght and top of the plate. It bubbled for 10 days and quit so we waited be a few days and then checked it, we were not sure why it only bubbled 10 days but we tasted the mixture it seemed to be sauer so we put in jars. My question is why so little time or did we cut the process short?
I’m curious about the directions not “stomping” the shredded cabbage. I have one of the nicer crocks and the directions that came with it was to stomp, mash, beat the cabbage. Why the directions to be gentle with it?
Carol, stomping the cabbage will make a softer, mushier end product. We prefer our sauerkraut with more texture.
Why not a glass jar? You mentioned everything but :).
Glass works great too!