This post may contain affiliate links which won’t change your price but will share some commission.

Marble cake is a wonderful old-fashioned baked good, as pretty as it is delicious. The idea of marbling two different colored batters into a cake originated in nineteenth century Germany, then made its way to America with German immigrants before the Civil War.
Marble cake has a Jewish history as well… in fact, the first American recipe for marble cake showed up in a Jewish cookbook!
Here is my favorite method for marbling cake. It produces a nice, even marbling result, and it’s really simple. It will work with any marble cake recipe, as long as the recipe has two different batter colors. Give it a try! 🙂
For my Marble Cake recipe, click here.
How to Marble a Cake
Learn how to marble a cake using two different colored batters, a checkerboard pattern, and a knife.
Servings: 1 cake
Ingredients
- 1 light colored cake batter
- 1 dark colored cake batter
Instructions
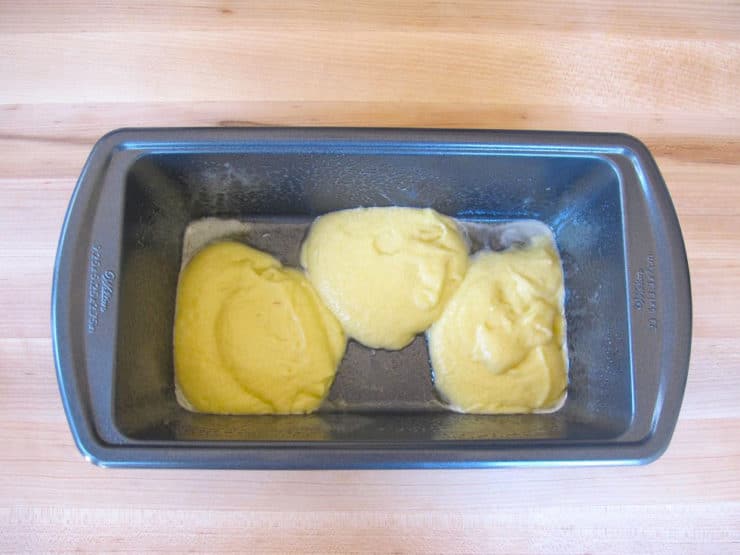
- Place your colored cake batters near your baking pan. Take 1/3 of the first colored batter and scoop it with a large spoon into your pan in a down-up-down pattern. If you're using a small loaf pan (as shown here), use three large dollops of batter. If you're using a round tube or bundt pan, drop dollops of batter in the same pattern--down, up, down-- all the way around the pan.

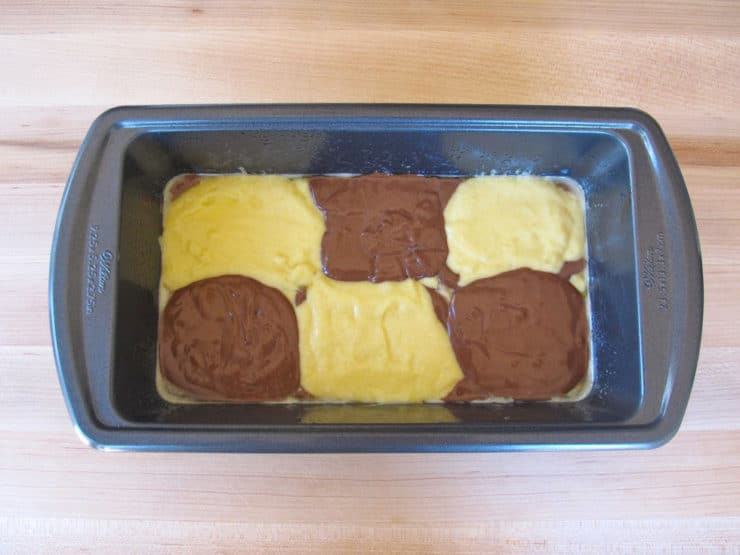
- Take 1/3 of your second colored batter. Scoop a dollop of the batter into each of the empty spaces to create a rough checkerboard pattern on the base of the pan. 1/3 of your total batter should be used at this point.
- With the second 1/3 of the batter, create a second checkerboard pattern on top of the first. Alternate colors-- meaning, if a light colored square is on the bottom, put a dark colored square on top.
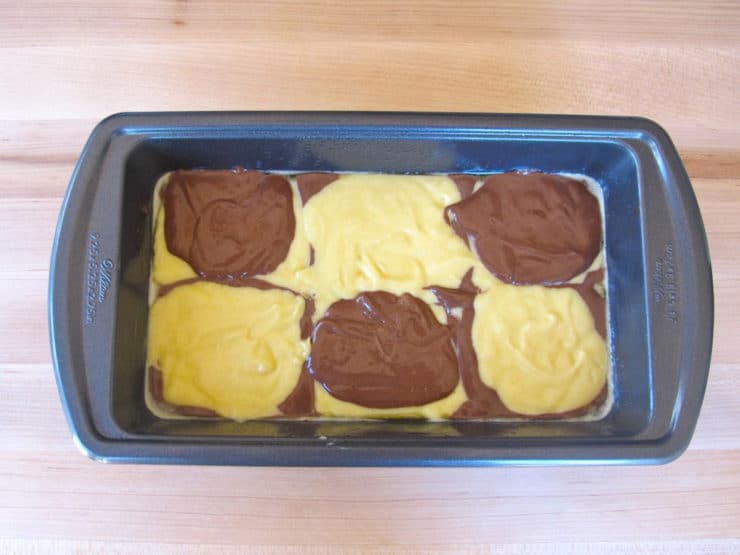
- Repeat the pattern for a third and final layer with all the remaining batter. You should have three checkerboard layers in your baking pan now.
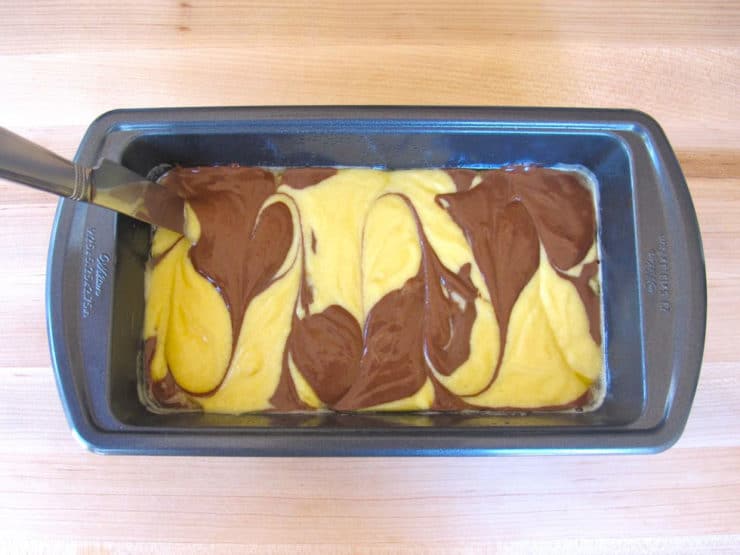
- Take your butter knife and swirl it through the batter, making rounded vertical zig-zags from one side of the pan to the other.
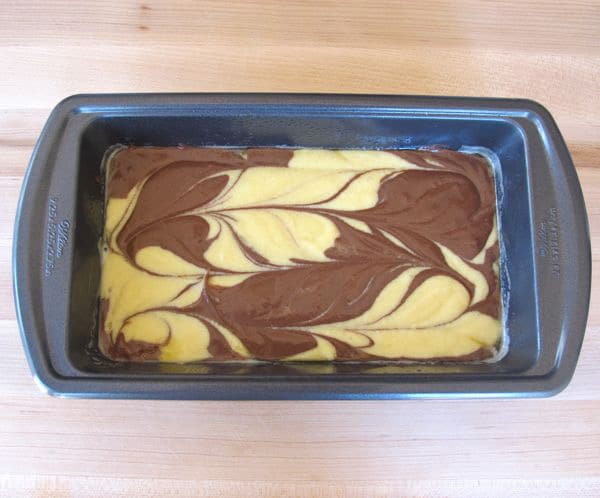
- Wipe the excess batter from the knife. Repeat the swirling pattern in the opposite direction. If you're using a loaf pan, make long horizontal swirls. If you're using a round tube or bundt pan, swirl opposing zig-zags all the way around the pan to create a chain shaped swirl.Resist the urge to make lots and lots of swirls-- the more you swirl, the less the cake will look marbled, and the more it will look like a mish-mosh when you slice it.
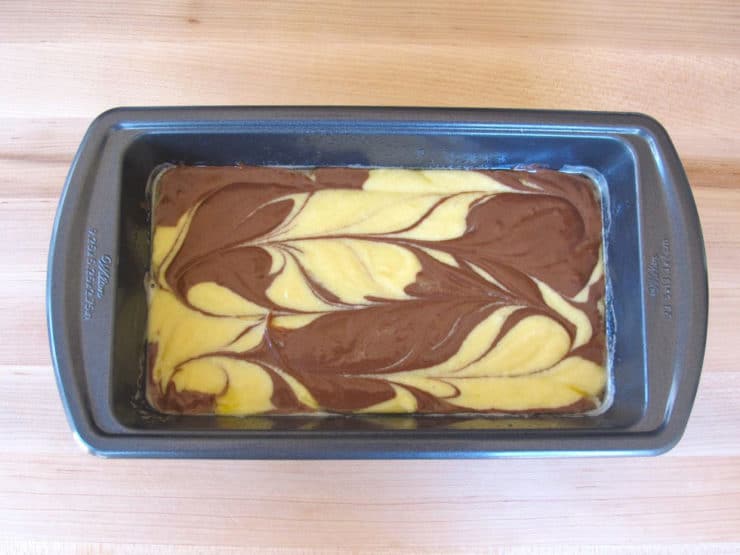
- Now your cake is marbled and ready to bake! When it's baked, cooled, and sliced, you'll see nice, evenly marbled patterns. Your cake will have its own unique variations. That's what make marble cake fun... you never know exactly what it will look like inside! 🙂 For my marble cake recipe, click here.


NOTES
You will also need: baking pan for cake batter, large spoon, butter knife.
Nutrition
Nutrition Facts
How to Marble a Cake
Amount Per Serving
Calories 1902
Calories from Fat 126
% Daily Value*
Fat 14g22%
Saturated Fat 8g50%
Sodium 3763mg164%
Potassium 242mg7%
Carbohydrates 426g142%
Fiber 6g25%
Sugar 223g248%
Protein 19g38%
Calcium 1091mg109%
Iron 10.7mg59%
* Percent Daily Values are based on a 2000 calorie diet.

tried this recipe?
Let us know in the comments!
Note: Nutrition facts above refer to yellow cake batter for 1 whole 9-inch cake.


This is a lovely marble cake that i have been looking for.Juicy and soft. My husband and my son luv this cake. I have been baking this cake every week (now for the 4th week)!I am begining to think that my famous fruitcake is no.2 now in our fav.list. Thanks for the wonderful recipe.Excellent.
you are the best Tori!!!
Really helpful thankyew sooo much 🙂
great idea! i’ll try it tomorrow! i hope it’ ll have a lovely pattern
This cake looks & sounds delicious! I can’t wait to try it out!I just stumbled across your beautiful blog – I look forward to popping back soon for some more lovely inspiration!
I made the marble cake….and it was perfect! Thank you so much for posting the recipe.
So glad you liked it Juliet!
This cake is fantastic!! Thank you for sharing such a wonderful recipe! It is so moist & delish!
You’re welcome Tiffany 🙂
I grew up eating the best cakes and breads..our father was the owner of a jewish bakery in The Bronx, then Long Island, NY.
I had been searching for the “ultimate” marble loaf..I found it in your recipe..During the holidays, the cake, was a favorite among friends and family. Thank You for bringing back the memories..Loved the vanilla pudding add on.
That’s great to hear Susan!
Thank you! I was nervous to try marbling, but thanks to your instructions, it was very easy.
So easy and yet such a beautiful effect!! Thanks for sharing.
What a beautiful marble cake! Thank you for the detailed instructions and photos.
Love your profile photos!
Angie
woow…sounds scrumptiously tasty…
first time here..love your space..
gorgeous posts with inviting cliks..
Am your happy subscriber now..:)
do stop by mine sometime..
Tori,
I couldn’t understand what you meant by “down up down” pattern in the instructions, but the photos were clear. This was a wonderful tutorial.
Good reminder on how to do this. I dont think I have done a marble cake for years!
Hope you are doing well! Just catching up with everyone after several hectic work weeks!
I’m a friend of Renny & Sharon. Congrats on your accomplishment on ur cooking show. He is so proud of u. I hope u don’t mind but I would love to try ur marble cake… It looks sooo yummy.
Thank you so much for the tutorial on how to get a good marbling effect 🙂 Love marble cake ! Congrats, your guest post got into Foodbuzz Today’ s Top 9 🙂
Hi first time here….great tutorial….just what i was looking for….
Great tutorial. I love marble cake. It’s just so fun to make and eat.
Tori, thank you so much for sharing your talent and recipe on my blog! I truly can’t wait to give your cake a try! xo
Such a pretty cake! I love marble cake…
Great tutorial!