
Pressure canning low acid foods can seem a bit scary, if you don’t know the process. Any pressure cooking process should be approached with caution, but if you take the time to learn the correct steps and safety procedures, it’s really not so difficult. In this step-by-step photo tutorial, I will walk you through how to pressure can low acid foods safely and effectively.

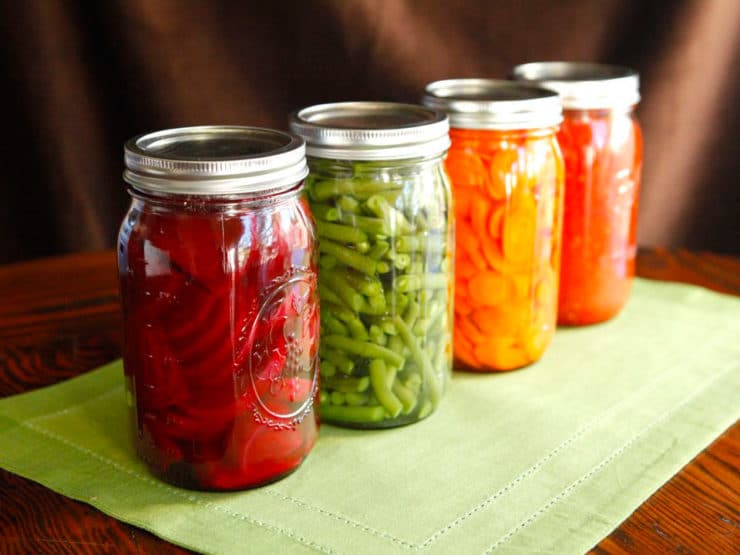
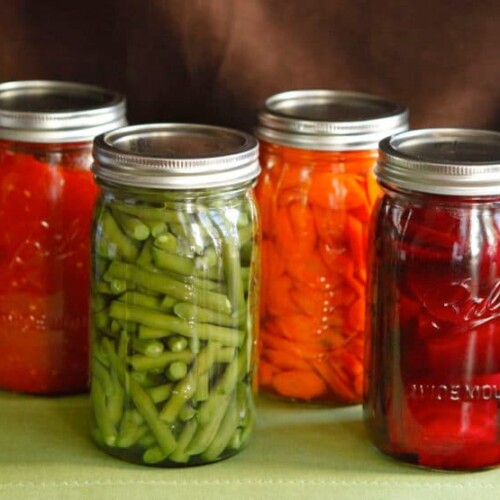
Last week, I covered canning fruits, pickles and preserves using the Boiling Water Method. Most vegetables do not contain enough acid to can using the simple boiling water method; they need the high heat of a pressure canner to safely ward off contaminants. For food safety, it is best to can vegetables using a pressure canner.
In addition to vegetable canning, I also pressure can my tomato products. There is some debate as to whether or not tomatoes are acidic enough to ward off contaminants on their own. Unless you have a stock of pH strips for testing acidity, it’s best to be safe and use a pressure canner.
You might come across recipes for tomato sauce that include a good dose lemon juice or vinegar, which increases their acid and makes them suitable for canning with the boiling water method. In my opinion that additional acid detracts from the taste of the tomatoes. I prefer the pure, clean flavor of pressure-canned tomatoes and tomato sauces.
Pressure canning is essential for low-acid foods. If you’re wondering which foods are considered high acid and which are low, it’s always best to keep a copy of a Ball Complete Book of Home Preserving handy. Lots of vegetables fall into this category, as do meat and seafood, if you’re feeling adventurous!
It is not advisable to can low acid food in a simple boiling water bath, because the boiling temperature is not high enough to kill off Clostridium botulinum, the bacteria that causes botulism. Low acid foods should be processed at a temperature of 240 – 250 degrees, which can be reached in a pressure canner set between 10 – 15 lbs. Every recipe should include the correct pressure poundage and time period needed for the type of food you are processing.
According to a document supplied by the USDA to the National Center for Home Food Preservation, “Empty jars used for vegetables, meats, and fruits to be processed in a pressure canner need not be presterilized.” This means that while your jars should be clean, you can skip sterilizing them in boiling water before you fill them with your product.
However, if you’re feeling super thorough and want to do the pre-sterilization, I’ve provided a link to my Boiling Water Method, which will walk you through the process step-by-step. Always use new canning lids, which should only be used one time.
Before you start, you will need to purchase or borrow a pressure canning pot. Do not use a regular pressure cooker; pressure canners are built larger with special inserts for canning.
Putting this tutorial together was somewhat tricky due to differences between pressure canner models and brands. I wanted to guide you clearly through the steps, but it’s difficult because each pressure canner is uniquely constructed. I decided the best way to illustrate the process was to use my own 16 Quart Pressure Canner and Cooker. Your model may vary in terms of process. While I have tried to keep the instructions general and somewhat broad, it is very important that you refer to your pressure canner’s specific instruction manual due to differences between brands and models.
Pressure canning can be dangerous if you don’t follow your manufacturer’s instructions carefully; pressure cookers and canners can explode if not used properly. Please use caution and proceed at your own risk. Even if you’re using the Presto Canner that I use, please read the instruction manual in addition to using my tutorial here. Always better to be safe than sorry.
Okay, enough caution statements. I don’t mean to scare you off of pressure canning; I just want to make it clear that it needs to be done carefully. Once you understand the process, pressure canning isn’t all that different from regular canning. It’s actually a terrific skill to have, particularly when your garden is overflowing and you want to save your veggies for the coming year. I’ve worked hard to put together a comprehensive tutorial here. I hope you find it useful!
Recommended Products:
16 Quart Pressure Canner and Cooker
Canning Jars – Quart, Pint
Ball Canning Lids – Regular and Wide Mouth
Canning Books (linked in “Research Sources” below)
We are a participant in the Amazon Services LLC Associates Program, an affiliate advertising program designed to provide a means for us to earn fees by linking to Amazon.com and affiliated sites. As an Amazon Associate I earn from qualifying purchases.
Home Canning - Pressure Canning Method

Ingredients
- Pressure canner
- 3-piece canning jars
- Wide mouth funnel
- Jar lifter
- 2 tbsp white vinegar optional, recommended
Notes
Instructions
- Before you start, make sure your hands and all of the tools you'll be using are very clean. According to FDA guidelines, while the jars should be clean before starting, they do not need to be boiled to sterilize before pressure canning due to the high temperature levels in the pressure canner. If you would prefer to boil and sterilize the jars prior to pressure canning, please refer to my previous post: Home Canning - Boiling Water Method.
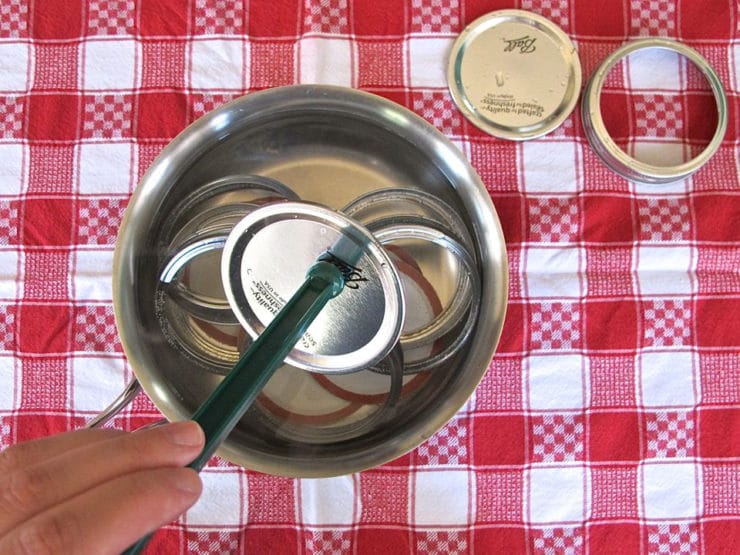
- Remove the lids and rings from your canning jars. If you are re-using jars, be sure that you aren’t using any with cracks or chips. Keep in mind that canning lids can only be used once, so don't reuse old ones-- buy fresh lids before you begin.
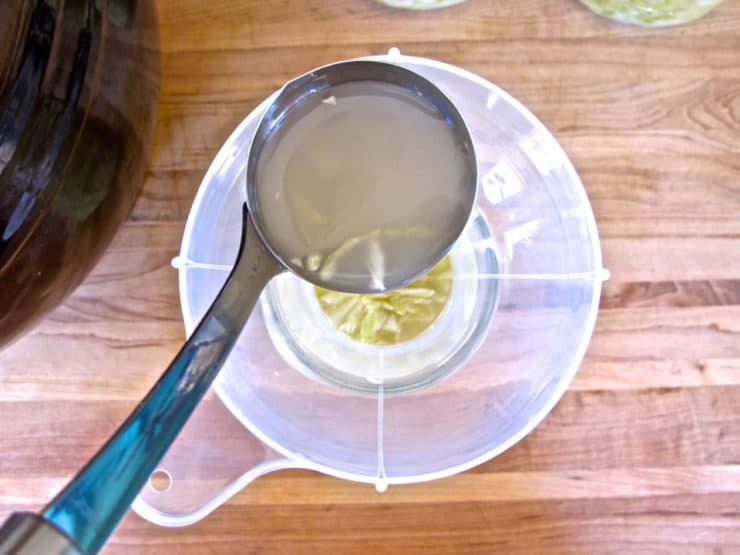
- Place the canning lids and rings into a small saucepan. Cover with water and bring to a low simmer for a few minutes. This will soften the sealing strips around the edges of the lids.
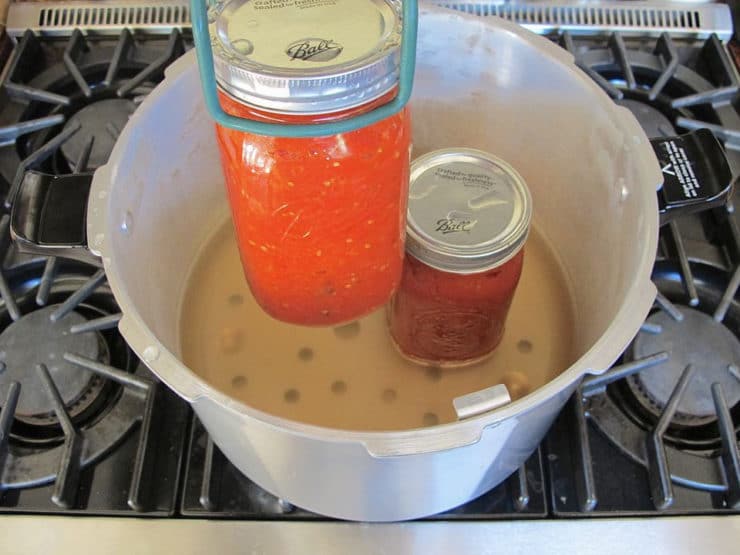
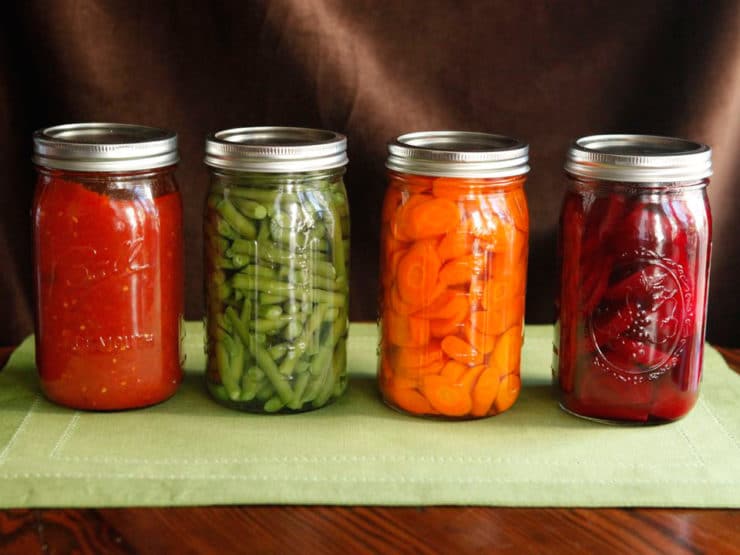
- Meanwhile, using a wide mouth funnel, carefully fill the jars with your product. Depending on what you will be canning, you will need to leave 1/2 – 1/4 inch of space at the top of the jar. Most recipes will specify what is necessary, but as a general guideline, most jams or jellies will need 1/4 inch, while pickles and thicker products will need 1/2 inch.

- With tongs or a magnetic lid lifter, remove the lids from the simmering water and place on a clean towel.
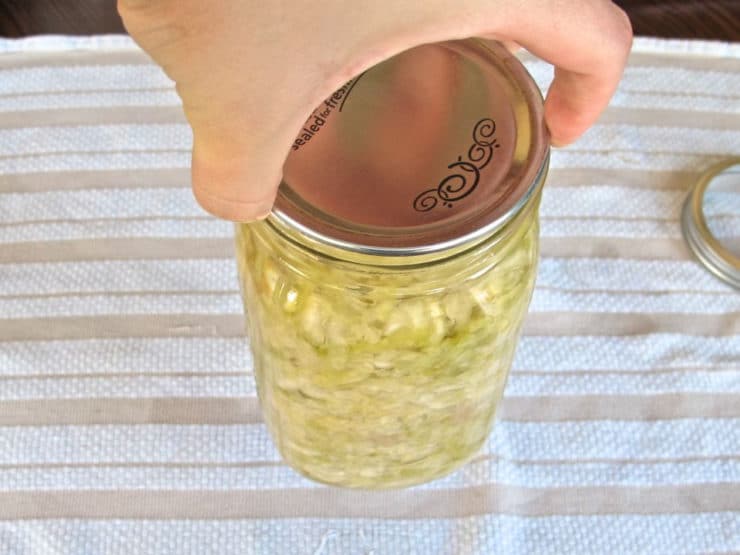
- Place the lids with warm seals directly onto the jars and seal with the circular bands using just your fingertips so that they are secure, but not too tight. Wipe any spills or excess product from the lid and sides of your jars using a damp cloth.
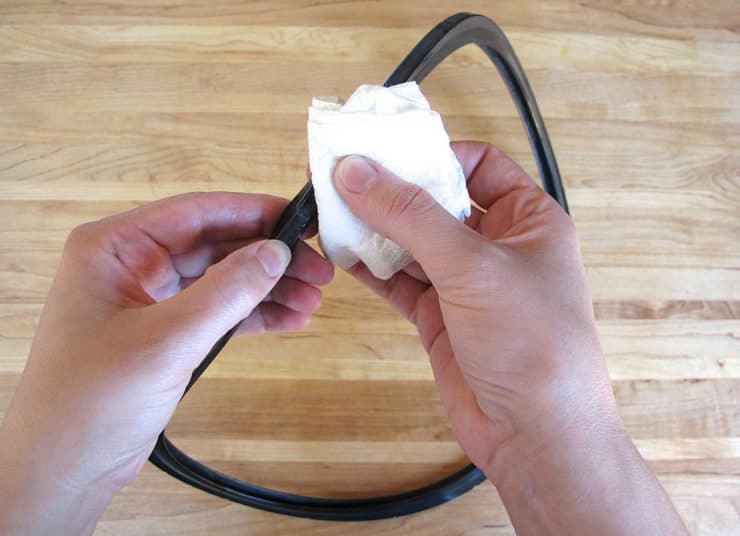
- Before you start canning, be sure your pressure canner has been thoroughly cleaned. Also check that the sealing ring, the black overpressure plug on the cover and the white compression gasket are not cracked or deformed.
- Prepare your pressure canner pot lid based on your manufacturer's instructions. Ours has a rubber sealing ring that fits into the edge of the pressure canner lid. This rubber seal usually comes pre-lubricated, but if it feels a bit dry you can apply a light coating of cooking oil around the ring (I usually do this step just to be safe).

- Fit the lubricated rubber sealing ring into the edge of the lid.
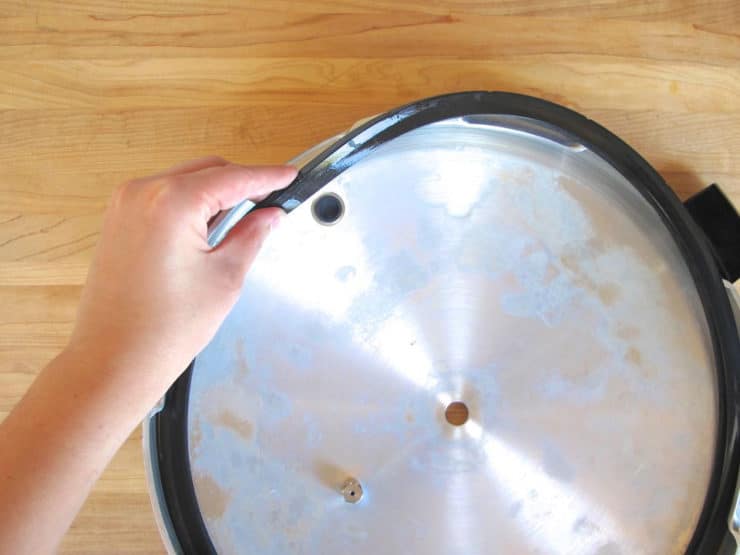
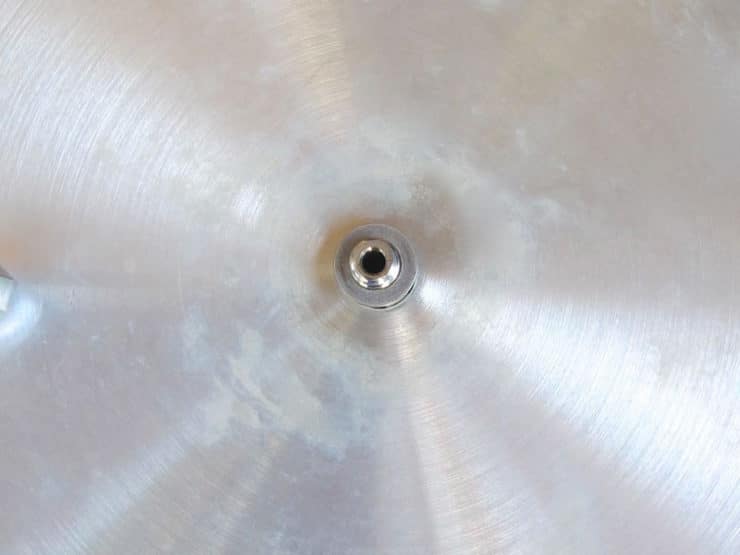
- Check the vent pipe for any food or debris that may be clogging the opening. If something is blocking the opening you can clear the vent pipe with a toothpick or a pipe cleaner.
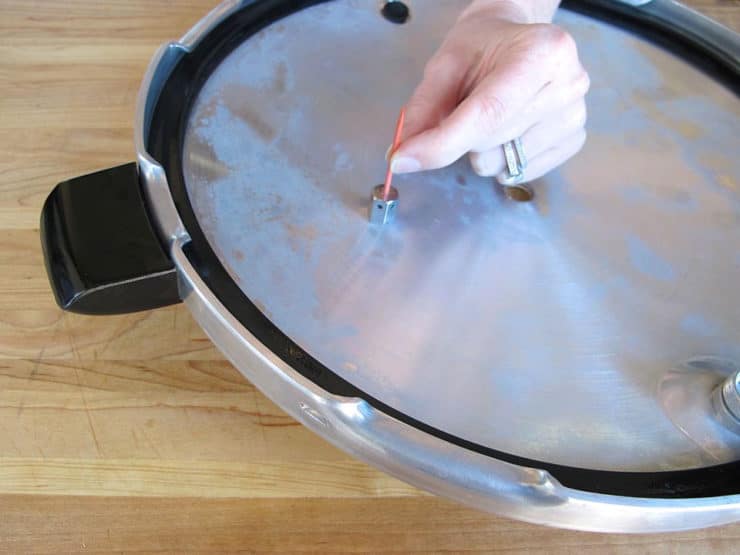
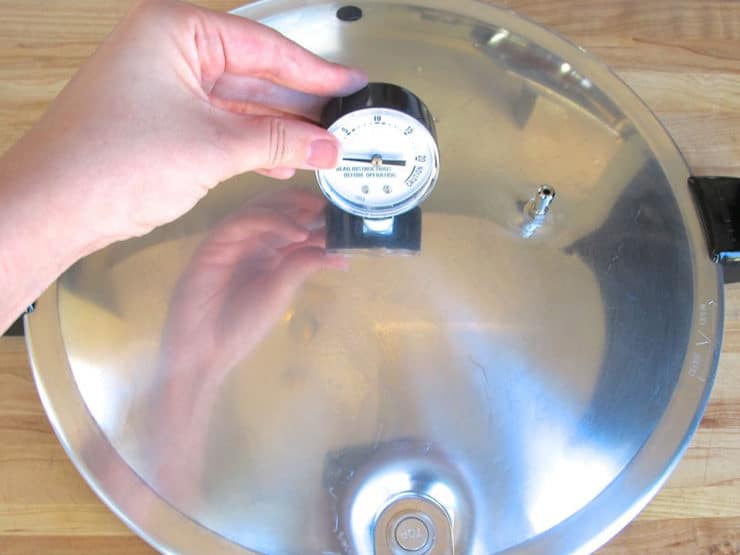
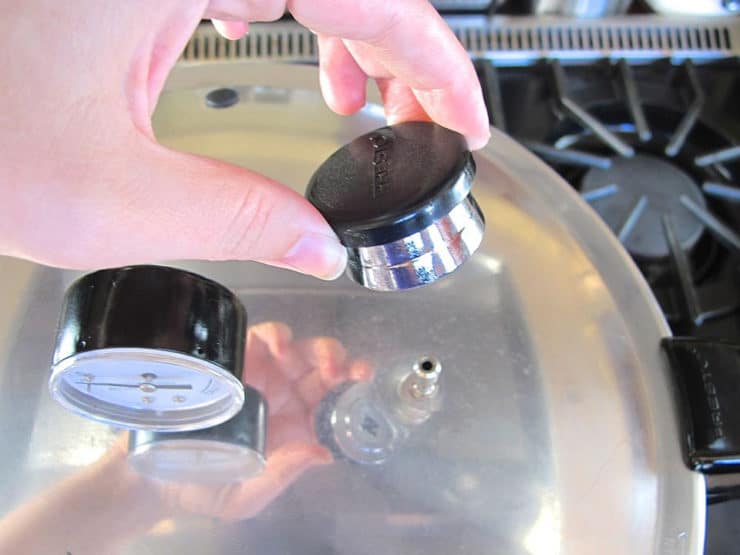
- Attach the dial gauge to the canner based on your manufacturer's instructions. On our model, we first place the white compression gasket onto the end of the dial gauge.
- Then we insert the dial gauge and the compression gasket into the hole at the center of the cover. The compression gasket should sit within the cover hole.
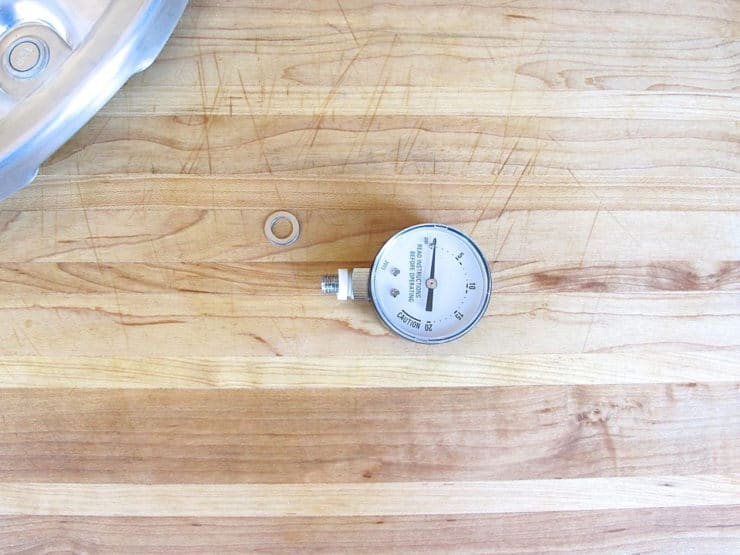
- Turn the cover upside down and place the metal washer onto the dial gauge.
- Place the nut onto the end of the dial gauge and tighten very tightly with your fingers. You can use a wrench if necessary.
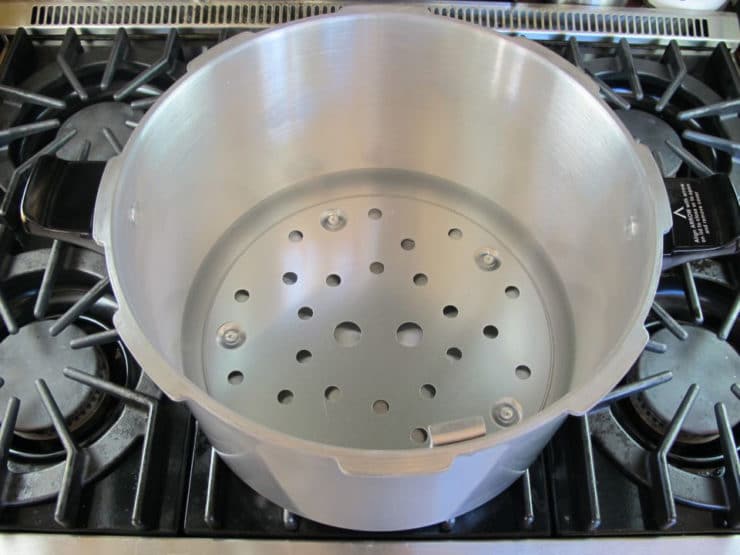
- Place the canning rack into the bottom of your pressure canner along with 3 quarts of hot water (the amount of water may vary based on the size of your canner-- refer to manufacturers instructions for your specific amount). To prevent water stains on your jars, you can add 2 tbsp of white vinegar to the water.
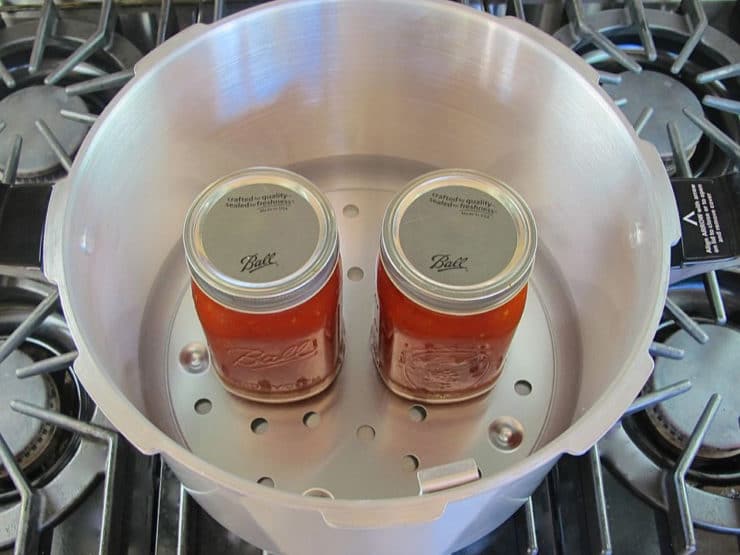
- Place your filled jars with secured lids on top of the canning rack. You must always use a canning rack to keep the jars away from the direct heat of the burner, which can lead to breaking or cracking.
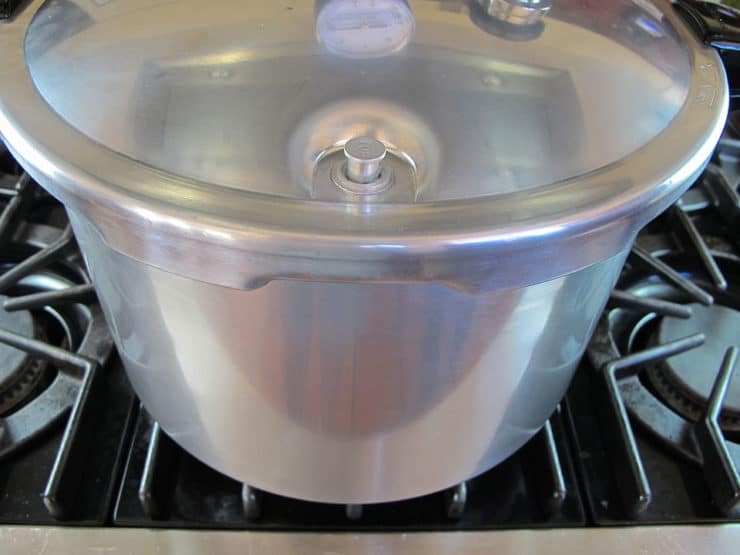
- Place the lid on the pressure canner and secure the lid tightly based on your manufacturer’s instructions. On our model, we apply pressure to the handles to compress the sealing ring and turn clockwise until the lid handles are directly above the pot handles. Your model may have a different method for securing the lid.
- Heat the pressure canner over medium-high until a steady flow of steam can be seen or heard coming from the vent pipe. Allow the steam to flow from the vent pipe for 10 minutes. If necessary, reduce the heat to maintain a steady, moderate flow of steam with minimal sputtering. It's kind of difficult to capture that flow of steam on camera, but it's there-- trust me. 🙂
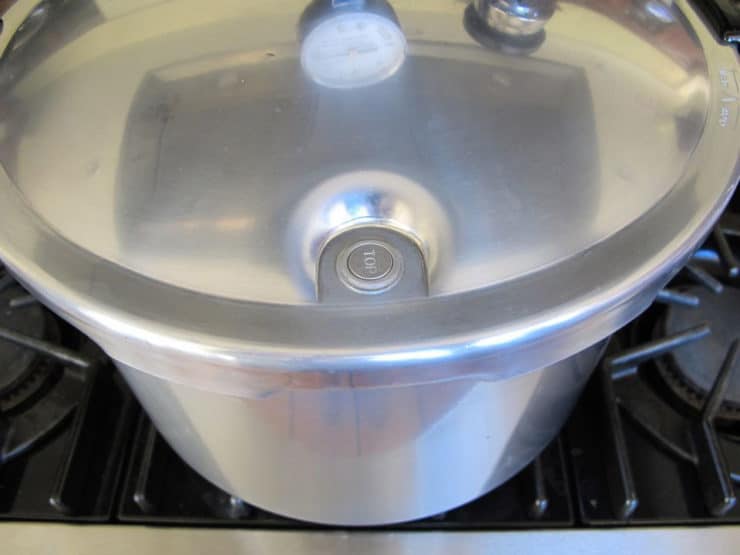
- Once the 10 minutes have passed, place the pressure regulator (a cap-like piece) on top of the vent pipe. Adjust stove heat to a relatively high setting to heat the water within.
- On our canner, as the heat rises and pressure develops inside, the air vent/cover lock (a small metal knob) will lift and lock the cover on the canner. Your model may have a different "signal" to let you know there is pressure in the canner. Once that cover is locked, DO NOT open the canner until the vent/cover lock lowers again, or until your canner signals that there is no longer any pressure inside the canner (more details below). Likewise, do not remove the pressure regulator cap from the top of the vent pipe.
- As the heat rises inside and pressure builds, the pointer of the gauge will move up. Your goal is to build to the amount of pressure specified in your canning recipe (each recipe is different, so refer to your specific canning recipe for the correct poundage). Continue heating until the pressure on the dial gauge reads the desired poundage. You may want to reduce the heat a bit when you are 1-2 pounds away from the desired pressure weight, so that the heat does not rise too high too quickly and surpass the desired poundage by a large amount.
- When the pressure gauge reads the desired poundage, start your timer. Adjust heat to maintain correct pressure on the dial gauge. Going slightly above the recommended poundage is ok, though you should try to keep it as close to level as possible. If at any time the pressure drops below the desired poundage, you must return pressure to the correct setting and start the timer over. The cans need to cook at the recommended poundage for the full recommended time period as stated in your pressure canning recipe, or you risk spoilage.
- When the timer goes off, turn off the heat and leave the canner to cool. DO NOT open the canner.
- Allow the pressure to drop on its own; this will take some time. On our model, we know that the pressure has reduced once the air vent/cover lock has dropped. Your model may have a different "signal." Do not use the dial gauge as an indicator that the pressure has reduced, since the gauge can read zero while there is still an amount of pressure in the pot.
- When pressure has completely reduced and the air vent/cover lock has dropped, remove the pressure regulator from the vent pipe and allow the canner to cool for another 10 minutes before attempting to open.
- Remove the cover of your pressure canner. On our model, we turn the lid counter-clockwise until it cannot go any farther and lift towards us so that the steam is released in the opposite direction. If for some reason the cover sticks, do not force it open. Allow the canner to cool for 10 minutes more and try again. Repeat as necessary.
- With a jar lifter, remove the jars from the canner.
- Allow your jars to cool for 24 hours. Remove the round outer bands from your lids and test your seals by lifting the jar by the flat lid a few inches from the countertop. The jar should lift without any separation. Jars with good seals can be kept in a cool dark place for up to a year.
- A broken seal doesn’t mean that your product has gone bad, it just has a shorter shelf life. Those jars should be placed directly into the refrigerator and used within two weeks or until the product has spoilage, whichever occurs first.


Research Sources:
Brady, Pamela L. “Canning Low Acid Vegetables.” University of Arkansas Division of Agriculture. University of Arkansas, United States Department of Agriculture, and County Governments Cooperating, n.d. Web. 20 Sept. 2013.
Kingry, Judi and Devine, Lauren. Ball Complete Book of Home Preserving. Robert Rose, Inc. Toronto, Ontario, Canada.
McClellan, Marisa, (2012). Food in Jars: Preserving in Small Batches Year-round. Running Press, Philadelphia, PA.
&n


Very detailed and thorough! Thank you for taking the time! Off to can tomatoes and beans
what if you don’t have enough jars to fill the canner.. can you still use it or do I add empty jars
In my pressure canner it isn’t a problem, I can do 2-3 at a time. If you have a different canner the directions may be different – it should come with a set of specific instructions.
I live in Thailand and do a lot of fermenting (kimchi, vegetables, kombucha) and high acid pickling.
I’m just getting ready to up my game and can mushrooms, then meats and low acid vegetables. Your intro to the pressure canner is just what I needed to help me understand the process and get over my fears/concerns. It really is just being careful to follow the instructions on the canner, using standard best practices, keeping the temp up and processing for the full time. I can do that!!
Thank you
I would like to start canning could you please tell me a good place to buy all equipment. Thanks Susanne
HI Susanne, Tori’s assistant Ashley here. We have provided Amazon links for all of the equipment used in this post.
Thank you for this information, I have been pressure canning but I am afraid of water bath salsa,
The one final safety of heating prior to eating is taken away on a food that has considerably amounts of mixed information.
I decided to look for a sauce with vegetables pressure canning recipe since even if I lose texture it won’t kill anyone,
I have literally lost sleep regarding the safety of pressure canning salsa especially now that the last ball book uses real not commercial lime juice which as most know you are told never more times than you can count.
I am glad someone who has your training has the same worries as I do about vegetables and water baths.
Have a great night
Kim
Thank you so much for taking the time to put this tutorial together. It was exactly what I was searching for and I truly appreciate it. I know it’s time consuming so please know that I, for one, am very grateful that you cared enough to do this! You are awesome!!
With kindest regards,
Mona Burt
7\16\18
You’re welcome Mona! Glad it is helpful. 🙂
What Mona Burt says! I so appreciate the time you took to help us newbies understand the pressure canning process and issues. Thank you! Judy, 8/7/18
I’m a little confused. Please tell me if my Power pressure cooker/canner XL is approved for canning. Some information I read leads me to believe that a pressure cooker is not a canner, however this seems to do both
Hi Grace– I don’t know what kind of device you have, I suggest you refer to your owner’s manual to see if it is approved for canning.
I have a canning question that I’ve not been able to get answered. I own the same 16qt pressure canned.i can fit my wide mouth pints,a divider then some short half pints on top. I am able to easily close lid.but is this safe?im wondering if the canned needs so much open air in the canned.
Hi,
I am new to canning especially pressure canning but I find that pressure canning is quicker and a little easier. If you please can tell us how long to pressure can pickled veggies, like green beans since that’s what I would like to do. I read in the comments section that someone had asked the question already but there was no answer yet of the length time/pound to process pickled veggies.
Hi Violeta, Tori’s assistant Ashley here. Some things are better suited to pressure canning and others are better for the boiling water method. It really depends on what you’re pickling and its level of acidity. This tutorial is just an overview of the pressure canning method. Each recipe is different, so you’ll need to refer to your specific canning recipe for the correct poundage. If you do a lot of canning, I highly recommend purchasing a copy of the Ball Complete Book of Home Preserving.
Simple question. How long do you pressure cook pickles. Quarts , pints. And at how much pressure? 10,15 lbs.
It is not recommended to pressure cook pickles as this will ‘cook’ them and you Will Have a jar of mush. Pickles contain enough acid with the addition of vinigar to be processed by boiling water bath. Find a good canning book and let it be your guide.i
does any one pressure cook dill pickles ?
Yes!
No
I have recently purchased an electric pressure canner. Where can I find a canning book for pressure canning?
Hi Pat, Tori’s assistant Ashley here. We’ve found the Ball Complete Book of Home Preserving to be very helpful.
https://www.amazon.com/Ball-Complete-Book-Home-Preserving/dp/0778801314?tag=theshiintheki-20
I may be wrong but as far as I know there is no electric pressure canner, only an electric pressure cooker. Please verify for yourself.
I also have an electric pressure canner
Hey Tori,
As a Master Canner/Food Preserver & Educator, it is very important to note that whether a recipe is canned by the pressure canning method or the boiling water bath, if the tested recipe calls for acidification, lemon juice or citric acid, this cannot be overlooked. Warm water and pressure method are same processes with different time/temperature combinations.
You made some clear points there. I did a search on the issue and found most guys will agree
with your site.
I have an All American pressure canner, I use to put up beans, black or pinto with spices. I also put up green beans, and non-Kosher smoked cottage ham. Sorry. But I also make fifteen or sixteen bean soup and can that. I make asparagus quiche, by preserving the the tips for show. Then chop the stems and the flavor is better. I steam the tips and chopped stems in microwave before adding.
I have only ever canned with the boiling water bath method. With that method the food is cooked first and added to the jars hot. Do you do the same thing with the pressure cooker?
I recently received a pressure canner and then noticed that there are no recipes for doing high acid foods in it, such as jam and pickles, but I wondered why that may or may not work, and how one would adjust water bath instructions for the pressure canner. I made one batch of Fig Jam in it (with pectin and sugar), processed 10 min at 15 lb, and it turned out great. What are your thoughts on or experience with converting recipes? Thanks!
Can anyone tell me once you place the pressure regulator on, how long does it take the canner to lock and build pressure. First timer and doing a trial run with water but it hasn’t locked and no pressure after about 20 minutes. Am I too impatient?
Are you waiting until the steam is out of the cooker and you have placed your regulator on? then wait? I do not know the actual time it takes just wait until it pops up.
Many thanks. Canning for the first time now that I’m retired and have a large garden. I had purchased the same canner you used so that helps a lot as well. Look out beans, beets, carrots and tomatoes, here I come!
Enjoy Dave! It is addicting!
This is a fantastic tutorial! I am thinking of getting a pressure cooker and I was wondering if you have ever tried canning chicken soup. If so does the canned soup taste worse than homemade soup stored in the freezer?
I have not tried it… not sure how it will turn out, but I’m guessing frozen soup will taste better. If you try please report back and let us know how it goes!
the trick to making any soup including chicken , and this includes preserving meats of any type, is that the meat should be just boiled {with a small amount of salt and pepper} and then removed from heat, the liquids should be drained into a stock pot and then any and all vegies should be added, and cooked until limp, the meat is then returned to the stock pot, tasted, add some more salt and pepper if desired, mixed, and then the jars are then filled, Note, any meats, 10lb pressure,for 60 minutesbut refer to guide lines for fish.
Pressure canned beef & chicken is a wonderful treat and makes for quick and yummy chicken or beef & noodles!