When Thanksgiving approaches, I can’t help but fixate on pumpkins. This earthy, sweet squash adds a delicious autumn flavor to many recipes. Last year, I created a Pumpkin Challah recipe that has become a favorite in our home– just a tiny bit sweet and subtly spiced, it tastes like the season.
This year, I thought what better way to celebrate the Thanksgiving holiday than with freshly baked pumpkin challah? This seasonal bread is a special treat, and it deserves a special topping. I decided to make Cinnamon Honey Butter, the perfect sweet accompaniment to pumpkin challah.
And then my creative mind started spinning. I thought, why not make a beautiful edible challah centerpiece for the Thanksgiving table? I started imagining my holiday guests tearing into a braided wreath of pumpkin deliciousness, topping it with delectable honey butter, and I had to try it!
This blog will detail the process of making the challah centerpiece. My Pumpkin Challah recipe will make enough dough for a centerpiece and 10 mini challah knot rolls.
If the centerpiece seems too complicated or time consuming, you can make 30 challah rolls instead– a simpler process, and that way everybody gets their own bite-sized challah.

Kosher Note: Most of you will be serving turkey or some other meat entree on Thanksgiving. If you’re keeping kosher, make the Cinnamon Honey Butter recipe with unsalted margarine instead of butter.
For the Pumpkin Challah Recipe, click here.
For the Cinnamon Honey Butter recipe, click here.
Recommended Products:
We are a participant in the Amazon Services LLC Associates Program, an affiliate advertising program designed to provide a means for us to earn fees by linking to Amazon.com and affiliated sites. As an Amazon Associate I earn from qualifying purchases.
Pumpkin Challah Centerpiece with Cinnamon Honey Butter
Ingredients
- 1 batch Pumpkin Challah Dough (click for recipe) , risen twice
- 2 1/2 cups Cinnamon Honey Butter (click for recipe), room temperature (1 batch)
- 2 large egg yolks, lightly beaten
- 1 tablespoon water
- Nonstick cooking oil
Instructions
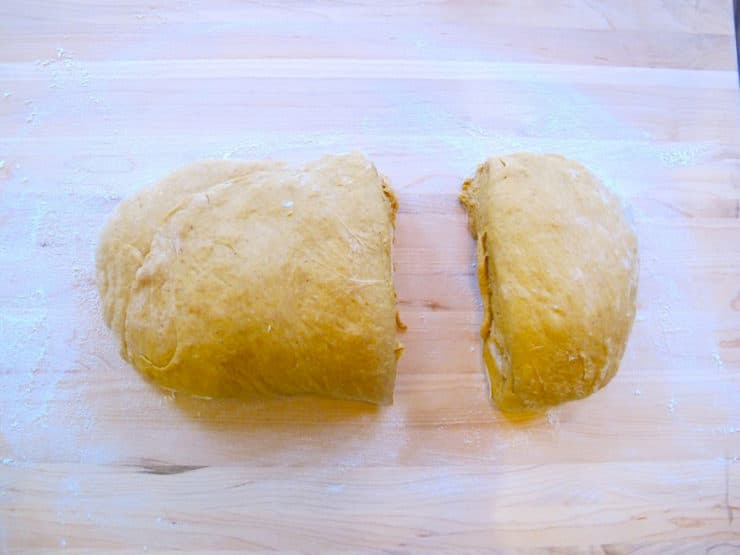
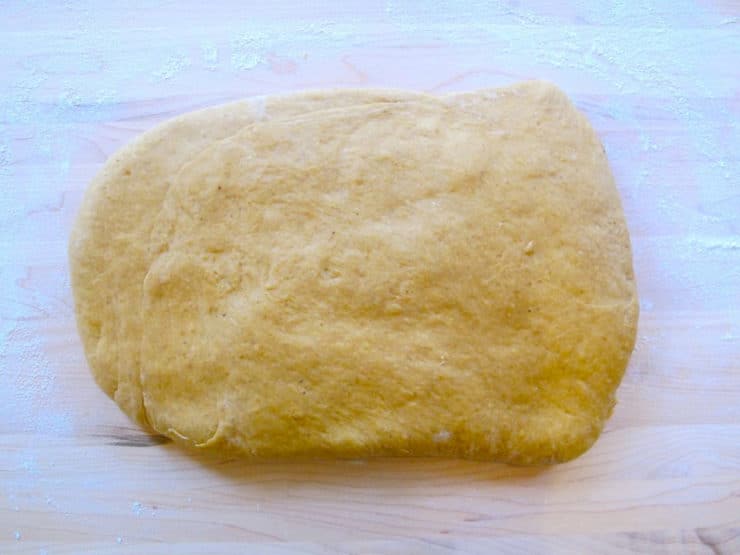
- Make a batch of pumpkin challah dough. Let it rise twice according to recipe instructions, so it is ready to braid. Turn out the dough onto a very lightly floured rolling surface.Section off 1/3 of the dough and reserve in mixing bowl covered with a moist towel.

- Take remaining 2/3 of dough and use your palms to flatten it into a rough rectangle shape about 1 foot wide and 6-9 inches high.
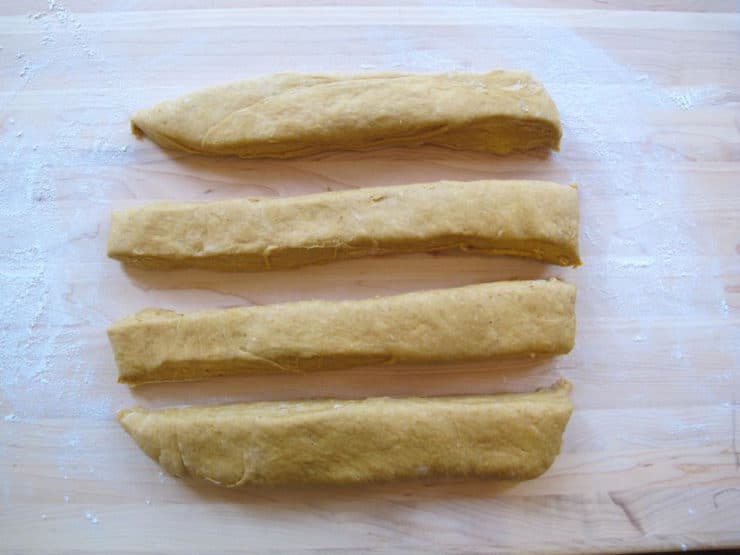
- Slice the dough rectangle into four long equal-sized strips.
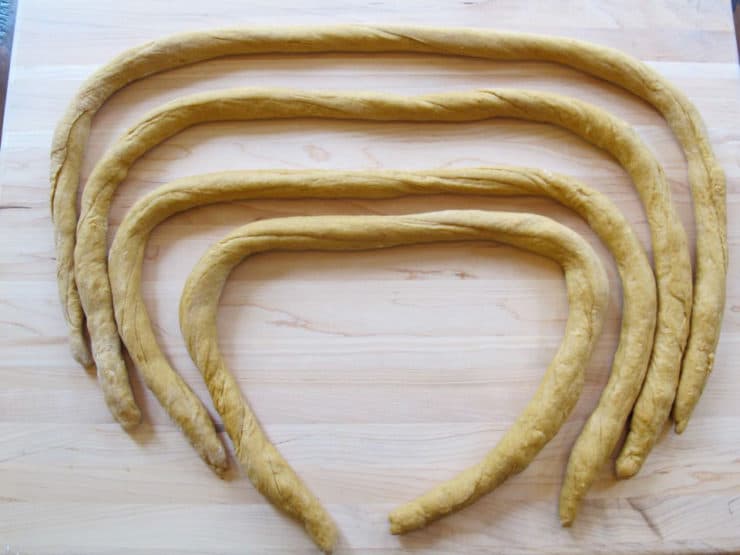
- Roll each strip into a long strand with tapered edges. For tips on rolling strands, see my How to Braid Challah blog. These strands will be extra long; between 2 1/2 and 3 feet is ideal. You will need to roll it in sections. Once rolled out, the strips will not fit on a standard cutting board.
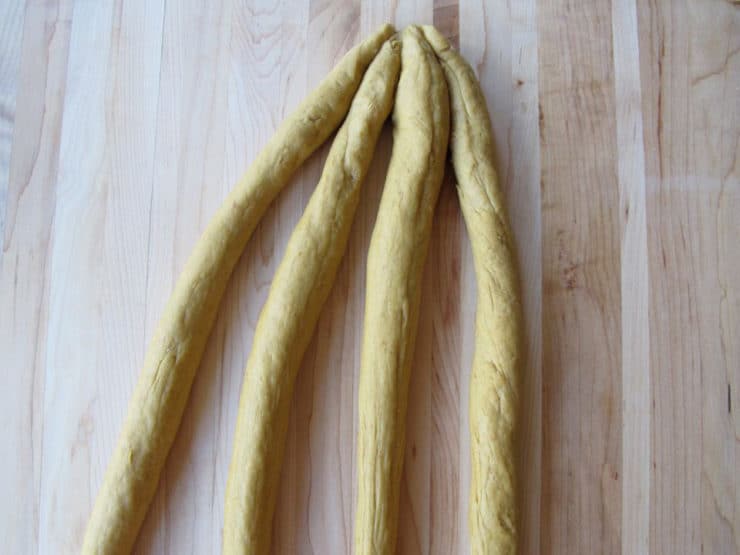
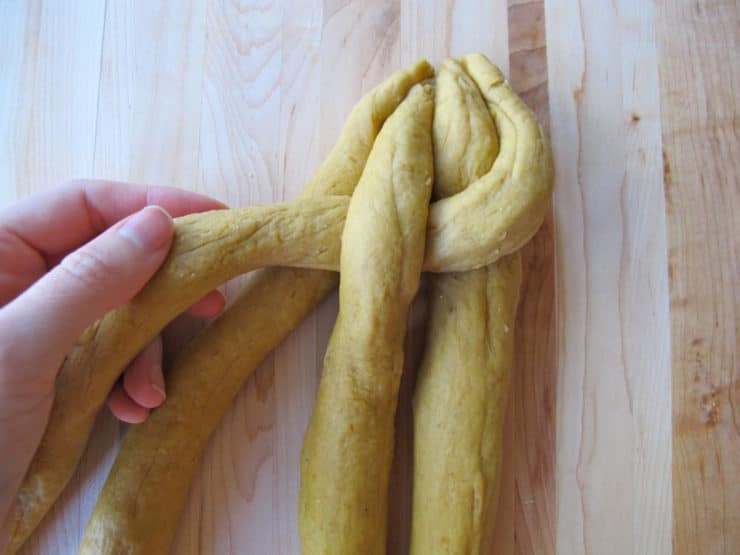
- Lay the four strands side-by-side, then loosely pinch them together so they are connected at the top.
- Take the strand furthest to the right and weave it towards the left through the other strands using this pattern: over, under, over.
- Take the strand furthest to the right and repeat the weaving pattern again: over, under, over.
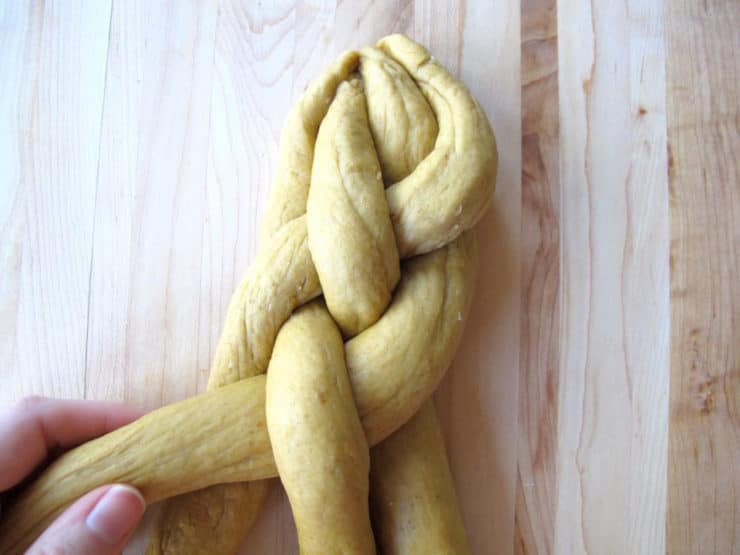
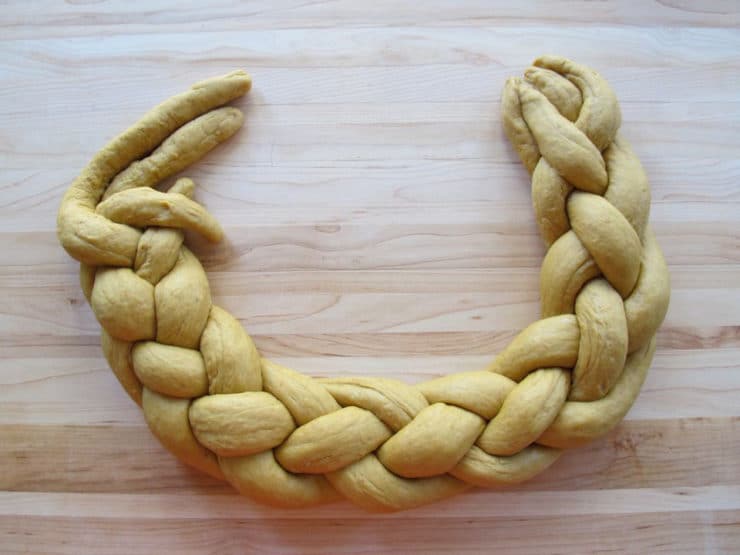
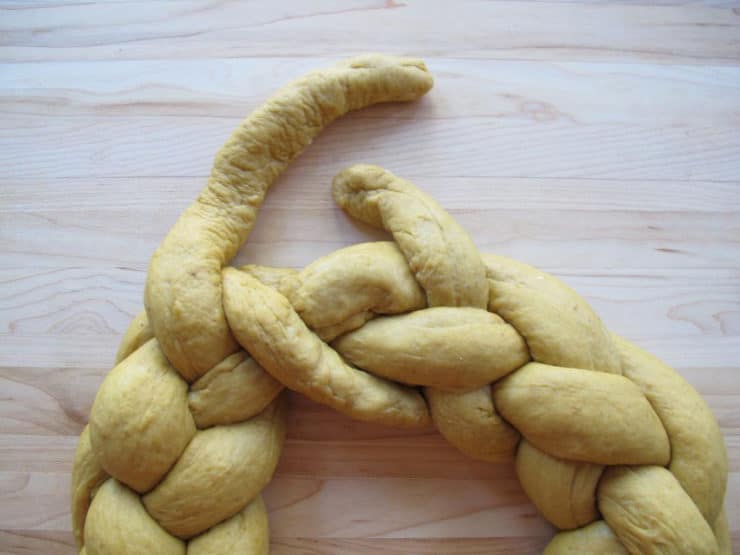
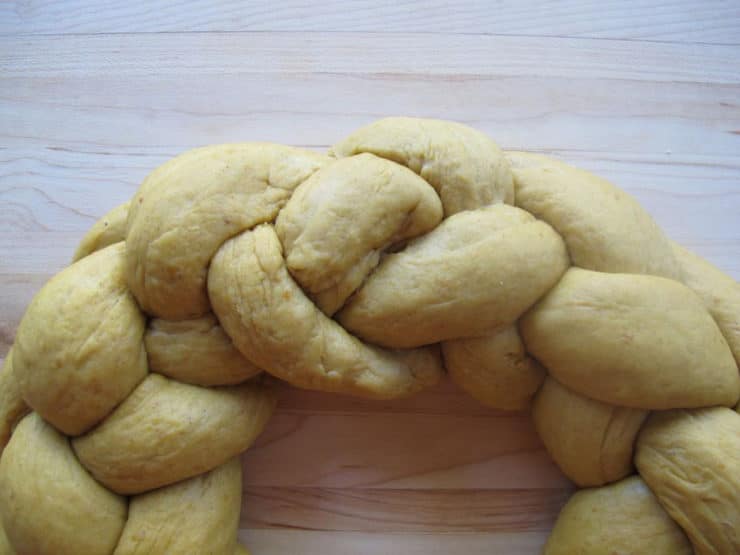
- Repeat this pattern, always starting with the strand furthest to the right, until you can no longer braid. Leave the bottom ends of the strands loose. Form the braided challah into a rough circular shape.Unpinch the strands on the upper part of the challah (where you started braiding. You will end up with 8 loose strands at either end of the braid.
- Braid the loose end strands together. I do this by attaching the strands that are opposite-- meaning, the top strand on the right side connects with the bottom strand on the left side, the second highest strand on the right side connects with the second lowest strand on the left, etc. You may need to attach two of the strands below the circular braid to create a neat appearance.
- When all strands are attached, push the braid together gently and plump it to create a smooth connection.
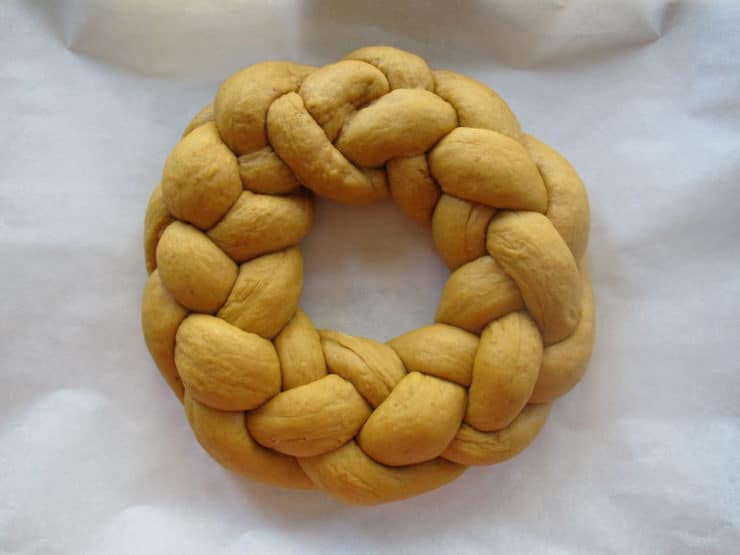
- Lift the braided challah circle gently and place it in the center of a parchment lined baking sheet. Plump it gently and reshape into a smooth circle, if needed.
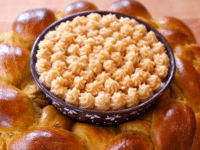
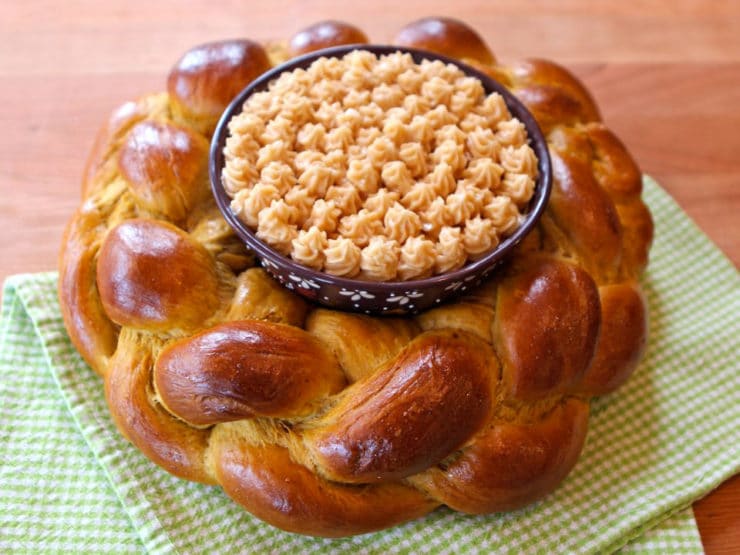
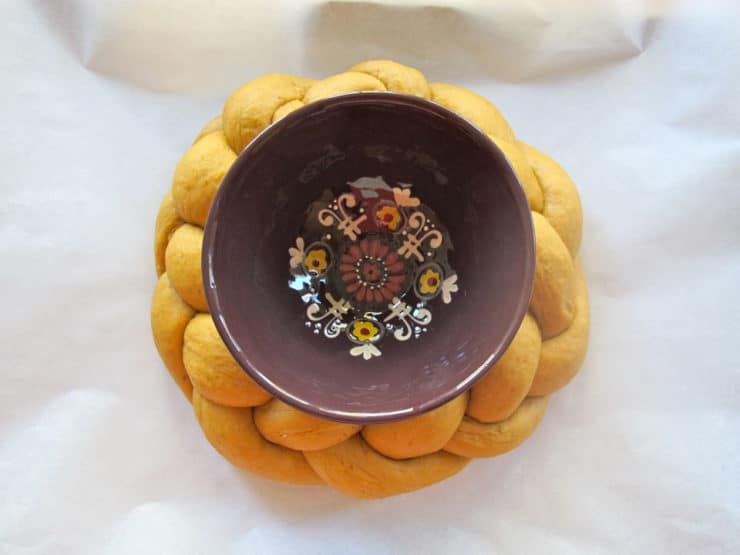
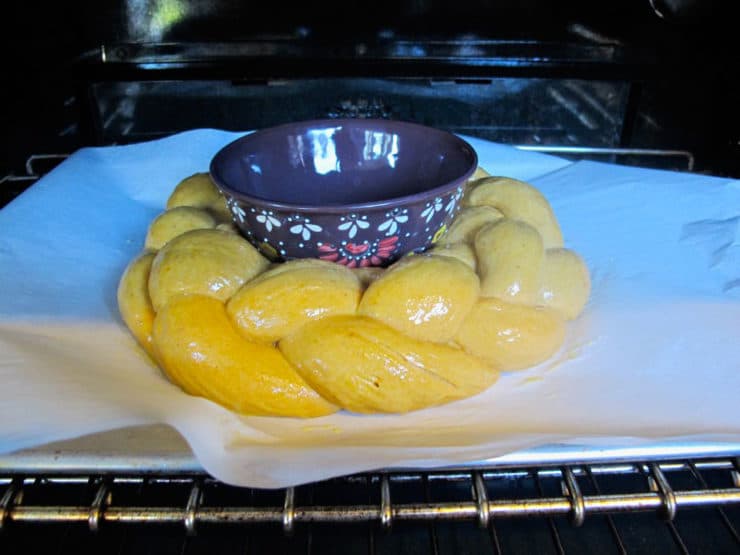
- Take the bowl you will be using in the center of the centerpiece and lightly spray the bottom edge with nonstick cooking spray, then place it securely in the center of the braid. You will need to keep this bowl in place throughout baking to ensure that the challah rises around it and doesn't close up in the center. If your decorative bowl is not oven safe, place an oven safe bowl of a similar size in the center as a placeholder.Let the braid rise 30 to 45 minutes longer. You’ll know the dough is ready to bake when you press your finger into the dough and the indentation stays, rather than bouncing back.
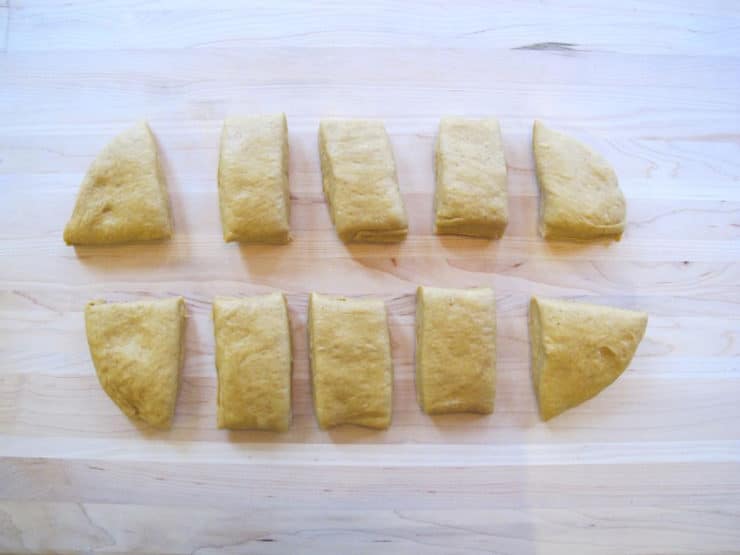
- While braid is rising, take the remaining challah dough and flatten it into a rough rectangle. Cut the rectangle into 10 equal-sized strips. I do this by cutting the dough in half lengthwise, then cutting each half of dough into 5 strips.
- Roll each strip of the dough into a strand about 9 inches long, then shape the strands into challah rolls (knots). You can find the instructions for creating challah rolls on my How to Braid Challah blog. Place challah rolls on a baking sheet lined with parchment paper.
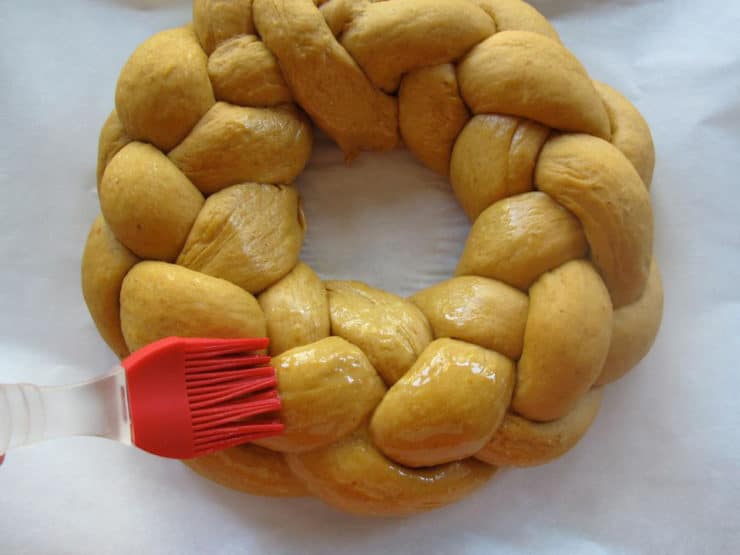
- Preheat oven to 325 degrees F. Whisk together 2 egg yolks with 1 tablespoon of cool water to create an egg wash. Remove the decorative bowl from the risen challah braid. Lightly brush the surface of the challah braid and knots with egg wash.
- Replace the decorative bowl in the center of the challah braid. Place braided challah in the oven and set timer for 20 minutes. While the challah braid is baking, let the challah rolls rise.Turn the baking sheet in the oven around after 20 minutes to ensure even browning on both sides of the challah circle. Let it bake for another 15-25 minutes until golden brown and baked through. If the challah seems to be browning faster than it's cooking, tent it with foil when it's browned to your liking; this will keep it from browning further as it continues to cook.When finished baking, remove from oven and allow to cool completely. Bake the challah rolls for 20-25 minutes till baked through and golden brown, turning once halfway through cooking to ensure even browning.
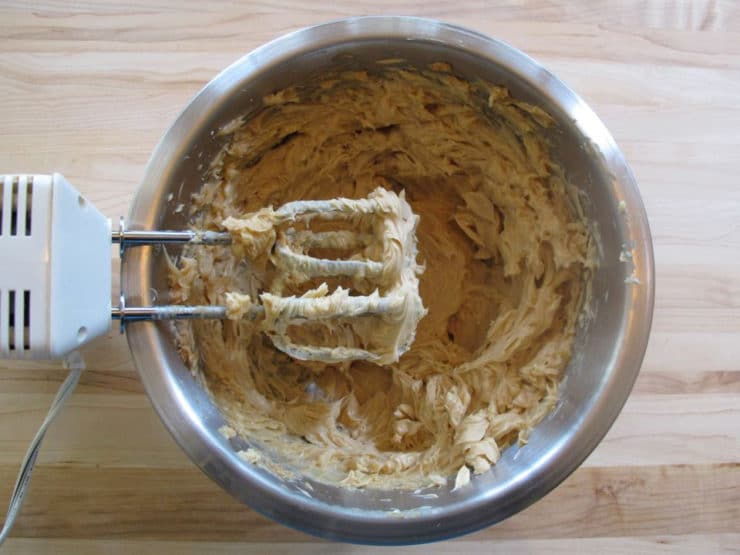
- Meanwhile, loosen the bowl from the center of the centerpiece and remove it.Make a batch of Cinnamon Honey Butter. As you prepare this decorative butter, make sure you choose a room that is not too hot-- the butter will melt in a hot kitchen and make it impossible to work with. Choose a cool area to complete this step; it can easily be made ahead and refrigerated before serving.
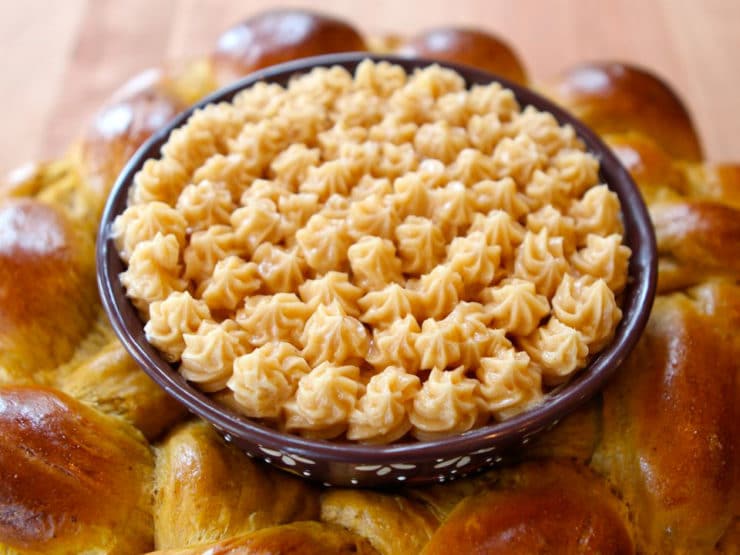
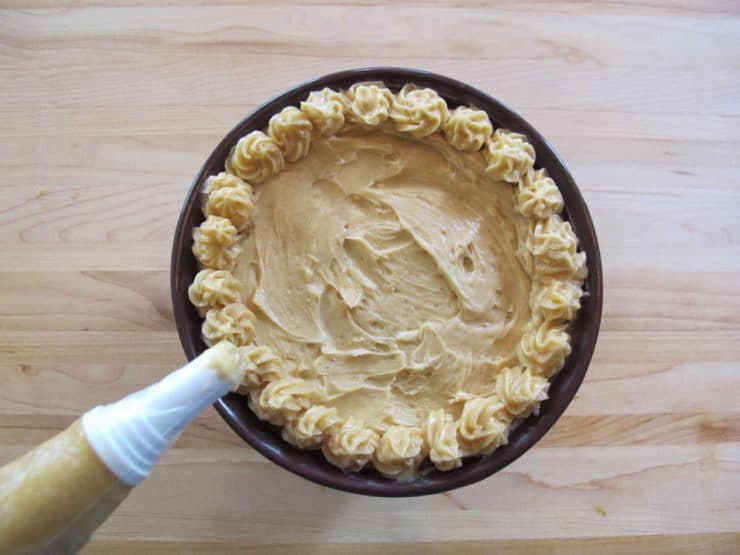
- Use a spatula to scoop 2/3 of the honey butter out of the mixing bowl. Spread it in an even layer in the decorative bowl.
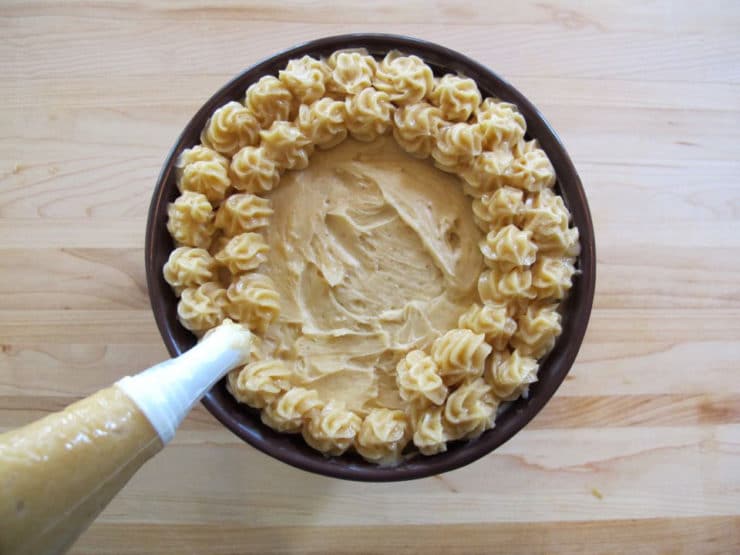
- Place a decorative frosting tip into a frosting bag. Put the frosting bag into a drinking glass and drape the edges over the sides; this will create an easy vessel for filling. Take the remaining 1/3 of the butter and fill the frosting bag with it.
- Seal the top of the frosting bag shut (I use a rubber band). Starting at the outer edge of the decorative bowl of butter, pipe florets in a circular motion on top of the butter.
- Continue piping in circles, working your way inward towards the center of the bowl.
- When surface is fully covered, refrigerate the bowl for 20-30 minutes; this will harden the butter.
- Before serving, place butter bowl back in the center of the challah centerpiece. Place in the middle of your table along with the challah rolls; allow guests to tear apart the centerpiece and spread challah pieces with honey butter. Enjoy!


NOTES
Nutrition

tried this recipe?
Let us know in the comments!
Note: Calorie count above is not exact; please see Cinnamon Honey Butter and Pumpkin Challah posts for detailed nutritional information.


So creative, yum!
This is beautiful! I am wanting to make 8 as gifts for my husbands co-workers, but I am not wanting to do pumpkin. By my calculations, I would need to multiple this recipe 6 times to make 8 rounds, yes? And it seems like the same would be true of your regular challah recipe? Thanks!
Hi tori
This recipe looks amazing and my kids are super excited about getting pumpkin challah for Thanukkah
I’d like to make the challah before the craziness starts. At what stage of the preparation would you suggest freezing?
Hi Danette– I would bake the challah completely, let it cool completely, then freeze it in an airtight sealed bag. When ready to serve, remove frozen challah from the bag and place directly into a 350 degree oven for about 30 minutes till warmed through. It should taste like it just came out of the oven. 🙂 Enjoy!
One note– I just noticed you commented on the centerpiece recipe. Keep in mind that if you’re making the challah as a centerpiece for the honey butter, you won’t want to put a dish of butter in the center if the challah is warm from the oven. It will melt the butter (obviously!).
Can this be made in a pan? I am not much of a baker, so I have those cool silicone bread pans for Challah….
Hi Rachel, I have never baked challah in a pan before, so I’m not sure what to tell you. Sorry I can’t be of more help!
Hey, is this a sweet bread? I’ve never had challah before, and I’m wondering if this would work as a breakfast/brunch dessert bread?
Hi Carmen, it is only mildly sweet. For a sweeter option, I’d suggest my Pumpkin Spice Cake: http://theshiksa.com/2011/10/09/pumpkin-spice-cake/
just finished making this as knot rolls for thanksgiving. didn’t have time to do all at one time so raised (rose?) in the fridge over night, punched down and during day while i was at work today. that worked really well and they are great. and the recipe made almost 90 1 oz rolls! 9yeah i ‘m a dork i weighed them) let the kids help “tie” the knots so some are a little interesting shaped.
Going to try this for Shavuot this year….
Wow. This has got to be the most beautiful challah I’ve ever seen! Thanks for the step-by-step pics.
this looks delicious! glad i found this blog im going to bed in to read more 🙂 Belle
Your bread is just beautiful. I’m still working on getting my breads to look like breads. LOL. This had to be just beautiful on your table. And I love how you piped the butter. 🙂
Hi Shiksa. I just found your blog via your comment on Prevention Nicole’s site. OMG…how have I not found your site before???? Your pictures and your words are fantastic. I’ve bookmarked and will be back often. All the best for the rest of your weekend.
Absolutely beautiful. Thank you so much for sharing. I think this looks almost too divine to replicate. I sure will try though, I think the hubs will be excited. Happy holidays.
Tori – this is amazing! The step-by-step on finishing the braid is incredible…I always wondered how that was done! Happy Thanksgiving!
GORGEOUS!
And sounds delicious.
One day I’m going to be brave enough to bake my own challah.
Happy Thanksgiving.
What a beautiful centerpiece!! Love it with the honey butter. And your photos are and ideal directional for someone who is not familiar with the process. Nicely done!
Happy Thanksgiving to you!!
SOOO gorgeous! Next time I’ll try my challah in a ring. Happy Thanksgiving to you and your family!
This is absolutely gorgeous, Tori!
your challah ring turned out so beautiful! i really need to try that!!
WOW. Just WOW. That is incredibly gorgeous. Also, I admire people who can use decorating tips so effortlessly (because I cannot). Fantastic!
This is so gorgeous! Perfect for the holiday table.