
A few months ago I wrote up a short post on a new food “trend” with ancient roots – fermentation. Many of you expressed interest in learning more about the process. I’ve never done any fermenting at home before, but your interest inspired me.
For my first fermentation adventure, I decided to take a crack at homemade sauerkraut. Together with my kitchen assistant Gary, who happens to be a farm trained, do-it-yourself culinary school grad with lots of fermenting experience, we fermented a crock of cabbage to make homemade sauerkraut.

iStock.com/vertmedia
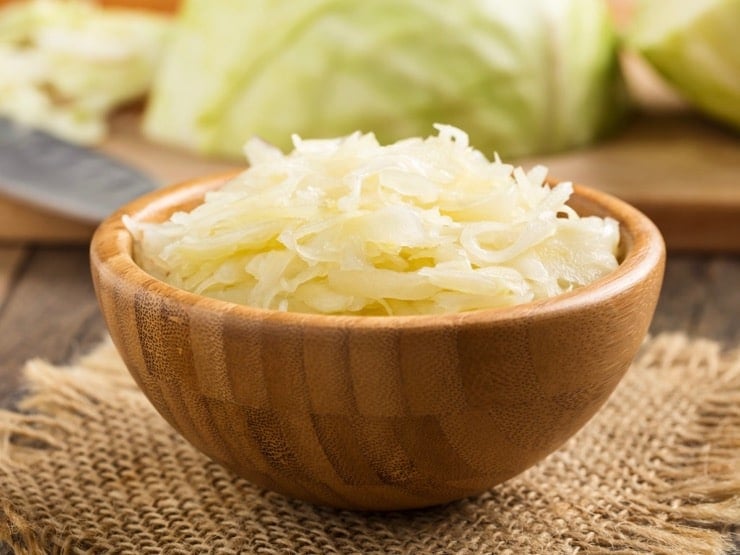
Sauerkraut, a combination of the southern German and Austrian words “kraut,” meaning cabbage, and “sauer” meaning sour, literally translates to sour cabbage. It is created by fermenting cabbage over a long period of time.
There are several health advantages to homemade sauerkraut. It’s high in enzymes and vitamin C, both of which are lost during the heating and pasteurization of store-bought sauerkraut. It’s also low calorie and easy to digest.
As I was learning about the fermentation process, I became curious about the difference between fermenting and pickling. The most obvious difference is that fermentation creates acid, while pickling requires an added acid, for example vinegar. Both serve as a preservation technique, the science is just a bit different.
Sauerkraut takes about 4-6 weeks to make. Since it’s a “hurry up and wait” kind of thing, I am documenting the adventure here on my blog. I will walk you through what we did, step-by-step, so you can try it at home.
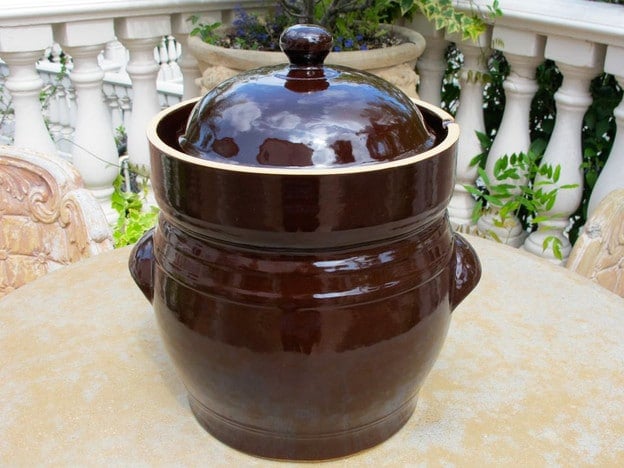
First thing’s first– I bought a crock. A big, honking fermentation crock. It really looked so much smaller online. At first, I was dismayed.
After the initial shock wore off, I decided the size was a plus… it means you can make a large batch of fermented veggies at the same time. With the amount of time it takes to ferment, why not make a big batch that will last you several months? And I do mean a big batch. We sliced up enough cabbage to create a decade’s supply of sauerkraut. Seriously.
If you too would like to be the proud owner of a ginormous fermenting crock, here is the one I’m using. Keep in mind that it’s pretty heavy/substantial and kind of awkward to handle. It also comes in a smaller size, which is likely a lot more manageable. There’s an even larger size, but that would require some serious fermentation love.
You will also need a set of weights to help weigh down whatever you are putting in the crock. We used 10-15 liter stone weights; for a smaller crock, use 5 liter weights.
Crocks can be a bit pricey, so if you’d rather not invest in one, there are some less expensive options. You can use just about any sterilized container, taller than it is wide, made from enamel, ceramic or food grade plastic.
Once you have chosen your vessel, find a plate that will cover the majority of the cabbage. To make sure that the cabbage stays submerged in the brine, a key component of fermentation, you will need to make a weight to place on top of the plate.
The simplest option is to place plastic storage bags filled with salt water on top. You can then cover your container with plastic wrap or a lid.
Once we cleaned out the crock, we got to work. With Gary and Ashley’s help and experience, I felt more confident in outlining the process for you here. I’ll check back with you in a few weeks and let you know how our sauerkraut turned out.
Meanwhile, here are a few books that helped us learn the basic fermentation process:
Preserving Food Without Freezing or Canning
Since I’m fairly new to fermentation, I decided to start with a basic sauerkraut, which only requires salt, cabbage, and water. Spices can be added to make a flavored sauerkraut or kimchi. If you feel like experimenting, the same method can be used for other vegetables, including cucumbers, onions, beets, carrots, kohlrabi, red cabbage, and rutabaga. You can even combine a variety of vegetables in a kraut medley if you’re really feeling adventurous.
We are a participant in the Amazon Services LLC Associates Program, an affiliate advertising program designed to provide a means for us to earn fees by linking to Amazon.com and affiliated sites. As an Amazon Associate I earn from qualifying purchases.

How to Ferment Cabbage and Make Sauerkraut

Ingredients
- Fermentation crock
- Cabbage - amount varies based on your needs we used 3 large heads
- Large mixing bowl
- Kosher salt
- Kitchen scale
- 2 fermentation weights
- Medium saucepan
Notes
Instructions
- Start by boiling 6 cups of water with 1 tbsp of kosher salt till salt is dissolved. Allow to cool.
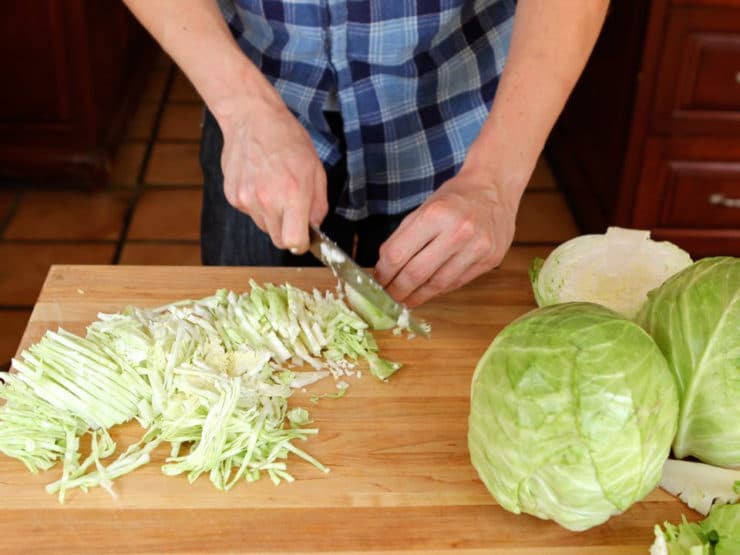
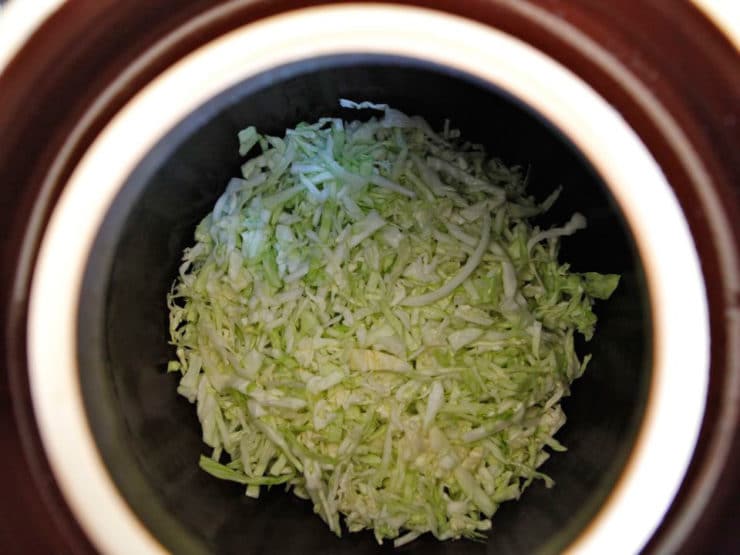
- Meanwhile, clean your cabbage and pull off 5-6 of the external whole leaves, set aside. Shred the remaining cabbage - for instructions on shredding cabbage, click here.

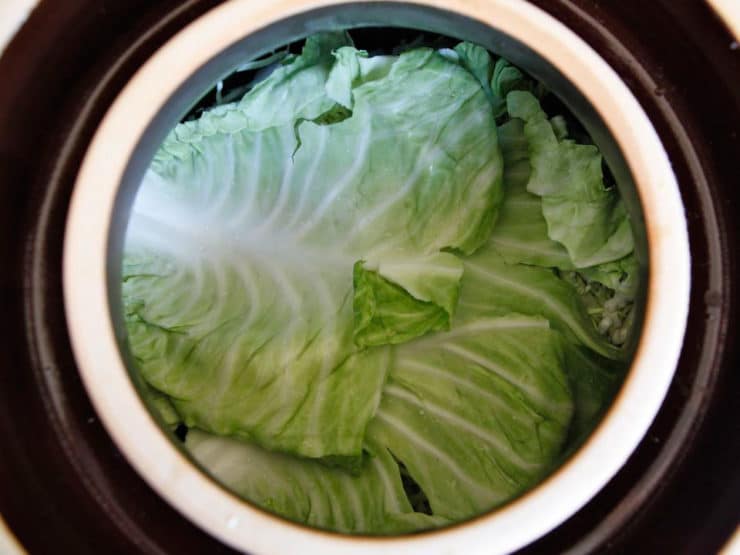
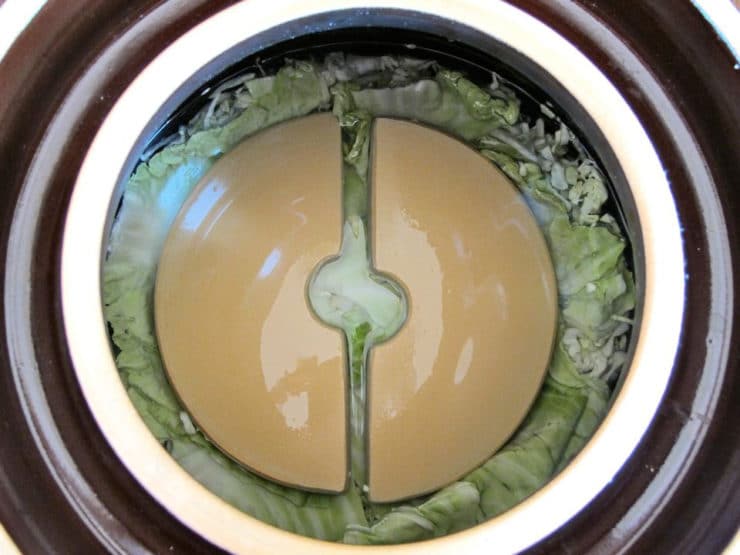
- Cover the bottom of your fermenting pot with 3-4 whole cabbage leaves. You will only need two layers of whole leaves in the crock, one on the bottom and one on the top.
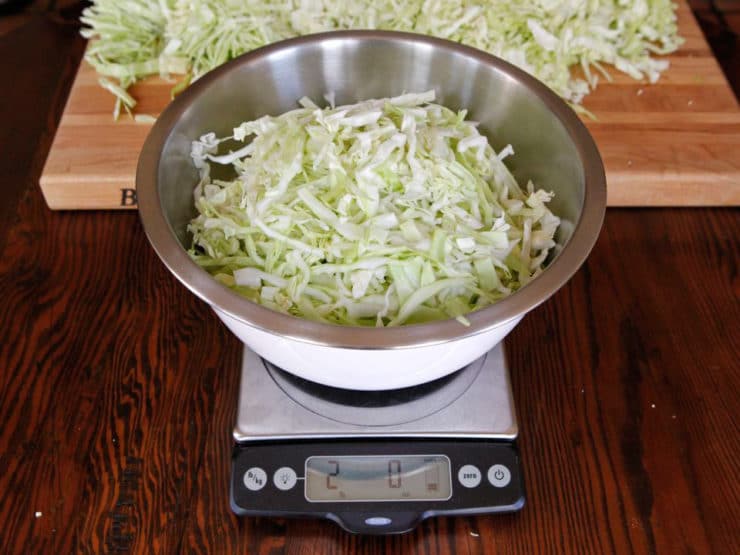
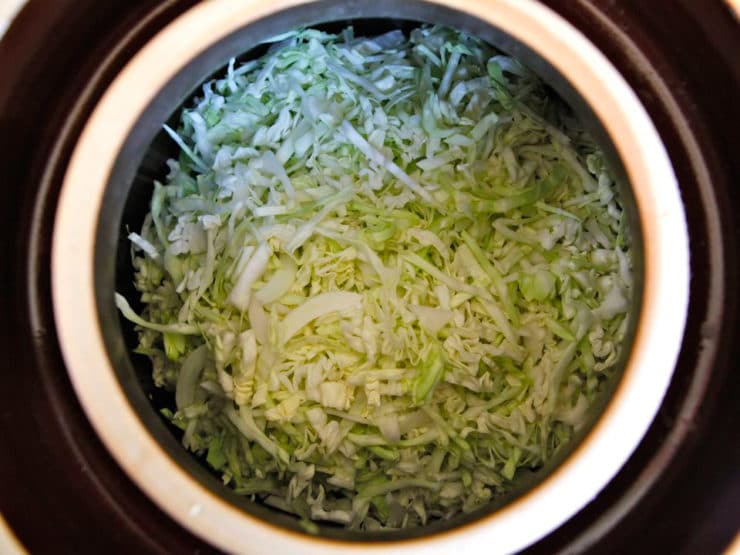
- You will need to salt the shredded cabbage before adding it to the fermentation pot. We found this is easiest to do in smaller batches, to keep the salting amount consistent and mixed throughout the fermentation crock. Measure out 2 pounds of shredded cabbage into a bowl (we zeroed our scale with the bowl on, then measured a 2 pound batch).
- Use clean hands to toss the shredded cabbage in the bowl with 1 tsp kosher salt.
- Place the salted, shredded cabbage into the fermentation pot on top of the whole leaves.
- Measure out another 2 pounds of the shredded cabbage and mix with 1 tsp of salt, then add to the fermenting pot. Repeat this process in batches until all of your shredded cabbage has been salted and added to the pot. Pack down the cabbage tightly, but do not crush the cabbage strips.
- Cover the top of your shredded cabbage with remaining whole cabbage leaves. These leaves will help to collect the yeast that may accumulate at the top of the crock, and can easily be removed and discarded after the fermentation process is complete.
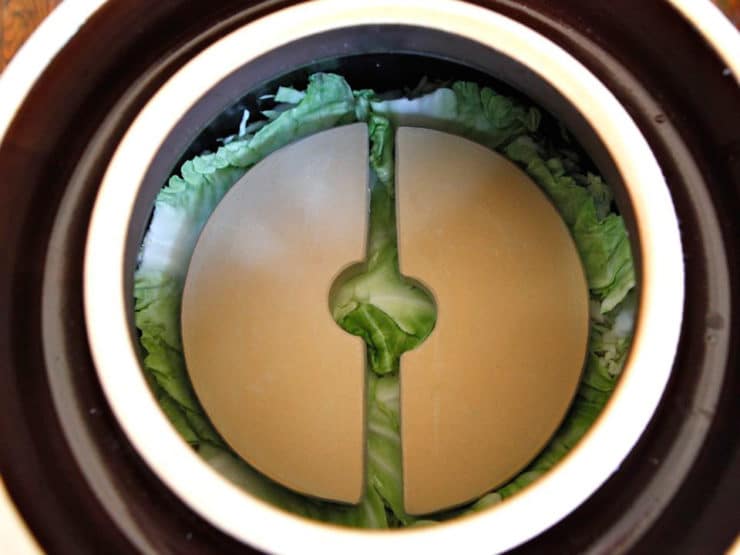
- Place stone fermentation weights on top of the whole cabbage leaves and press down, but not too hard. You don’t want to damage the cabbage.
- Cover the fermentation crock with a lid. The salt will naturally draw some water out of the cabbage. After a few hours, check to see how much liquid has accumulated inside of the pot. It should be about 1-3 inches above the cabbage. If this hasn’t happened, add cooled, boiled salt water to the pot. We ended up needing about 3-4 cups of salt water. Pour it over the cabbage till it is submerged (you may not need to do this if your cabbage has created enough natural liquid). Reserve the remaining salt water.
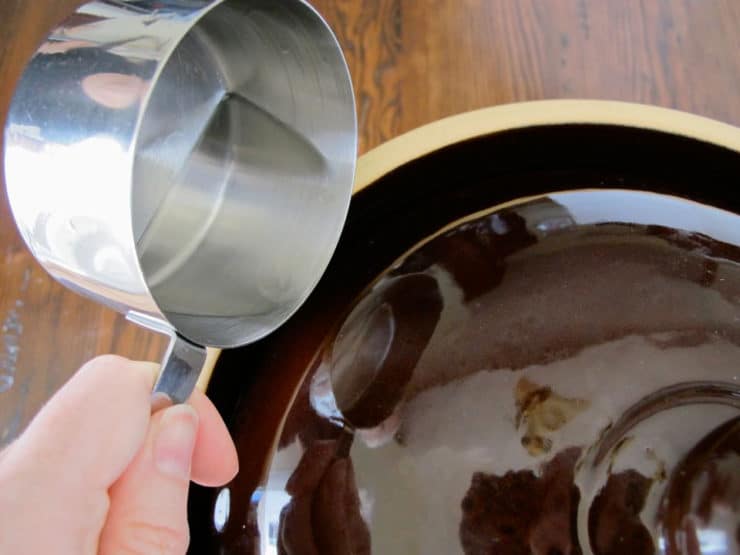
- Once the water level is where it should be, cover the pot and fill the channel around the lid with cooled salt water to create an airtight seal. This will keep oxygen out of the pot. Once this has been done, do not open the fermentation pot for at least 2 weeks. No peeking! Reserve the remaining salt water brine in a sealed container in the refrigerator; you will need it over the course of the next several weeks.
- For the first few days, store the pot in a warm place, between 68 and 72 degrees. After a few days have passed, listen for a fizzy, bubbling sound coming from the pot. This is good and means that fermentation has begun. If you don't hear anything, don't worry, it may just mean that the walls of your crock are too thick for sound to travel through. After fermentation has started, move the pot to a cool place, between 59 and 64 degrees, for the remaining fermentation time. If you don't hear anything after 1 week, go ahead and move the crock to a cooler location without waiting for it to sound bubbly.
- Check your water channel regularly to make sure that it's filled with salt water. At times, the pressure which builds up inside the crock can cause suction, which pulls the channel water into the crock (it happened to us a few days in). If this happens, pour more of the salt water into the channel to keep it full.
- After the first 2 weeks, check your sauerkraut’s brine level and skim off any yeast or bubbles that have gathered near the top. Be sure that your cabbage is always submerged in the brine. Fermentation breeds strange sounds and smells, so try not to worry about those. Close the fermentation crock again and refill the channel with salt water.
- Your sauerkraut should be ready in about 4-6 weeks. You will know for sure once bubbles no longer appear in the liquid. The longer you allow the cabbage to ferment, the tangier the flavor will be.


UPDATE: Our kraut turned out great! It took about 5 weeks to achieve the flavor and texture I was going for. This sauerkraut was so much better than the store-bought kind… it was salty, pungent and the lactic acid made it tingle on my tongue. It’s delicious and way cheaper than store-bought probiotics. Good for your gut, good for your tastebuds… can’t beat that!
Have you tried fermentation before? Did it turn out the way you hoped it would? What is your favorite fermented f


Hi Tori. I just received my beautiful new crock; it is unpacked and set up on my counter. It is the same one you pictured here except I got the 10L having absolutely no clue as to what I am doing. Very excited about this new adventure! Your instructions and accompanying photos of the process are enormously helpful to neophyte! The crock did not come with any instructions for first use: do you wash these pottery crocks with SOAP and water? Do you use white vinegar to remove any last residue of soap that may remain after rinsing. The crock is large, heavy, bulky, and rather unweildly so not sure how to do this without chipping the crock. Then, how do you ‘sterilize’ it — I’m afraid of pouring boiling water in it for fear it might crack. I would imagine that cleaning it this first time should be done right before I’m about to use it to reduce possibility of ‘contaminents from air?’ What an utterly great blog this is!!!
Hi Sandra! I know what you mean, it’s a very big and heavy crock. We were able to fit it into an otherwise empty dishwasher; we ran it through once to sterilize it, along with the lid and stones. Do you have a dishwasher? If not, good old soap and hot water will probably do the trick and your idea to follow up with vinegar sounds like a good one. I wouldn’t pour boiling water in or immerse the stones in boiling water either, you are correct that they might break this way. The cleaner you can get it before you start the better! Have fun fermenting. 🙂
Yahoo! Started my first batch in a 10 L gärtopf! 10 lbs of cabbage, salt, much pounding and a lot of love. See it in 4-6 🙂
Enjoying the guidance and suggestions here.
I bought a German crock and it’s HUGE!
I used 3 heads of cabbage and 15 carrots. Added fennel and anise seeds.
Question: Do you have to fill the crock to nearly the top or can it be half full of cabbage? The opening is too small to place a plate on the cabbage and then the stones so they went directly on the cabbage leaves.
The liquid volume was 2 inches above the stones. I am concerned that the stones look odd…kind of irregular with what I’d guess is grease ground in?? Wonder if they are safe..been too long to contact seller I fear. Your thoughts?
Anyway..I did not use salted water for the channel and I think my channel water got sucked in so I don’t know if it went dry or just disappeared… I checked it every 2-3 days.
I am a bit sad my first attempt in my crock went sour..:-)
I have made several batches in jars with off and on results.
I wish I had the cute crock shown here!
Hi Annette. The size of the crock shouldn’t make a difference, as long as everything is fully submerged in the brine, including the stones. It doesn’t “need” to be filled to the top. Ours wasn’t even close to full. Also, we didn’t place a plate between the cabbage and the stones, it isn’t necessary. As for the stones, I’m not sure what you mean when you say they are irregular, but they shouldn’t look greasy. It’s important that every single thing you use (crock, stones, any utensils, hands) has been thoroughly cleaned and sterilized before you begin.
If the liquid appears to have dried up, you need to make more brine to refill the channel. When you say your are checking every 2-3 days, do you mean you are checking the channel or opening the crock? Checking the channel daily is a good idea, refill with salt water as necessary. However, you definitely should not be opening the crock every 2-3 days during the fermentation process. Every time you open the crock the sauerkraut is vulnerable to contaminants from the air, which can lead to spoilage. Hope that makes sense!
Hi Annette,
Cleanliness is everything when it comes to fermenting anything, be it beer, wine or cabbage! I put my crock weights in the dishwasher before and after use. After washing to remove any physical soil and contaminates, you may consider sanitizing them with hot water but be careful! Do not immerse the cold stones into scalding hot water, they may break. Warm them first with very warm water from the tap.
Good day! I bought the same pot you did but smaller !!! It didn’t came with a liner!!!!! Can I use it anyway??? You now an inside piece!!! Thank You Larry larnewm@aol.com
Hi Larry, our crock doesn’t have a liner either. You don’t need a liner to use the crock.
Just wondering. Is it necessary to use salt water for the air lock? Is it beneficial? Thanks in advance.
Dan- yes, and yes. It helps to keep bacteria from penetrating the fermentation crock.
I just started my first batch. I followed the directions to a “T” but found that I actually had to put 12 cups of salted water to bring the level to 1.5 inches above the weights. After sitting for four hours there wasn’t much juice from the cabbage. I used fresh organic cabbage that looked great. I have a 3 gallon fermenting crock and I used 6 medium heads which filled it to a little more than halfway. Hoping for the best. Upon further reading I found that it can take up to 24 hours for the juices to release. Should have researched a little more…
You actually can use a glass jar, or plastic container / bucket with the same result. Kosher salt doesnt do any miracles either.
I know this a few months past the time you made your Kraut
I started my 1rst. Batch 3wks ago every thing is going ok
Except the water in the top channel keeps disappearing
Could it be evaporating or being drawn into the crock ? Any suggestions ?
Ken
Hi Ken, if you read the recipe above you’ll see that we ran into this too:
“Check your water channel regularly to make sure that it’s filled with salt water. At times, the pressure which builds up inside the crock can cause suction, which pulls the channel water into the crock (it happened to us a few days in). If this happens, pour more of the salt water into the channel to keep it full.”
Hi Ken,
You can call me crazy but I swear the fluctuations in the water channel are linked to barometric pressure. I too have experienced this same phenomena with very batch I have made, the past three years in a water sealing crock.
During this years batch (which I just finished this past Sat. Yummy by the way!) I carefully monitored the water level in relation to the weather conditions and it remained stable for the first 4 weeks during which our weather was our normal autumn conditions of mild, cloudy and moist weather. We had a post-Thanksgiving cold spell here in the Pacific Northwest and we experienced a week of very dry, frigid and clear weather. Around here these wintertime conditions are always accompanied by very high atmospheric pressure and sure enough my water level began to fluctuate dramatically. The water would seem to disappear overnight but was actually being pushed into my crock and as soon as the conditions changed to our more normal wet mild weather, which is always accompanied by low pressure, the water channel began to fill again as it was (I believe) pushed out of the crock by the now higher pressure inside the container.
So long as this stable weather system prevailed the water level remained unchanged. That’s my story and I’m sticking to it!
Great blog and documentation of the process…..one correction though. You mentioned taking care so you don’t bruise the cabbage. This is wrong, you actually want to POUND the cabbage as flat as possible, as in STEP 3 of this tutorial:
http://learningstore.uwex.edu/assets/pdfs/B2087.pdf
I made a wooden tool for this out of a piece of firewood, I call it a STOMPER and the process is kinda fun. I have made two batches now by this method, turned out great both times…wonderful flavor. I have since bought some large pickling crocks, but the first time I used a gallon clear glass cookie jar. It was a little small, but great to because I could see all the bubbles forming and traveling up as fermentation happened.
Hi Dave, while we do pack down our cabbage, we don’t stomp it so hard that the cabbage is crushed or bruised. It’s especially important not to bruise the barrier layer of cabbage at the top of the crock, as it’s there for protection. We’ve had excellent results without “stomping,” however there are many different techniques out there. Obviously you should use what works best for you (and if that means stomping, go for it!). I love the idea of a glass cookie jar, it would be neat to see the fermentation bubbles gathering.
My mum used white large buckets.plate on top then a stone weight on top.left for 3 months cool dark place.water salt and cabbage.she just used to scoop scum off remove plate and that’s it..awesome cabbage!!
My kraut is ruined. 🙁
The mold permeated all the way through!
The smell was unholy.
Guess I’ll try again next weekend.
Oh no Mitch! Sorry to hear that. It happens from time to time. You have to be so careful that all of your utensils and tools– the crock, your hands, everything that touches the cabbage– is very clean. If not, a small amount of bad bacteria can get in there and ruin the whole batch. Better luck next time!
Hi! Awesome directions! How much cabbage (approximate number of heads) did you put into the crock? How much did it make?
I’m getting ready to buy a crock and trying to choose btwn 5 and 10 liter.
THanks
EThan
Hi Ethan, we used 3 large heads of cabbage, which made about 3 quarts of sauerkraut.
I used two large (and I mean large kraut cabbages, 16 and 14 pounds each) They filled my 20 liter crock about 2/3 full, it is too heavy to move so best to pack your crock where it is going to stay. For me that is in a corner of my kitchen. I find the gentle “burping” of the crock as the kraut ferments oddly soothing. Weird…
Mike, good tip re: packing the crock where it will stay. Mine was quite heavy too!
Thanks – Did you use the 10 liter crock?
E
I just canned my first batch of sauerkraut and am currently loading the second crock full to start fermenting. I keep reading about the wonderful probiotic benefits of fermenting and I am wondering if I destroy those good bacteria when I process (can and heat) my sauerkraut?
Canning will take the living probiotics out of fermented food. Best to let the sauerkraut live in the refrigerator, where fermentation slows down and you can still enjoy the health benefits. I’ve been told it can last up to a year in the fridge.
I just checked my kraut at the 10-week mark. I was disappointed to realize I had totally forgotten to put whole leaves on top. There’s a fair amount of white mold, so I’m hoping when I remove it the kraut will be okay.
Hi Mitch,
It’s not absolutely necessary to cover your kraut with whole leaves although it does help to keep the underlying cabbage clean. 10 weeks seems like a long time to ferment your kraut, how did it turn out?
On my fourth year of kraut fermenting. Ist year in an open crock, the last two in a 20 liter straight sided water seal crock of Polish manufacture. My first batch was excellent and every batch since has just gotten better. The water sealing crocks are definitely worth the extra cost as they eliminate the task of removing the fermentation scum that accumulates in an open crock.
I just shred the cabbage, sprinkle in kosher or pickling salt as I add the layers of cabbage, mixing with a large spoon as I go and firmly tamping down the cabbage to help create the brine. I also cover the top of the shredded cabbage with whole leaves and the ceramic weights.. Your crock, utensils, and hands don’t need to be sterile just very clean, I don’t mean pretty clean, I mean very clean! That’s it, I can’t imagine anything more simple and once you taste naturally fermented sauerkraut you won’t be able to imagine eating anything else. I use it to make sauerkraut soup as part of a traditional Slovak Christmas Eve meal and one of my all time favorite dishes Choucroute Garni. After fermentation I store in the fridge in an airtight container and it lasts for months without losing it’s flavor or texture because it is still alive, just sleeping, not dead like canned food.
Table salt has iodine and will not allow fermentation to begin, don’t use it. My theory on the fluctuating water level in the water seal channel is that it is due to changing atmospheric pressure, that your crock is acting somewhat like a barometer. When high pressure moves into your area it “pushes” the water down and into the crock and when low pressure is present it allows the water to expand and fill the channel to the rim and sometimes overflow. I could be completely full of beans too!
the bag of water to seal sounds so much easier! I want to know though, has anyone substituted sour whey for sweet whey in the inoculation process? the sour whey from yogurt as opposed to the sweet whey from cheese making?
I’ve got a Harsch 10L fermentaton crock, and am on my 3rd batch of kraut this year. The first failed, only had enough cabbage to do 1/3 of the crock. Had some mold after 4 weeks and a foul smell, so I discarded the whole batch.
The second one is a work in progress. Had some issues with the water in the airlok channel, which, kept “syphoning” into the crock and may have contaminated that batch. After 4 weeks, the liquid (in the crock) had overflowed into the airlok channel, the kraut smells ok, but there is no flavor and the product is very firm. I transferred the kraut to 1 gallon glass jars and placed in the refrigerator to, hopefully, continue the fermentation process.
The third batch is in it’s first week, started “burping” within 24 hrs (1 burp about every 5 minutes), and am relocating the crock to a cooler location. All comments/advice is appreciated.
I tried to make kraut for the first time 2 weeks ago from the cabbages from my garden. Organically grown, beautiful cabages. I used 1/2 green cabbage and 1/2 purple cabbage. In two weeks now, I see the scum on top and have removed it but I see no bubbles and it just smells moldy and theres blue mold in the insides of my food grade plastic bucket. The cabbage is all under the brine level and has been from day 1. Is it spoiled? Again, ive seen no bubbles.
Hi JIl, if the brine has been thoroughly overtaken by mold it is time to start over. It is difficult to determine how bubbly the sauerkraut should be since I used a fermentation crock and could not see the inside at all times. Some white mold and strange smells are normal, but if it smells like it’s spoiled then it’s best to start over. Bad bacteria or spores may have gotten into your kraut, which will cause it to spoil rather than ferment. Every piece of of equipment must be clean and sterile before starting, and the brine must be at room temperature before adding it to the cabbage. Also, try not to keep it opened and exposed to the air for any longer than necessary– you can check it after the initial 2 week period, but only open it as long as you need to, no longer. Hope that helps!
My mother still makes sauerkraut and we want to keep the tradition going. Your steps are similar to the ones she uses except mom uses a 10 gallon crock that that has been passed down through the generations (made by Uhl Pottery) enough to do about 35 heads of cabbages she raised in her garden. I was happy to learn sauerkraut has beneficial bacteria for the gut which we all know keeps us healthy. Hooray for old world solutions ( cheaper than buying probiotics in the drug store)
Indeed Mary! I’ll be posting a follow up blog for this one during the last week of September.
I make sauerkraut every summer in my grandmother’s #6 churn. I make it with just cabbage and salt, never used water, but pack the shredded cabbage down with a stick until the brine covers it. We leave it 9 days (or longer if you like) then heat it and pack it in sterilized jars and seal it. This is how my grandmother always made it and “store bought” kraut can’t even come close to homemade. My son is helping this year so he can carry on the “krauting” tradition.