

A few months ago, my family and I ate at a restaurant where they served fresh, warm pretzel rolls as an appetizer. Needless to say, we inhaled them. My stepdaughter wanted me to sneak a few home in my purse. I told her I would figure out how to make them at home, so we wouldn’t need to sneak anything. My husband nudged me– “why don’t you make pretzel challah?” The idea was inspired! I wrote it down in my little idea notebook, then promptly forgot about it.
This past weekend, I was thumbing through my notebook when I noticed the words “pretzel challah” scribbled on a page. The weather is a little cooler this month, and I felt ready to start a new baking project, so I went for it!
Before exploring a new recipe, I like to check out the history behind it. I reached for my trusty “Oxford Companion to American Food and Drink” and looked up “pretzels.” I learned some pretty interesting things! Modern pretzels are likely descendants of Italian Lenten bread from the Middle Ages. While not certain, it is thought that the shape of a pretzel represents the Medieval custom of folding arms in prayer. The breads were called “bracallae” (little arms) or “pretiola” (little reward); over time the German language turned it into “bretzel.”
This led to what we call it today– pretzel! Soft pretzels likely came to America from Holland with the Pilgrims. Over time, they became popular on the East coast, sold on street carts throughout New York and Philadelphia. Hard pretzels are an American invention, developed in Pennsylvanian Dutch country as a way to prolong shelf life. Hard pretzels are tasty, but I particularly love those soft baked pushcart pretzels– they draw you in with their warm, carby goodness. Yum!
On to baking! I started with my basic challah recipe and played around with the ingredients to get a more pretzel-flavored dough. Then I studied lots and lots of soft pretzel and pretzel bread recipes, till I felt confident enough with the process.
Making pretzels involves boiling the dough in a solution of baking soda and water (once upon a time lye was used, but today it’s usually baking soda– though lye baths are still common in Europe). I tried the “dunk” once with plain soda and water, but felt the soda flavor was overpowering, so I added some brown sugar to the water for balance. It turned out to be the perfect “pretzel dip.”
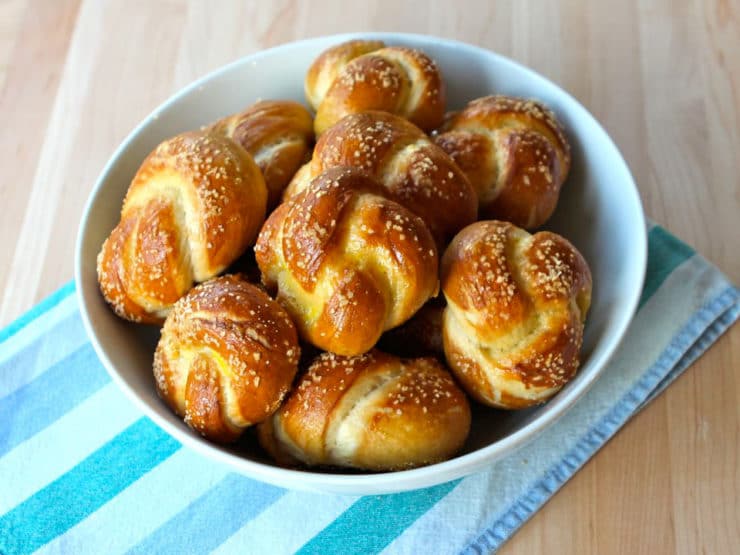
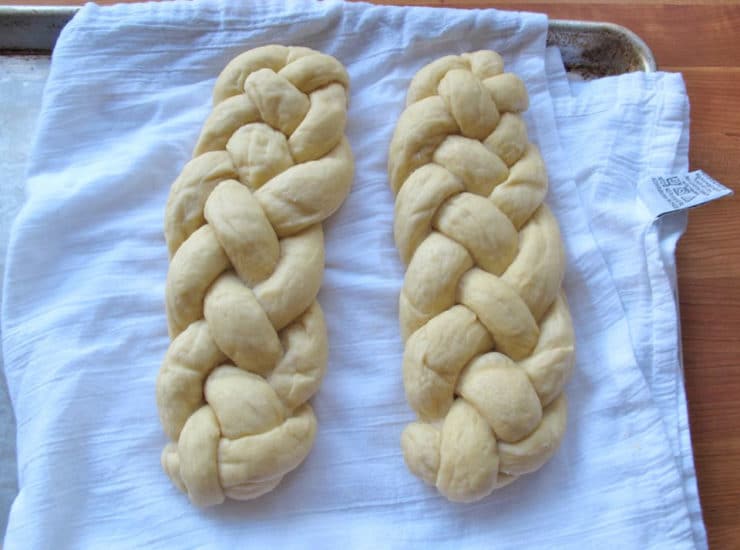
It took a few messy tries, but I finally hit upon a recipe I am proud to share with you today! One thing I learned during the recipe development process– smaller is better. That boiling water dip can be tricky, especially with a large braided challah.
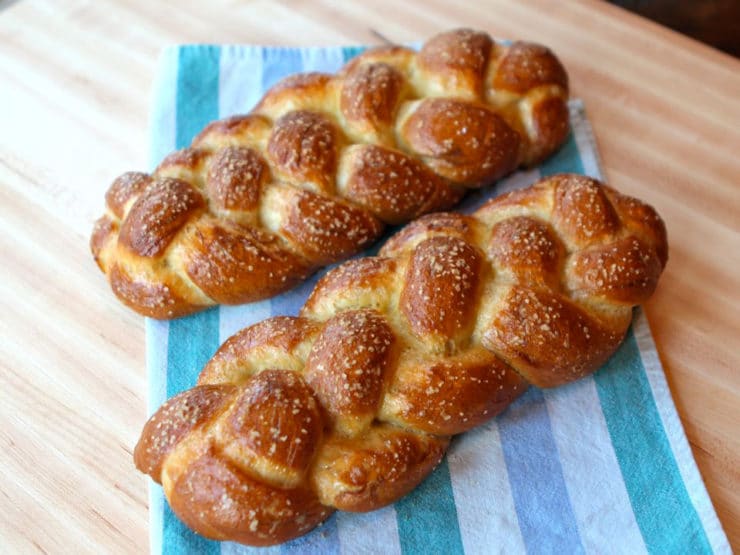
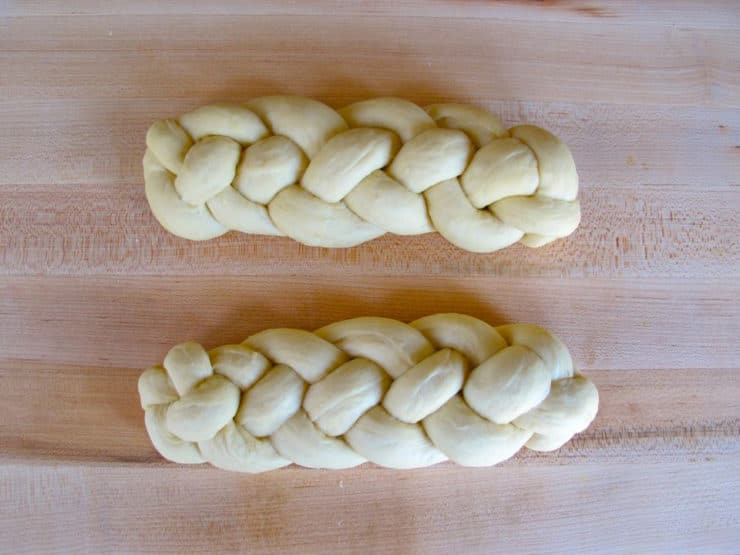
Stick with two smaller challahs by dividing the dough in half, then braiding each separately. You’ll end up with two cute challah braids that will serve 4-6 each, and they’ll be much easier to manage than one large braid.
Now, at first glance this may seem like a complicated process. There are a lot of “steps” to making a pretzel challah. It’s really not as difficult as it seems, but it is a project you’ll need to set aside a few hours for (the challah needs to rise three times, twice in dough form and once in braided form, for the best texture results).
It would be a fun weekend project, and a great challenge for somebody who is new to challah making. I’ve laid out the steps very clearly, leaving nothing to guess at. It’s my pet peeve when a recipe is not clear, which is why my recipes are annoyingly detailed– hence the step-by-step photos.
If you’ve never braided challah before, click here for my instructional challah braiding blog. As always, if you have a question or run into a problem, leave me a comment. I’m here to help!
This challah goes great topped with salted butter, mustard, or cheese. If you want to keep the bread pareve, use a non-dairy condiment. Last night I served the challah rolls as mini grilled cheese sandwiches alongside a hot bowl of tomato soup. Amazing!
Recommended Products:
We are a participant in the Amazon Services LLC Associates Program, an affiliate advertising program designed to provide a means for us to earn fees by linking to Amazon.com and affiliated sites. As an Amazon Associate I earn from qualifying purchases.

Pretzel Challah
Ingredients
Pretzel Challah Ingredients
- 3/4 cup warm water
- 2 1/4 teaspoons active dry yeast (one packet)
- 1 tablespoon white sugar
- 1 tablespoon vegetable oil (I use canola)
- 1 1/4 teaspoons salt
- 1 large egg
- 2-3 cups flour
- 4 quarts water
- 1/2 cup baking soda
- 1/2 cup dark brown sugar
- Corn meal for dusting the baking sheet
- Kosher or coarse salt for dusting
- 2 tablespoons melted butter or margarine (optional - if using butter, bread is no longer parve)
Egg Wash Ingredients
- 1 large egg yolk
- 1 tablespoon cold water
- 1/4 teaspoon white sugar
- 1/4 teaspoon salt
Instructions
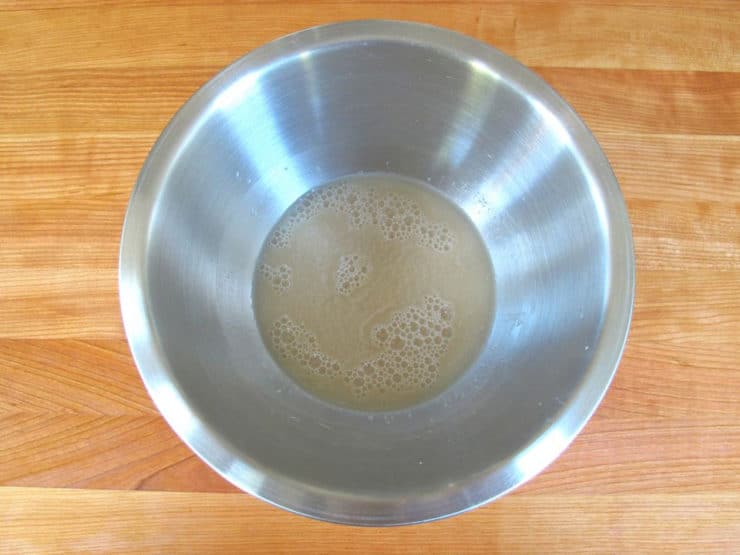
- Add 3/4 cup warm (not hot) water, 1 tbsp white sugar, and yeast into a large bowl, whisk till combined.

- Let mixture rest for 10 minutes. The yeast should have activated, meaning it will look expanded and foamy. If it doesn’t, your yeast may have expired, which means your bread won’t rise—go buy some fresh yeast!Whisk in canola oil, salt, and egg and beat till well combined.
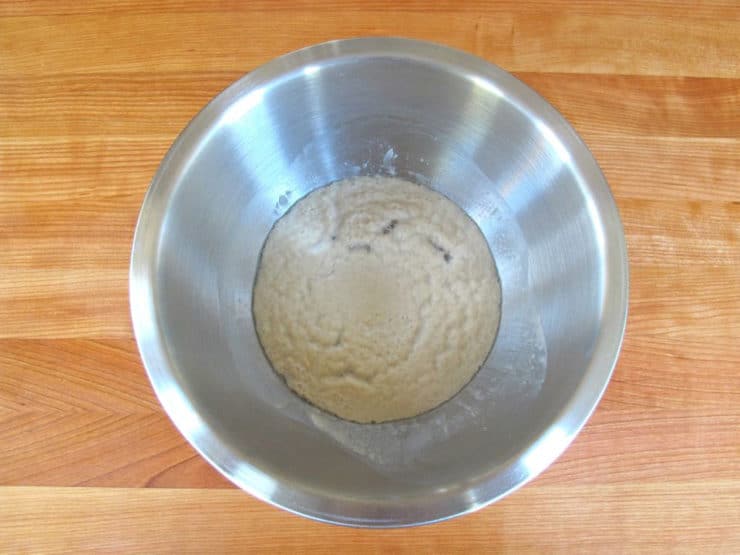
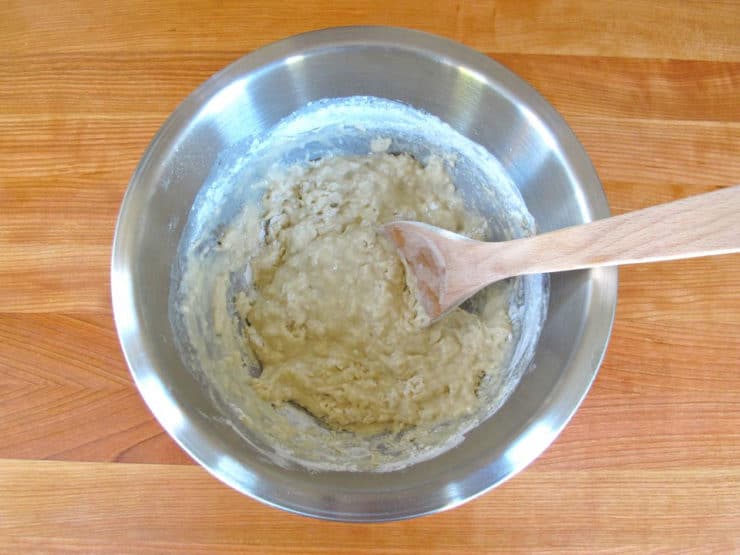
- Begin adding the flour to the bowl by half-cupfuls, stirring with a large spoon each time flour is added.
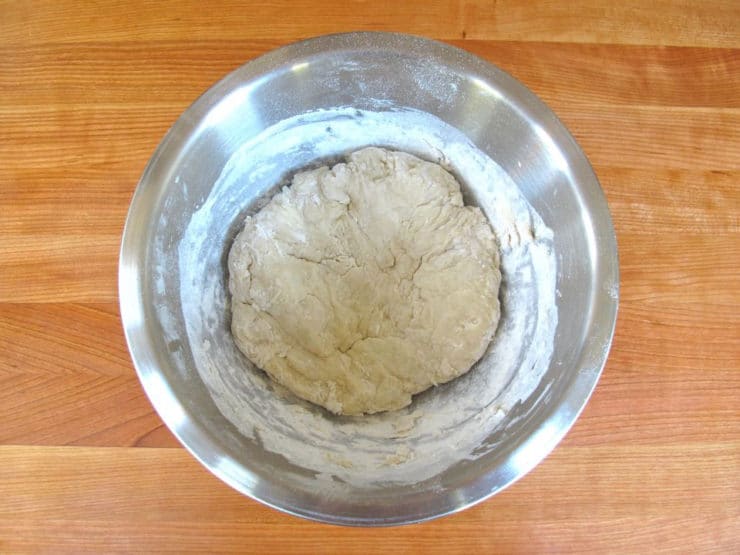
- When mixture becomes too thick to stir, use your hands to knead. Continue to add flour and knead the dough until it’s smooth, elastic, and not sticky. The amount of flour you will need to achieve this texture varies—only add flour until the dough feels pliable and “right.”Place a saucepan full of water on the stove to boil.
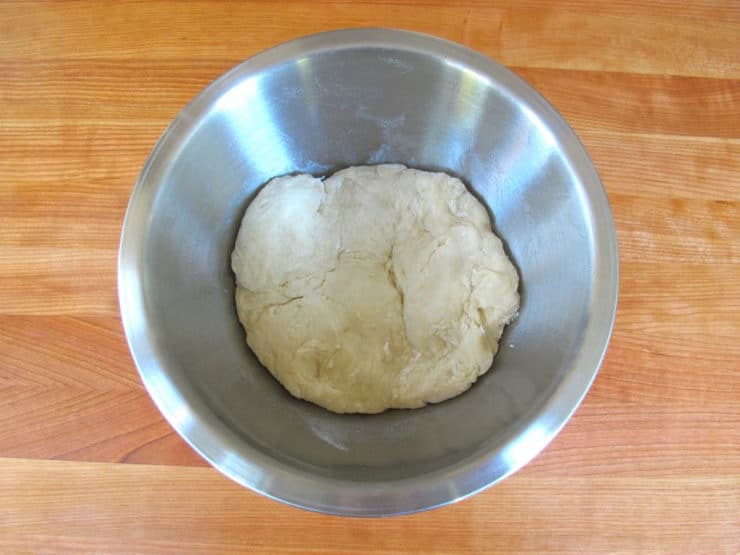
- Meanwhile, remove the dough from your mixing bowl and wash out the bowl. Grease the bowl with vegetable oil. Push the dough back into the bottom of the bowl, then flip it over so that both sides are slightly moistened by the oil.
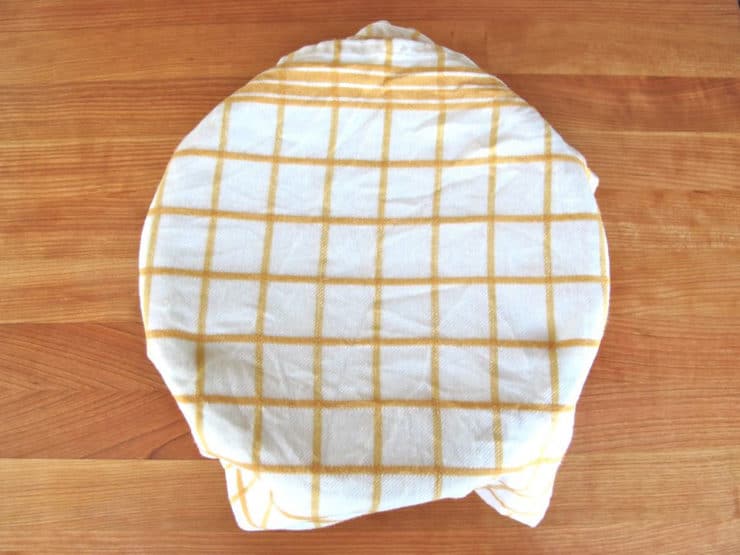
- Cover the bowl with a clean, damp kitchen towel.
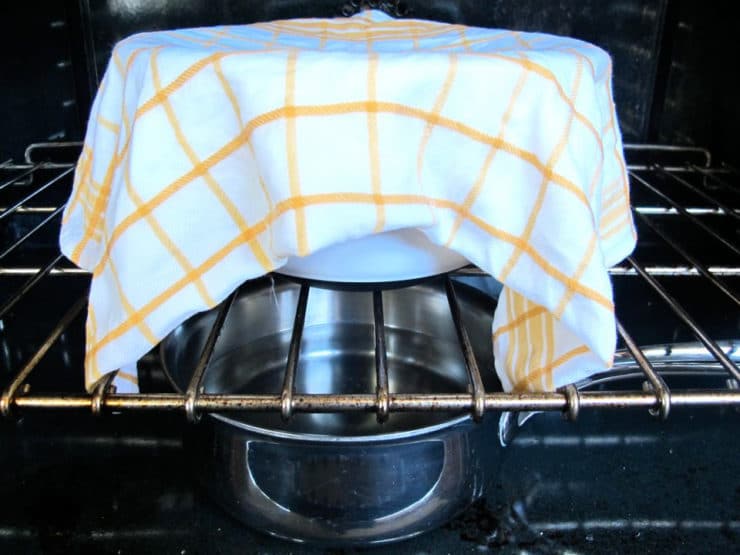
- Place the bowl of dough on the middle rack of your oven. Take the saucepan full of boiling water and place it below the rack where your dough sits.
- Close the oven, but do not turn it on. The pan of hot water will create a warm, moist environment for your dough to rise. If it’s a cold day, you can also heat the oven for 2-3 minutes till it’s warm inside (not hot). Let the dough rise for 1 hour.
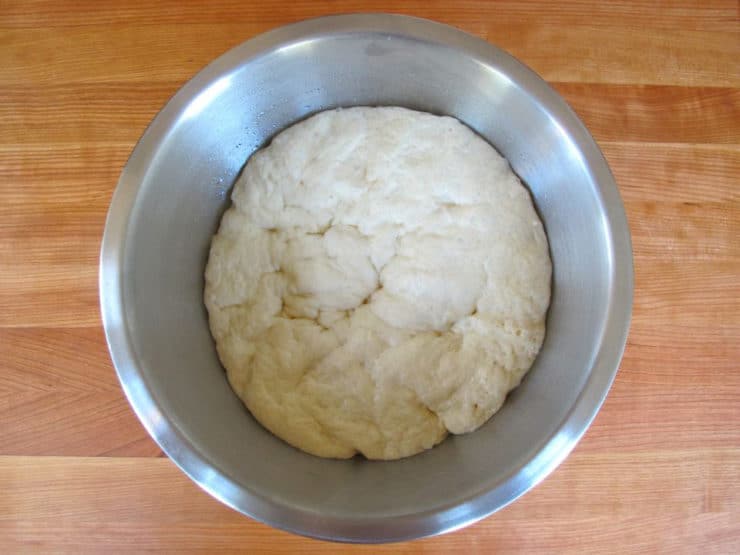
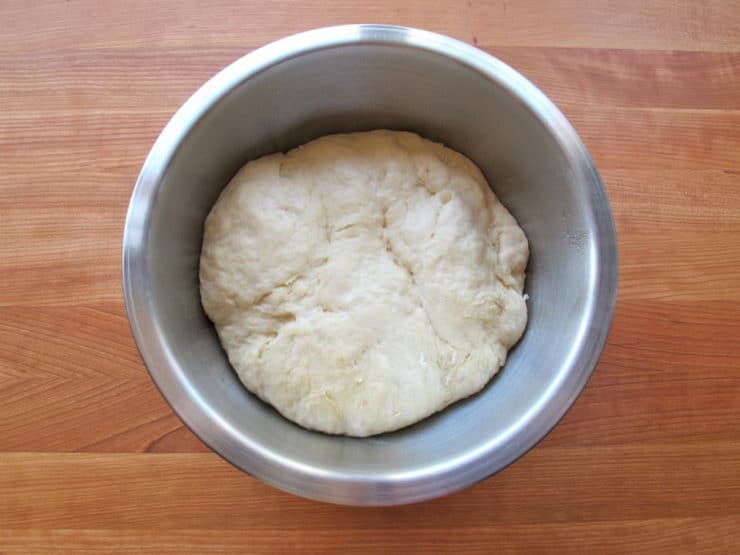
- Take the dough bowl out and punch it down several times to remove air pockets.Place it back inside the oven and let it rise for 1 hour longer.
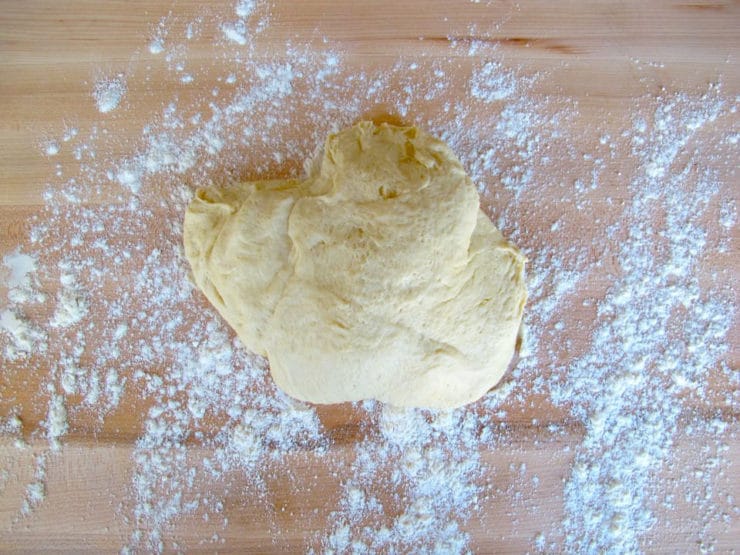
- Take the dough out of the oven.
- Flour a smooth surface like a cutting board. Punch the dough down into the bowl a few times, then turn the dough out onto the floured surface. Knead for a few minutes, adding flour as needed to keep the dough from feeling sticky.
- Now it's time to braid your challah. For challah braiding instructions, click here. I highly recommend you make two small braids with your dough, because later you will have to immerse the braids in boiling water. It is easiest to manage two small braids, rather than one large one.
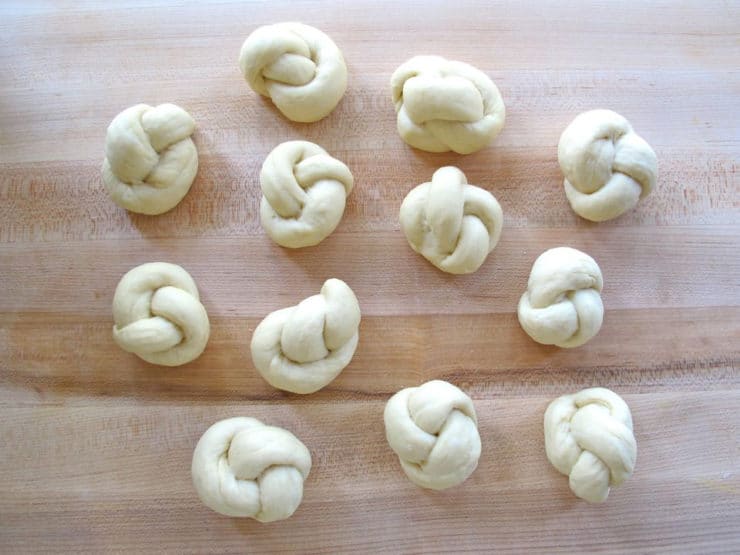
- For this blog, I made two 4-strand braids, which worked out great. Two 3-strand braids will work, as will round challah shapes. I do not recommend making 6-strand braids, it would be difficult with the small amount of dough you're working with. Mini challah rolls are fun, too!Line a large cookie sheet with a clean, dry, smooth kitchen towel. Place the braids on top of the towel and let them rise for 30-45 minutes longer. You’ll know the dough is ready to bake when you press your finger into the dough and the indentation stays, rather than bouncing back.
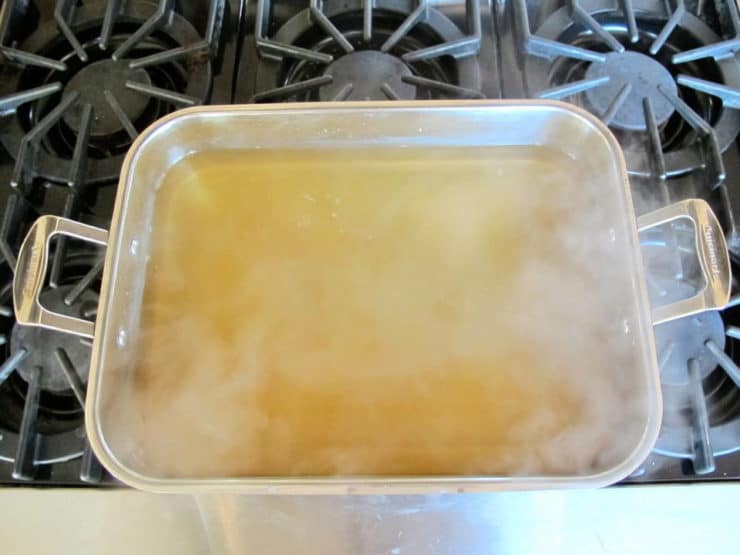
- Preheat oven to 350 degrees F. Bring 4 quarts of water to boil in an oval saucepan or roasting pan on your stovetop. The pan should be large, with an opening wide enough to immerse the entire challah. Dissolve the baking soda and 1/2 cup brown sugar into the boiling water, using a whisk to break up the baking soda and sugar that settles on the bottom of the pan. Careful, the baking soda will fizz up when you add it to the boiling water!
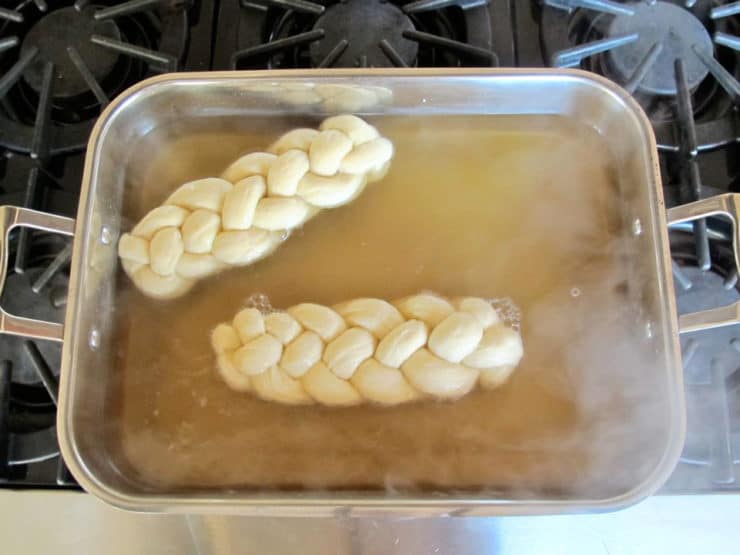
- Bring the cookie sheet to the stove area. Gently immerse the two braids in the boiling water for 30 seconds. Turn them once with a spatula to make sure both sides of the braid are evenly moistened by the boiling water. Use the spatulas to carefully remove the braids from the water and place them on the kitchen towel lined cookie sheet. If you prefer, you can immerse the braids one at a time for easier handling.
- Let the soaked braids rest on the kitchen towel for a few minutes while you prepare your egg wash. They will look slightly "water-logged" and pruney at this point, but don't worry, they'll puff up again when they bake. The kitchen towel will soak up any excess liquid so the bottom of each challah doesn't become soggy.To prepare the egg wash, whisk together the yolk, water, sugar and salt till smooth.

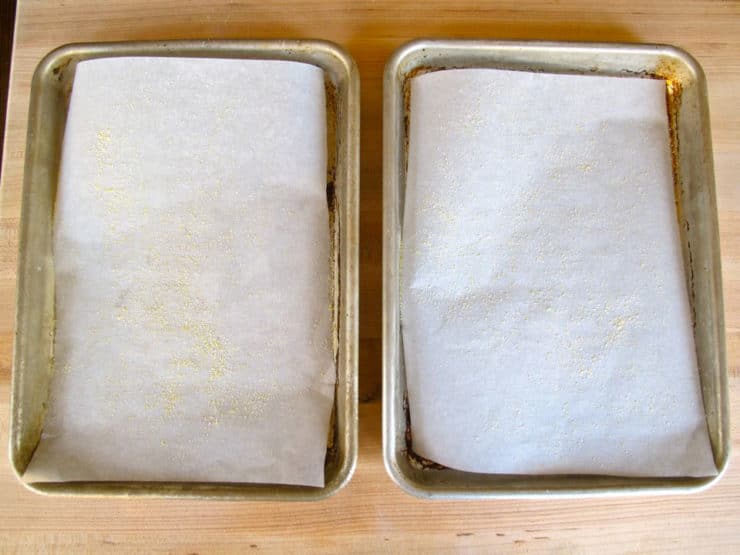
- Line another baking sheet, or two half sheets, with parchment paper (or, you can gently remove the challahs from the baking sheet and dry that one, then re-use it). Sprinkle the parchment paper with a light dusting of cornmeal. Pretzel bread is sticky business; doubling up with parchment paper and cornmeal is the safest bet to ensure that the challahs don't stick.
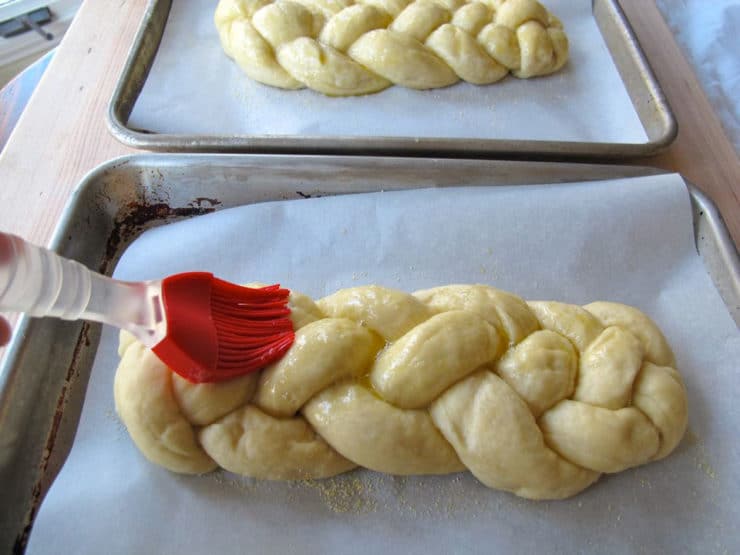
- Place the braided challahs onto the parchment paper lined baking sheet(s).Brush the challahs evenly with a light, thorough coating of the egg wash.
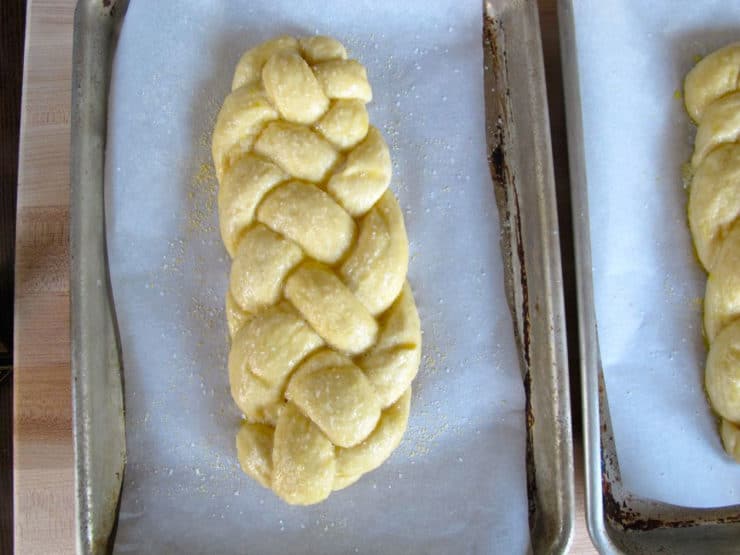
- Dust the challahs with kosher or coarse salt to taste. Careful, they can get very salty very fast! A thin, even sprinkling will work best.The challah needs to bake for about 30-40 minutes total, but to get the best result the baking should be done in stages. First, set your timer to 15 minutes and put your challah in the oven.
- After 15 minutes, take the challah out of the oven and coat the center of the braid with another very thin layer of egg wash. This area tends to expand during baking, exposing areas that will turn white unless they are coated with egg wash. Don't lay it on too thick, or the egg will scramble-- just a thin layer will do it.Turn the tray around, so the opposite side is facing front, and put the tray back into the oven. Turning the tray helps your challah brown evenly—the back of the oven is usually hotter than the front.
- The challah will need to bake for 15-25 minutes longer. Challah is finished when it's a dark golden brown color all the way across. Test the bread for doneness by turning it over and tapping on the bottom of the loaf—if it makes a hollow sound, it’s done. To keep the outer part of the pretzel challah soft and supple, you can brush each challah with a tablespoon of melted butter or margarine as soon as it comes out of the oven (if you use butter, it becomes a dairy dish, not pareve). This step is optional.Let challah cool slightly on the baking sheet or a wire cooling rack before serving. Pretzel challah is best served warm; reheat before serving. Store it wrapped tightly in plastic wrap or foil to keep it fresh.


NOTES
Nutrition

tried this recipe?
Let us know in the comments!


Hi! Challah bread is my favorite to make, and who doesn’t love soft pretzels? So excited to try this combo. I want to make the rolls. About how many rolls will this recipe yield?
Hi Amy! It’s been a while since I’ve made this recipe as rolls, but I’m guessing it’s around 2 dozen. I can’t give you a more exact amount, it’s only a rough estimate.
Hi Tori! Just read your recipe, can’t wait to make! I was wondering if you know if the Challah’s can be made the day before and taste just as well? Looks delicious!!!
Hi Atara– yes, just keep them in a sealed bag till you’re ready to serve so they stay fresh. You may want to pop it in a 325-degree oven for a few minutes before serving to warm it up a bit!
I would like to try this, but to get started, what size bowl is that in the pictures.
Thanks.
It’s a large mixing bowl.
I just finished making the pretzel challah and I must say they turned out great! Especially for me, it was due to the great instructions and photos. Thanks! My kids love it.
You’re welcome Lillian, happy you liked it!
Tori: I stumbled onto your blog a couple of weeks ago and found this recipe. Though I typically make artisan breads with living starter, I periodically make breads with packaged yeast. I’d never made a challah and the weather here in CO has been cold and snowy this weekend giving me the opportunity to do indoor chores. Made these yesterday afternoon and they took exactly 4 hours from start to finish. They were beautiful (made 4 strand loaves) and yummy. Will add this to my repertoire of Jewish goodies for my parties.
So happy to hear that Carol!
Hey Tori
Want to try the rolls but since they are smaller I am wondering whether the baking time changes? New to your blog and love it! New to making Challa too so really appreciate the detailed instructions. A blessing on your New Year
Hi Linda, they will take less time, however I don’t have an exact time for the rolls– best to check them periodically. You can use a thermometer to measure a roll’s internal temp for the most accurate results. It should read 190 degrees F in the thickest part of the rolls. Enjoy!
I made this bread on Christmas Eve and served it with your cheese fondue. It was a huge hit! It was such fun baking most of the day. The only really tricky part was lifting the dough out of the boiling water. It took two of us.
Thanks for a great blog. I learned a lot!
Fabulous Marsha! I’m so pleased you liked it. The combination of fondue and pretzel challah is one of my all-time faves.
way to difficult with braided challahs, but a cinch with the small knotted challahs. best of all, DELICIOUS!!
Hi,
My husband was in LA for a conference last weekend and experienced pretzel challah, loved it so much he brought a small one home to taste . He couldn’t stop talking about it so I went looking for a recipe, found your site and found it super user friendly. In the process of dough rising now. So excited for Shabbos to have this
Enjoy Donna!
Hi Tori,
Could you clarify one thing? After I let the dough rise for the first hour and I punch it down, do I put the towel back on when I put the bowl with the dough back in the oven? (And if I put the towel back on, should I dampen it a bit if it got a little dry?) Or do I leave the dough/bowl uncovered? Thanks. Really excited to make this.
Hi Av, I usually recover it. Sometimes the dough rises so much that it touches the towel! No biggie if it does though. I don’t re-dampen the towel, there is no need.
hi ive made this pretzel last nite came out really nice and rised nice for me till i put it in the water bath and came and then when i put in the oven didnt rise at all …what did i do wrong,,,,the taste was real nice,,thanks
I am trying your recipe for the first time today. I plan on using it in my kitchen at our local Jewish day camp. In the home stretch, I just turned and brushed my bread at the 15 minute mark. It looks beautiful. Thanks so much for your blog 🙂 !!
That’s great Tricia! Love that you’ll be using it at the Jewish day camp. 🙂
Made this last week and it was excellent. Made them on monday and my wife and I had devoured the two loaves by Wednesday night. Tasted just like a baked pretzel so you’ve certainly hit upon the correct taste.
The one thing though that I still haven’t been able to do with any of the bread recipes you post is to get the rise. This loaf (and your Pumpkin Challah recipe I made back in the fall) didn’t get any lift to it. These loaf’s MAYBE got to 3-inches high and while I think of Challah I typically think of a braided loaf reaching 4-5-inches high.
I use my KitchenAid to knead it until it pulls away from the sides. This time I even finished the kneading process by hand until I got to the window-pane test to see the gluten development (I’ve been baking lots of bread this past year). So I’m not sure what’s going on.
But again, they tasted great.
Hi Craig! A few things. I never use the KitchenAid, I only knead by hand. I’m not a bread/baking master so I’m not sure if that makes a difference, but it’s what I do. My dough rises quite a bit and doubles in size in the bowl, but after braiding it won’t rise a ton… it will expand a bit, but it’s meant to keep its shape and not rise so much that you lose the pretty braided aspect of the bread. I suppose you could try adding more yeast to the dough, but I’m not sure if that would help. Other than that I’m not sure what to tell you– I wish I was a master baker, so much of it comes down to basic chemistry and I was never great at science. I’m so happy you liked the pretzel challah!
Thank you for this recipe. I used my challah recipe with your method. They were a huge success – FANTASTICLY delicious there was not a crumb left! Definitely one to repeat. The step by step instructions were spot on- made it so much easier to do.
Pretzels are one of my weaknesses, bookmarking to make one day soon!
I have a question. After you take out the dough the first time to punch it down & you place it back in the oven to rise some more. Do you need more hot water to continue to have the warm environment in the oven so the dough will continue to rise? Thanks!
Nope! It should continue rising, as long as it’s not very cold in your kitchen. If it’s a particularly cold day, you can refresh the hot water– it can’t hurt. 🙂
GREAT! Thank you for the recipe and new idea with challah. I will also BH bake it on Shavuot for the dairy meal.
Hi Tor,
I purchased the Royal Challah Silicone Bakeware as mentioned on your website. I love it! I follow your challah recipe and put the dough in the silicone bakeware for is final rising. I was not successful in “braiding” and this bakeware solves the problem! Now for my question: I guess I cannot use the pretzel challah recipe since I don’t know how I would do the dipping process. Do you have the answer for me?
I love the combination of pretzel bread and challah bread that you have developed – it looks so good. The photo tutorial is so helpful too!
Where did you get the recipe?
I developed the recipe on my own after experimenting with soft pretzels. I used my standard challah recipe and used the same dipping process that I used for the soft pretzels to create a pretzel exterior on the challah dough. I varied the dip slightly for the challah, adding some brown sugar to sweeten the salty coating just slightly.