
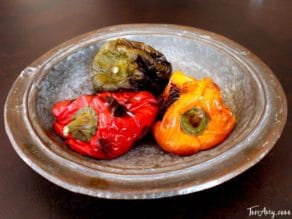
Roasted bell peppers are one of my favorite healthy snacks. In this post, I’ve outlined four easy methods for roasting bell peppers with a step-by-step photo tutorial, as well as an instructional video. These methods can actually be used for any pepper, but the amount of roasting time will vary based on the size of the pepper.
How to Roast Bell Peppers – Easy methods for cooking and charring bell peppers for a rich smoky flavor, from stovetop to oven to grill. Recipe & step-by-step video below!
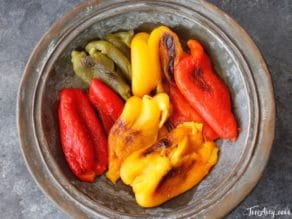
Roasted bell peppers are tender, smoky, and delicious. They add flavor and texture to a variety of dishes and sauces. Once you know how easy the process is, you’ll never spend the money on those jarred roasted peppers again. Detailed instructions for how to roast bell peppers below including a step-by-step how to video. Here are a few of my favorite recipes that include roasted bell peppers:
Recommended Products:
Nutritional information is for 6 bell peppers – values and cook times will vary based on how many peppers are prepared and what cooking method is used.
Video by Entice Films

How to Roast Bell Peppers
Ingredients
For All Methods You Will Need
- 6 bell peppers (more or less as needed)
- Large bowl, paper bag, plastic bag or plastic wrap
- Towel or paper towels
For Oven Roasting Method You Will Need
- Oven
- Baking sheet
- 2 tablespoons olive oil
For Stovetop Roasting Method – Direct or Grill Pan You Will Need
- Gas stovetop burner
- Oven mitt
- Aluminum foil, for lining the burner to keep it clean
- Tongs
For Flame Grill Roasting Method You Will Need
- Flame grill
- Oven mitt
- Tongs
NOTES
Instructions
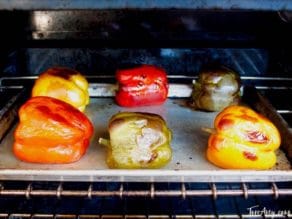
Oven Roasting Method
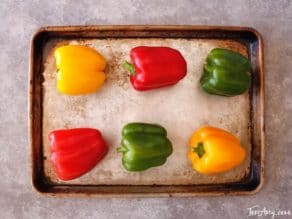
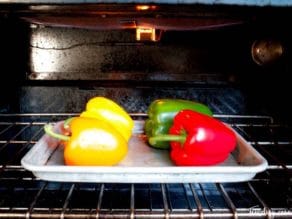
- This is my preferred method for roasting peppers, because you can roast several peppers at once. Preheat oven to 400 degrees. Brush a baking sheet lightly with olive oil. Lay peppers on their sides, stems pointing sideways.

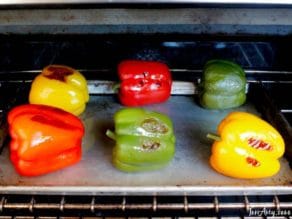
- Put baking sheet in oven and allow peppers to roast for 20 minutes.
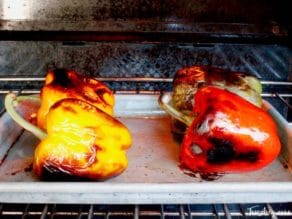
- Remove baking sheet. Using tongs, give the peppers a half turn, then place back in the oven for another 20 minutes.
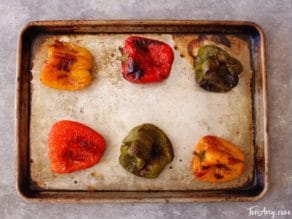
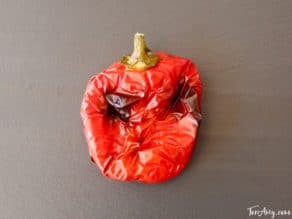
- Check to make sure peppers have fully roasted. The skin should be charred and soft, and the peppers should look slightly collapsed. If they don’t look ready, let them roast for a few more minutes. When they’re done, remove baking sheet from oven.
- You can also use your oven broiler to roast the peppers, which is a faster process that chars them more than regular oven roasting. While it goes faster, you also have to watch it carefully, as the peppers will need frequent turning during the process. If you wish to broil the peppers, I suggest placing the rack in the upper third of the oven so there is 8-9 inches between the broiling element and the peppers. That way, the peppers will be able to soften as they char. When they're too close to the broiler, they will char before they're cooked, which means the flesh won't soften and they'll be harder to peel.
- Preheat broiler to high and place the peppers below the broiler.
- Let them roast for 20-25 minutes, giving a quarter-turn every 5 minutes, until the peppers are charred, soft and collapsing. The broiler will char them quite a bit, the skin will be very black and crispy– don’t worry, you’re going to peel it off anyway. Remove from the oven.
- Proceed to instructions for “Steaming Your Peppers.”
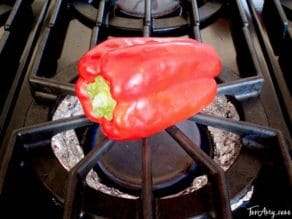
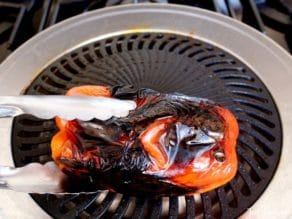
Stovetop Roasting Method – Direct or Grill Pan
- I typically use this method when I only have one or two peppers to roast. It’s messier than the oven method, but it produces a very smoky rich flavor. There are a couple of ways to roast peppers on the stovetop – on a gas flame, or on a grill pan. If roasting directly on a gas stovetop, you may wish to cover parts of your heating element with foil to protect it from spills.
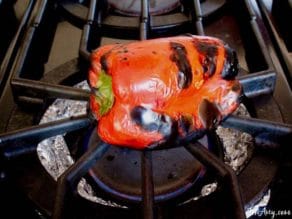
- Turn your gas stovetop flame to medium. Place pepper on the grate directly over the top of the gas flame. Let it roast for 20-25 minutes. Use a pair of tongs to give the pepper a quarter turn every 4-5 minutes.After 20 minutes, use tongs to gently squeeze the pepper. If the pepper is soft and easily yields to the tongs, it is ready. If the pepper still feels somewhat firm, let it continue to roast for a few more minutes until it softens.
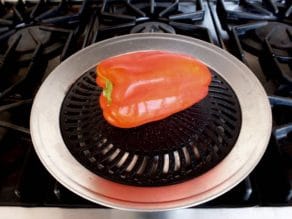
- Remove pepper from the stovetop. Proceed to instructions for "Steaming your Peppers."Prepare grill pan according to instructions. My pan requires a bit of water to be placed in the circular chamber. Preheat grill pan over medium heat; brush lightly with oil if it is recommended for your pan. Place pepper on the preheated pan.
- Roast the pepper for 20-30 minutes, giving a quarter turn with a pair of tongs every 5 minutes or so, until the pepper is charred and collapsing. Check water level about halfway through cooking if your grill pan requires it. Skip to instructions for "Steaming Your Peppers."
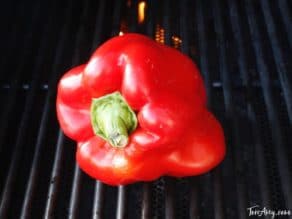
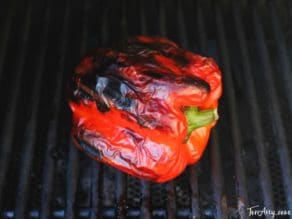
Flame Grill Roasting Method
- I tend to use this method during the summer when we’re using our gas grill a lot. Roasting over an open flame produces a great smoky flavor. Be sure to wear a protective oven mitt. Place peppers on the open grill over a medium flame. Let them roast for 15-20 minutes, using tongs to give them a quarter turn every few minutes, until the peppers are charred, soft and collapsing.
- You can also use a kitchen/bruleé torch to char your peppers, but it’s a slow process. Using a grill or gas flame is more efficient.
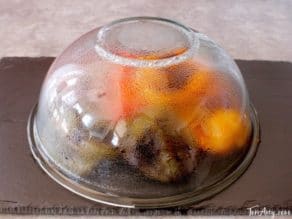
Steaming Your Peppers
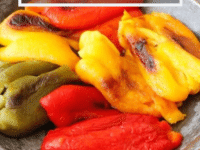
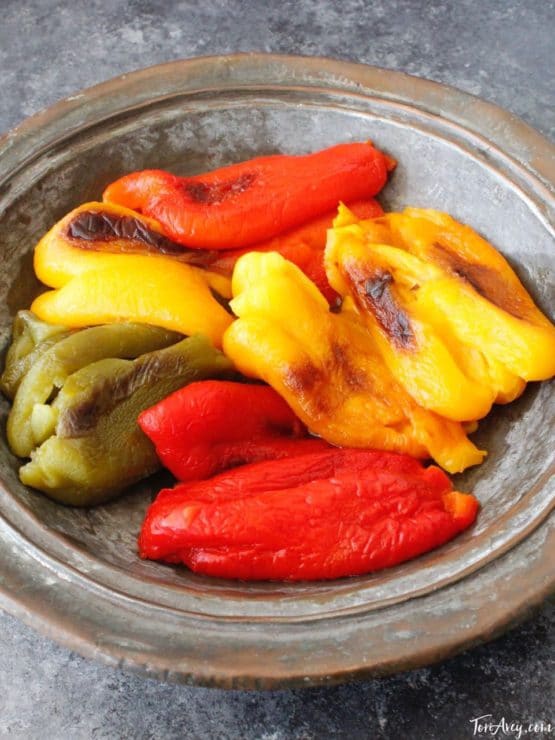
- Once you have roasted your peppers, you will need to steam them. This process will help you peel the tough skin from them more easily. There are a few ways to steam the peppers. I like to place the roasted peppers on a flat, smooth surface like a cutting board, then invert a large bowl over the top of them. The bowl traps the steam inside. Steam for 15 minutes.Alternatively, you can place the peppers in a paper bag and seal the top by rolling it closed. I prefer using the bowl method. Whichever method you choose, steam the peppers for about 15 minutes.
Seeding and Peeling Your Peppers
- Once you have roasted your peppers, you will need to seed and peel them. This is kind of a messy process, but it’s well worth the effort. Note that some people like to seed their peppers before roasting. When I have tried this in the past, the results are never as good as when I keep the whole pepper intact during roasting– I recommend roasting the peppers whole and seeding after the roast.
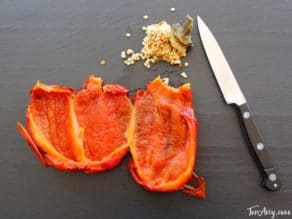
- Slice the pepper vertically from top to bottom and lay the pepper open so it becomes one long strip. Pull the stem from the top of the pepper. The stem and a clump of seeds should loosen easily. Use a towel or paper towel to wipe off any loose seeds that remain inside the pepper.
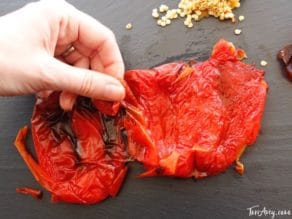
- Flip the pepper over to reveal the skin side. Strip off the charred skin. If you want a more charred flavor, you can leave a few small blackened bits on the skin.
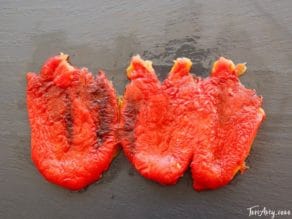
- Alternatively, you can seed and skin the pepper under running water, which will make it easier to get the pepper flesh clean. I prefer not to do this, because I feel the pepper loses some flavor in the process– but if you're in a hurry and don't want to mess up your hands too much, it will speed things up.Once you've peeled and seeded your peppers, you'll end up with soft, sweet, tasty pepper flesh.
- Roasted peppers can be used in a variety of recipes, or snacked on as-is dressed with salt and pepper. They can be added to stews and pasta sauces or chopped into salsa. They can even be mixed with fresh basil and olive oil to create a peppery bruschetta. I have many recipe ideas on my website, just search Roasted Bell Peppers for ideas. Enjoy!
Nutrition

tried this recipe?
Let us know in the comments!


My peppers came out perfect! (oven method) THANK YOU!!!!
Great recipe – thank you for sharing!
How can I roast the peppers with electric stove & oven?
Carol, the instructions for oven roasting appear above. For an electric range (stovetop) you would need a grill pan, so using your oven with broiler is probably the easiest way.
Thanks for variable ways to roast peppers. I don’t have a gas stove or a grill, so the oven method (broiler) is perfect!
Thank you Tori for the explicit details and the steaming. We are making Chile Rellenos and it calls for roasted peppers – without checking your instructions I would have left the skin on without knowing….so great that I came across your site. Thanks
Wow, thanks so much for the explicit details and photos about each method. For some reason, roasting bell peppers always seemed so daunting. I think it was that I always read that you need a paper bag, and I rarely have one around. But after reading your info, it was not difficult at all and I used your bowl over the pepper method for steaming. I used the oven roasting method and my peppers turned out perfectly.
Do you have to remove the skin?if so, why?
No, it just makes for a nicer texture overall.
Nowhere can i find the oven temp. for roasting peppers
It’s right there in the instructions – “preheat oven to 400 degrees.” That’s Farenheit. 🙂
Tried recipe today. Directions were simple. Peppers came out great! Thanks a million.
Do you cover the peppers in any oil before roasted?
There is no need for any oil, Donna.
I went to a produce distribution in my community yesterday and one of the items being handed out was bell peppers in 3 colors. I was armed with about 8 lbs of peppers and no idea how two old people could eat them all before they went bad. A quick internet search led me here to this recipe. It worked like a charm. I followed each step exactly as described and the results were perfect. What I couldn’t believe was the ease in removing the skins! I loved learning about the steaming step, something I have never even thought of before nor read anywhere else. Seems like the steaming also caused the seeds to pop right out. Thank you very, very much for taking time to post this recipe. I shared the link on facebook.
Yes! I agree! Have seen many recipes/methods, but never the ‘steaming’ one. I’ll keep doing this with mine! Roasted red peppers go great in a wrap with sliced cukes, carrots, lettuce, avocado and garlic hummus as well! Healthy and tasty!! Take it from a kidney transplant/diabetic patient ??
Hi Folks,
If you want the peppers to stay firm (uncooked) give this a try. I just did and it works great. If you have a hand held propane, butane or map gas torch this is what you do. I took a large red bell pepper from the fridge. and put it in the sink an a metal rack. I lit the torch and put the blue flame directly on the pepper the nozzle about an inch away. You will get the feel for the right distance as soon as you start. Slowly move the flame in a straight line back and forth. Go slow enough to let the skin turn totally black as you go. It will char about 1/2 inch per stroke (just a few seconds). Progress going around the pepper by turning with a pair of tongs. Stand the pepper up and do the ends. Then put it under running water and rub it with a green scotch pad or scrape it with a sharp knife. The skin comes off very easy and the pepper is just as firm and raw as it came out of the fridge. COOL!!!
CAUTION: If you do not know how to use a torch, have someone show you how. You can easily be burned if not careful.
P.S. These torches are cheap and can be found at any hardware store.
P.P.S. A high temp. heat gun works just as well but cooks the pepper a bit.
James
Great recipe and step by step photo examples
Easy and clear instructions, although I suspect they are best for the large bell peppers indicated. I was hoping to have better luck with piquillo peppers (a pimento-sized pepper) using the oven method here than I have had with other techniques, but the results were similar. Although I reduced the time a bit to account for the smaller size of the piquillos, they still cooked too thin, which made separating the skin from what was left of the wall of the peppers almost impossible without tearing them apart completely. That said, the steaming step here, with the bowl, is definitely better than the bag method I’ve used in the past.
I would really like to find instructions on how to peel piquillo peppers, specifically, without roasting them to bits or tearing them apart, as I have lots of recipes that call for stuffing them.
Thank you for providing a great and clear technique for large peppers, though!
Have you ever tried freezing the roasted peppers? I have a bunch from the garden I want to try this with. Thank you
Hi Kathy, Tori’s assistant Ashley here! I would not suggest freezing roasted peppers, as they probably won’t have a nice texture when they thaw.
Hi Girls!
I’ve roasted my peppers in the late summer and freeze them for Christmas. You must let them thaw slowly. They retain there freshness and the peppers say firm! Enjoy!
Ashley:
Strange that you mentioned about freezing not being a good idea. In the post above, Tori says:
“If you want to store the peppers short term, put them in a sterile glass jar and cover them with olive oil. Cap the jar tightly and refrigerate. If you don’t plan on using them within a few days, pressure can them or freeze the roasted pepper strips in Ziploc bags… they actually hold up well to freezing and retain much of their flavor when thawed.”
_______________________________________________________________
I agree with Bill about the thawing. Vegetables I have frozen myself (either cooked or raw) tend to be more like what they were before freezing if you defrost them in the fridge for 24 hours, or if time is a necessity, on the kitchen counter for a few hours (Put them in a bowl or plate before thawing, because the juice that will come from the peppers as they thaw can quickly stain clothes, countertops, floors, etc.) I wouldn’t force the thaw by immersing the peppers in hot water, microwaving them, or by heating them in the oven or stovetop. If you want the peppers hot, heat them in the oven *after* you defrosted them. A full, slow defrost will insure that the peppers are somewhat firm. Of course, if you are dropping them into a blender for a sauce or soup, by all means, defrost any way you choose. The consistency will not matter if the pieces will not be used whole.
The freezing is better if you are able to use a “seal-a-meal” type device that seals and removes air simultaneously – the air in the bag can give freezer burn to the peppers (You can also leave open a tiny bit of the ziploc bag and suck the air out of the ziploc before quickly closing the bag. I wouldn’t advise forcing the air out of the bag with your hands, unless you want crushed roasted peppers…grin.)
_______________________________
Great recipe, by the way! I had dome similar things in the past, but knowing I don’t have to oil the peppers meant a lot of difference in the outcome of the peppers. Adding oil to roast them makes the charring take a little longer, and it also adds liquid to the pepper, making the pepper a bit mushy – not great if you want the roasted peppers as an antipasto, where it needs to have shape and be strong enough to pick up by fingers or fork.
Kelly – you are correct, this was a mistake on Ashley’s part. They do freeze and thaw quite nicely. 🙂
I was filled with trepidation, never having done this before, but your description was perfect, and the photos enhanced your words. I actually had fun doing this and am definitely saving your posting! Thank you so much!!
Haven’t tried the recipe yet, but definitely think I will try soon. Wanted to thank Ms. Avey for her concise but detailed descriptions of the different methods, the great pictures and excellent pros and cons of each method. Don’t need to do much more research on this subject, you covered it better than anyone else I’ve seen. I got more out this then from the Food Network. Someone should really give you the opportunity to write a cookbook! Thank you!
The oven method and the upturned bowl worked beautifully. I actually used the technique for pimentos, although they weren’t a lot smaller than large bell peppers. Forty minutes may have been too long because the pimentos were a little softer than intended. I’ll keep a closer eye on them next time and reduce the time. The pimentos have gone into pimento cheese, with Duke’s mayo and a pound of Tillamook extra sharp cheese. Two thumbs up for your instructions.
Thank you so much for the peeling tips. Much easier when you cut them open. 🙂
Thank you so much!!! The oven method with steaming was so easy and the skins slipped off like a dream. I’m on a low carb diet and when I make fajitas for the family I just eat a big bowl of roast peppers, onions, and fajita meat . . . yum . . . hardly miss the tortillas.
Great directions – easy to follow, delicious. Thanks.